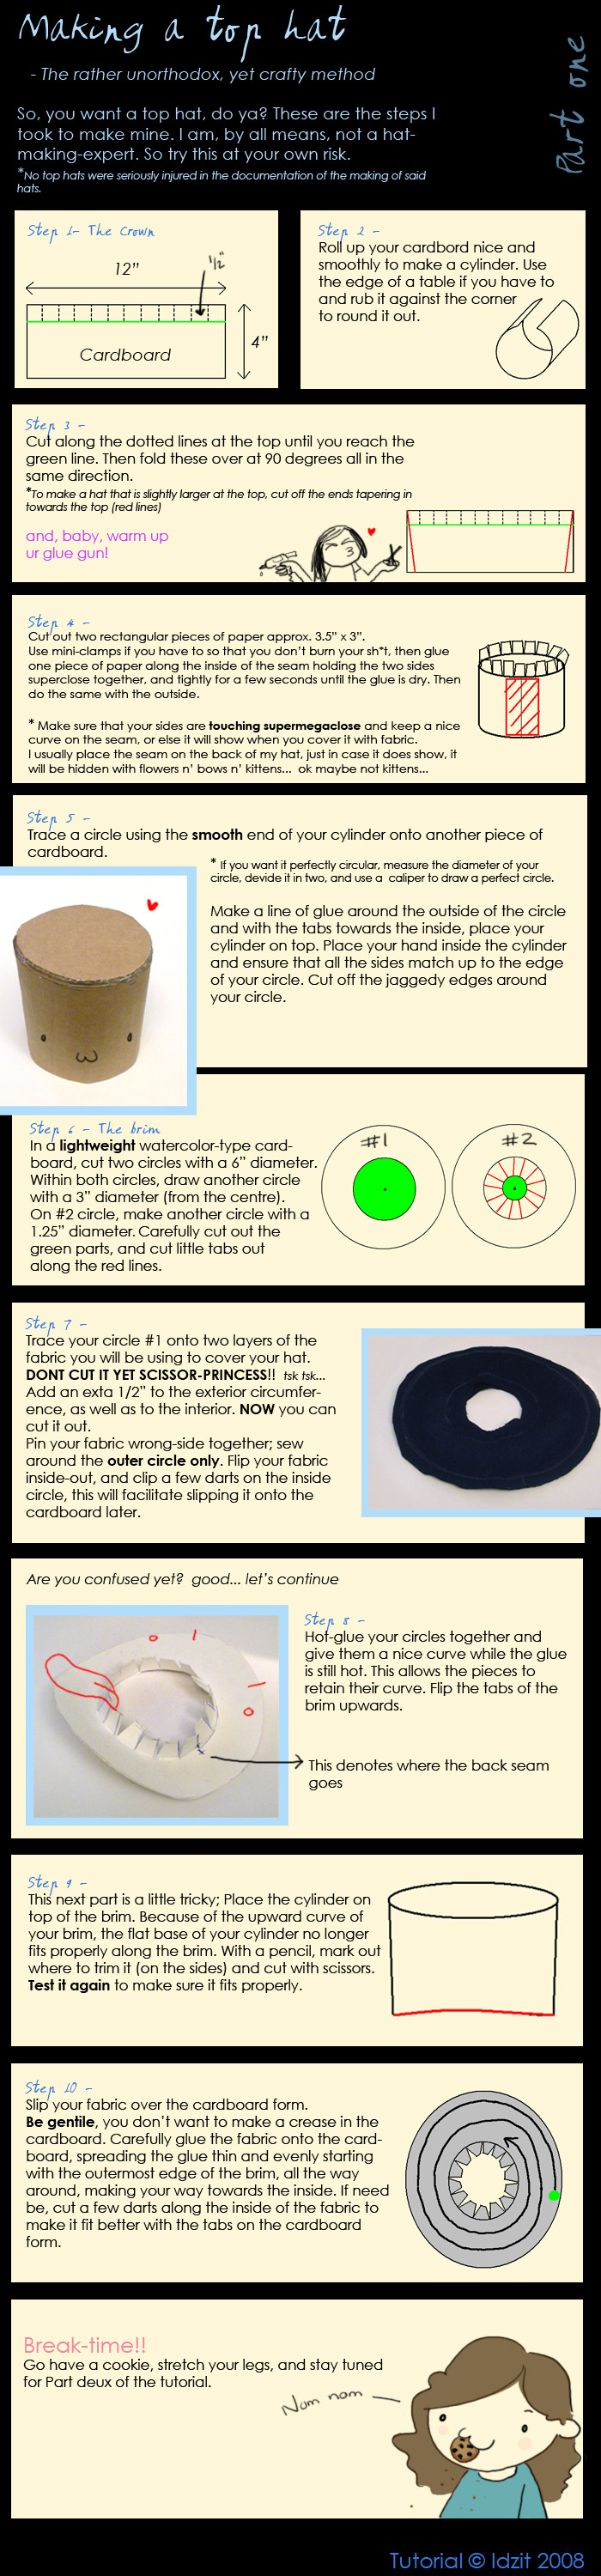
HOME | DD
Published: 2008-12-31 01:35:14 +0000 UTC; Views: 105795; Favourites: 1784; Downloads: 2190
Redirect to original
Description
Pattern: [link]Basic fleece hat tutorial: [link]
You guys better love me for this, because this took waaay longer then it should have. T_T
This is for my curved ear-flaps, but feel free to make them square, long, pointy or whatever tickles your fancy.
 (Smile)")
Tutorial (c) clearkid, Do not republish without permission.
Related content


Comments: 187

Never mind, checked the main tut and saw the explanation. Just call me slowpoke.
👍: 0 ⏩: 0

I plan to use this pattern for a cosplay, I will upload a picture when it's done.
👍: 0 ⏩: 0

")

xD I looked at it and was like " ....how? ..... OHHH I GET IT!!!!"
")
👍: 0 ⏩: 0

is the print out the correct size or would i take the shape and make it bigger?
👍: 0 ⏩: 1

It says print at 100%
Just make sure that the setting is at 100% when you print it and all will be sweet
👍: 0 ⏩: 1


Thank you very much for sharing your knowledge on how to make super hats! I have presents for my nieces and nephews for Christmas now! It's great that you share your skill freely. So many people hold onto what they know how to do and won't share. You're very special!
👍: 0 ⏩: 0


I do love you for this. Thank you for posting!!
👍: 0 ⏩: 0

I take it that you wouldn't include the rectangle from the basic tutorial if you use ear flaps? It replaces the rectangle's function, right?
👍: 0 ⏩: 2


wait at step four do we cut out four pieces?
👍: 0 ⏩: 1
clearkid In reply to crystal-rain-fox [2010-12-27 04:16:25 +0000 UTC]
Sorry, cut everything out at the same time. xD
👍: 0 ⏩: 1


i don't understand how to make the Jolteon Hat's ear-flaps :S
👍: 0 ⏩: 0

I hope you don't mind, but I used the pattern. ^^
[link]
Thank you for making this tutorial! It was very useful! ^^
👍: 0 ⏩: 0

thankyou soooooooo much for this its helped me immensly
👍: 0 ⏩: 0

thanks for your awesome hat tutorials :'D
*goes to sew stuff* xD
👍: 0 ⏩: 0

Though i just found your Page I am great full for all of your tutorials 
👍: 0 ⏩: 0

Thanks for the tutorial! I love the ear flaps on my panda hat, which I've linked over at your hat tutorial <3
👍: 0 ⏩: 0


Thanks so much for this!! I'll try it out
👍: 0 ⏩: 0


Thank you so much for the tutorials! But I have a question about step 3. What do you mean by folding the pattern? Fold at the 22'' line on the front band? Isn't that the same as just cutting the pattern there? What's the point of folding? What are the 22'', 23'', 24'', and 25'' for?
Sorry for so many questions but I'm confused.
👍: 0 ⏩: 1
shimmering-blood-fae In reply to ice-tears [2010-11-13 05:33:22 +0000 UTC]
My understanding is that folding is so you don't have to print out a whole other pattern if you make a different size hat, if you cut it you will only have a pattern for that length of ear flap. I believe the idea is to keep the pattern and use it for more hats like a normal pattern you would buy.
The 22", 23", etc are the different lengths for the ear flap portion, not everyone's head is the same size.
👍: 0 ⏩: 0

I just worked out how to make the band then my mum said "Screw bands make some ear flaps" and i just looked at her like T___T... So I did thanks a heap  (Wink)")

👍: 0 ⏩: 0

hi, would the thinner side or the fatter side of the band end up on the front of the hat?
👍: 0 ⏩: 2
clearkid In reply to inasaku [2010-05-25 04:09:37 +0000 UTC]
The thinner side. The fat side with the seam goes in the back.
👍: 0 ⏩: 0

the fatter part goes over your ears to keep them warm
👍: 0 ⏩: 0

I bet if you were tech-savvy enough, you could put speakers in the ear flaps and run wires on the inside of your hat, and a little pouch on the hat for your iPod or other MP3 player.
👍: 0 ⏩: 2
clearkid In reply to SaratheTheif [2010-02-18 06:33:14 +0000 UTC]
That is totally a possibility, but that would require that I also buy headphones. No one's suggested or requested it yet, but I'd be open to trying it.
👍: 0 ⏩: 1
cool o:
I would, but I'm totally broke at the moment from preordering both HeartGold and SoulSilver. But, in a few months I will probably get my first job. I was already offered a job at a japanese import store, but they were disappointed when I told them I was still under my state's legal working age. I will be able to get a part time job this summer though.
👍: 0 ⏩: 0

That's a good idea, I'm gonna try that :3
👍: 0 ⏩: 1
I want to try it too 8D
Like, kitty ears that are down that have speakers in the sides.... or something. You could get really creative with it. or.... Robot antenna. or... some type of cool futuristic headgear. *cough cough, Jet Set Radio, cough cough*
👍: 0 ⏩: 1
Yeh yeh! Huge padded headphones inserted into the ear-flaps.
Actually, I could probably make an awesome slip-in cover for my headphones and style it into a hat by sewing more fabric around. Then add attachments with velcro and wire.
Hahahaa. Those robot antennas might jab someone's eye, if I charge at them ...with accuracy. 8D
👍: 0 ⏩: 1
8D Yey for accuracy (which I do not have)
I need some new headphones, speaking of.
I'm covered for ear buds(silicone tip, oh yes), and I have my eye on some SkullCandy brand headphones.
Alas, I'm broke :c
👍: 0 ⏩: 0


I really wanna get the pattern, but my computers saying the link doesn't work. Dx
👍: 0 ⏩: 0

so useful! i was trying to do a simple cap for my frind i think this will help me alot!
👍: 0 ⏩: 0

Hey
Having trouble with ear flaps. Specifically, the folding part. I now understand that you need to flip it over, keeping the edge of the shorter side where it is (so yes, creating a mirror).
So do we need to cut out TWO pieces of fleece, one normal and one flipped for a total four pieces, and then sew each matching pair together along the bottom and continue to create a solid band out of it?
👍: 0 ⏩: 1
clearkid In reply to supadoodles [2009-08-06 05:35:43 +0000 UTC]
You're only cutting two whole pieces out, because you don't cut along the edge you mirror. Print the pattern twice and tape the two pieces together if it's easier. xD
👍: 0 ⏩: 1
^___^ I GET IT NOW. Thanks.
👍: 0 ⏩: 0

by "fold the pattern at the skinny end" you mean take the pattern and flip it over so it is a mirrored version of the pattern that connects at the skinny end, correct? and then i need to make two of those.
did you just trace the pattern of the material or what?
thanks for the clarification
👍: 0 ⏩: 1
clearkid In reply to zundoko [2009-07-24 02:26:26 +0000 UTC]
That's right.
Yeah, I just trace it with a pen and then cut it out.
👍: 0 ⏩: 0
| Next =>