HOME | DD
 danimation2001 — pre prelude to step 1
Published: 2003-09-20 03:24:03 +0000 UTC; Views: 13015; Favourites: 156; Downloads: 4471
Redirect to original
Description
If the image does not come out right, go back and then foward on the net. It should straighten out.---------------------------------------- ----------------
Woah, What a piece of crap!
I guess I made a few mistakes and errors. So lets get rid of all this crap. not my crap though, we want to keep that crap.
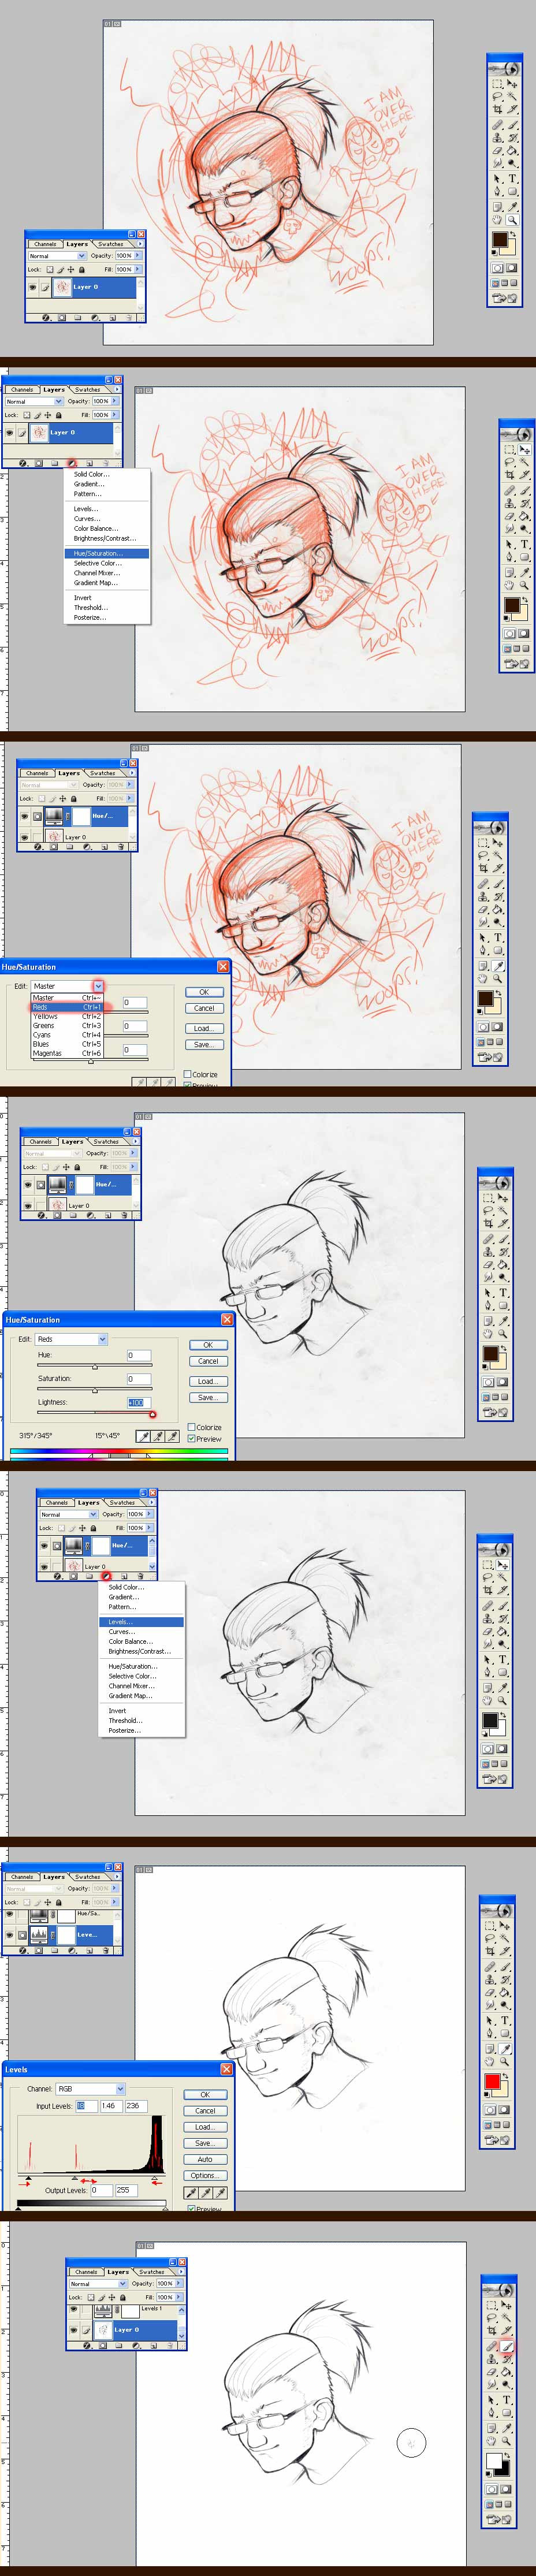
I usually now like to start off with red pencils to do sketches as you will see they are easy to clean up.
1.) Draw out a sketch in a red pencil.
2.) Do the final pencils/ink or what ever it is you stop at, and scan it in at 300 dpi or higher and in color, no grey scales, sorry for some it may take longer but it's worth it.
3.) Now go to your layer palette and click on the effects button. go to " hue/saturation". A window will pop up giving you some color changing options. Go to the "master" setting option and change it to "RED". Now you can change and affect only red!
4.) Move the control bar for the lighting all the way to the right. Bingo, all the red sketches are gone. Though there are still some smugges and dents made by me still there. NO problem.
5.) Go back to the "effects" button located on the bottom of your layer palette and now select "LEVELS".
6.) A graph will pop up giving you the option of controling the amount of light colors, medium colors, and dark colors. In this case you'll have control over the amount black, grey, white. Try moving the controls around until you are satisfied with the image.
(the higher the grapgh the more of the section there is in the piece. white being the most it is the highest.)
7.) after that use the brush tool to get rid of any left over smugges/anything else that bugs you.
and there you have it. a nice and neat poorly drawn head shot by me.
")
...
must draw better.... must be smooth....
Related content


Comments: 47

Handy use of the layers palette - I love things that are as efficient as this. Will be keeping this in mind for future sketches!
👍: 0 ⏩: 0

"must draw better.... must be smooth...."
Agreed!
👍: 0 ⏩: 0

Yay!
Good stuff to know, thanks for sharing.

👍: 0 ⏩: 0

 (Wink)")


wow... I just learned something extremely valubale. thanks- I got it without even having to read it
👍: 0 ⏩: 1

I usually like to do tutorials that way where it's really all visual learning. Simple and easy to understand without the need of an explanation in text. But it is there in the description just in case.
👍: 0 ⏩: 1
yeah that's a pretty good way
and It doesn't fill up the image with too much text either ^^
👍: 0 ⏩: 0


Ah, fairly helpful indeed. Thanks for posting that.
👍: 0 ⏩: 0

yep, that's strong bad all right.
👍: 0 ⏩: 0

STRONG BAD!!!!!!!!!!!!!!!!!!!!!!!!!!!!!!!!!!!!! !!!!!!!!!!!!!!!!!
sweet tute dude...
👍: 0 ⏩: 0

that is one HELLUVA nifty trick!!!! and by the way u draw good!
👍: 0 ⏩: 0

This Was Extremely helpful, my lineart was in a need of cleaning up abit. Thanx.
👍: 0 ⏩: 1
glad that it was of some use. :]
👍: 0 ⏩: 0


very nicely done and very valuable too!! i think i may be doing red sketches from here on out!
maybe....
its hard to break away.
👍: 0 ⏩: 0


Oh yeah, don't beat yourself up about your pencil work, either; it's far from shabby.
👍: 0 ⏩: 0
Dan, is there any advantage to using the button in the layer pallete which makes an adjustment layer rathen than doing the same thing by going to image> adjustments where no adjusmtent layer is created? Is the adjustment layer handy to have?
👍: 0 ⏩: 1
Oh yeah definitely. You can actually brush out areas that you would not like to be affected by the changes with the mask provided.
👍: 0 ⏩: 0


This would be a really nice tutorial if DA wasn't so damn retarded. ::kicks DA:: Good job, we just need to go kick someone's ass at DA to fix this stuff for the PC...
👍: 0 ⏩: 0

I cut and paste the link and hit "go" couple of times and it worked. ^^b I guess we just have to cope and survive. lol
Good tutorial, step by step easy to see. 
👍: 0 ⏩: 0


dude, thats awesome. That should help a lot ^__^.
👍: 0 ⏩: 0


Very cool i'll have to try and use this sometime!

👍: 0 ⏩: 0

Excellent tutorial! Concise and to the point! The graphics element is self explanitory.
This is one fantastic set of instructions!
👍: 0 ⏩: 0

dammit, wish I could see this, deviantart is sort of squishing all the images for some reason on my comp
👍: 0 ⏩: 0

it's up to me  (Smile)")
👍: 0 ⏩: 0


nice trick... Know... All I need to do is learn to draw.

👍: 0 ⏩: 0


argh DA is screwing things up...but thats so cool!
👍: 0 ⏩: 0


Its workin man... DA is just screwin up. Go back a page then click on it again. Thanks for the info, thats valuable lol. I totally forgot about that.
👍: 0 ⏩: 0

Wow, you're just awesome man!!! Thanks for posting the tutorials, these are really helpful for a bad artist like myself.
👍: 0 ⏩: 0
Press F11 key twice will restore the image for you.
👍: 0 ⏩: 0