HOME | DD
 kyla79 — Tutorial -Mara Jade-
Published: 2006-02-06 01:31:42 +0000 UTC; Views: 44466; Favourites: 799; Downloads: 9735
Redirect to original
Description
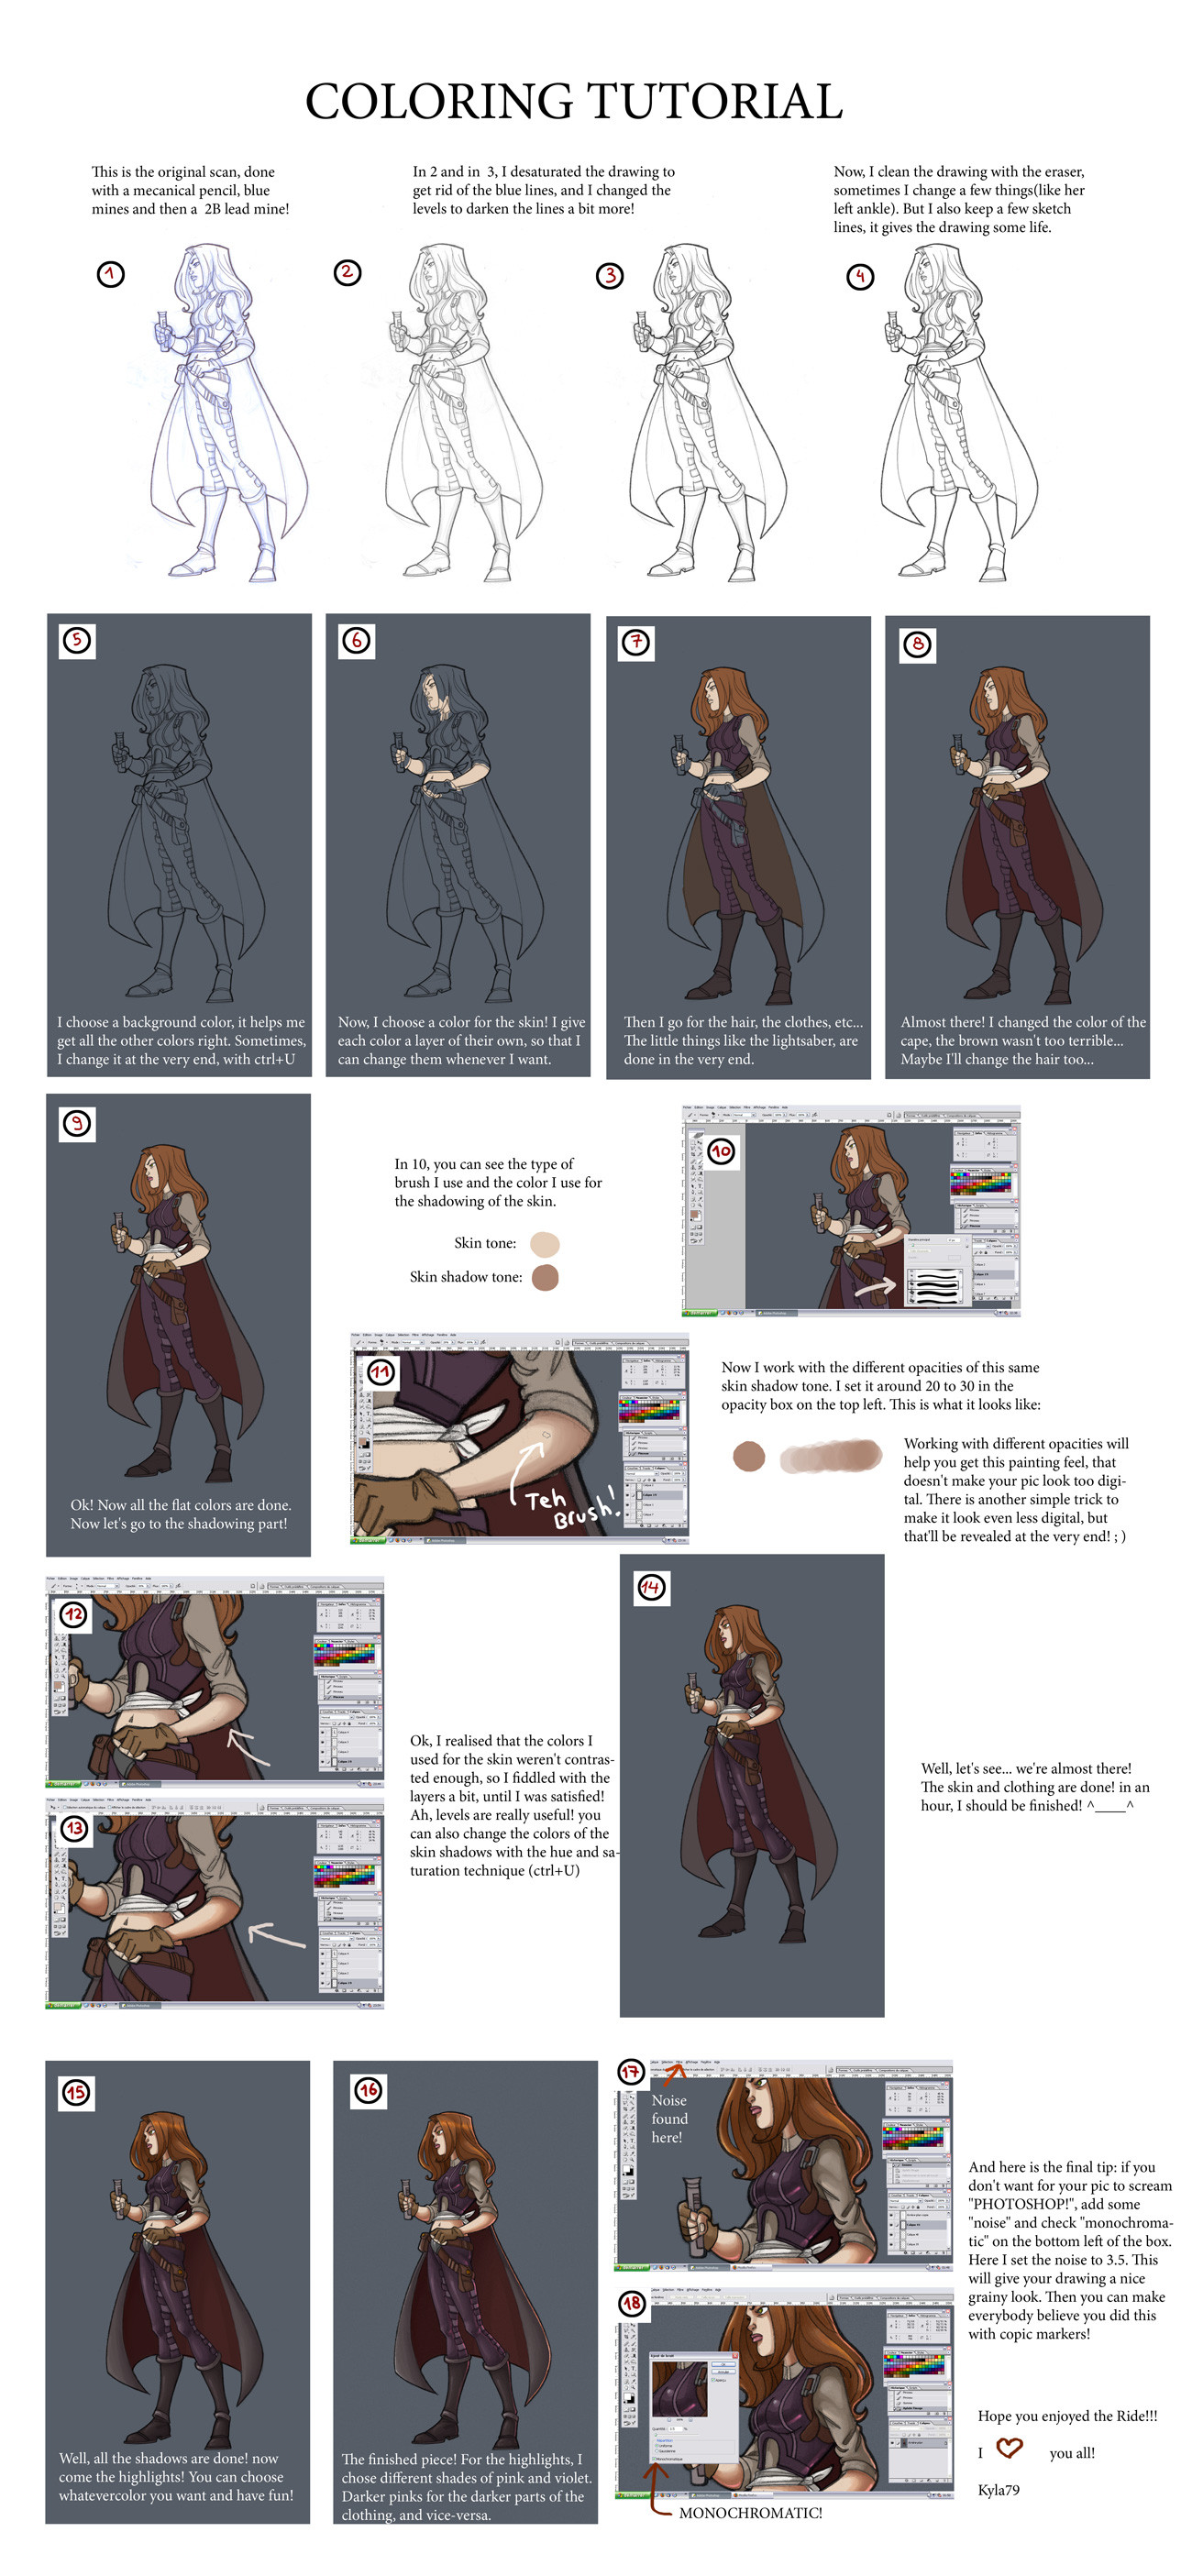
Well, here is my first tutorial! I know some people have been asking for it, so here it is! I hope you'll enjoy and that it will help you!Related content


Comments: 309

This is the one deviation I haven't deleted from my "new deviation list" The suggestion you made in this turtioral have really helped me blend my chartares eyes to the bodys better. Thank you!
👍: 0 ⏩: 0


Wow. This tut is awesome. I like it much. I was looking for a tut like this for a long time. Well done
👍: 0 ⏩: 1

I hope it'll help you! thanks for passing by!
👍: 0 ⏩: 0


I read through the comments but I'm really confused. What tool did you use.. and I'm confused about what the difference is between Photoshop 7 and Photoshop CS. could you help me? x_X
-
👍: 0 ⏩: 1
I used photoshop CS. But I couldn't tell you the differences with photoshop 7... I have never used anything other than Cs... Sorry...
👍: 0 ⏩: 0

Love your tutorial but I'm completely stupid and couldn't figure out the things in between that look so logical to u all if it saved my life! =/ I've read lots of tutorials but couldn't find one that would teach the basic steps ")

👍: 0 ⏩: 1
When you scan the drawing and place it in photoshop, you'll have a first layer. Duplicate that layer by right-clicking on it. Then, you'll have two layers with the same lineart. select the top one. Then, there is a little box right on top of your layers, on the right, where it's written "normal". you have to change that to "multiply". so your top layer is now set to multiply (your drwing will suddenly look darker) Then go back to the bottom layer, select the drawing, and fill it with white (erase the whole lineart on that layer. Et voila!) Now you have a bottom white layer (dont do anything on it) and a top layer with your lineart, which is now transparent. So now, in between those two layers, you can start creating new layers for your colors!
I hope that helps!
👍: 0 ⏩: 1
Yay, I'm so happy right now ")

👍: 0 ⏩: 1

I don't know if anyone has suggested this to you yet, but a 'better' way to remove blue from your line art is to seperate your color channels. You can go to the channels pallette and select 'split channels' from the menu, OR you can select the blue channel and copy/paste into a new layer.
Have you tried the grain filter? I used to use the 'clumped' grain (and monochromatic noise!) often when I wanted to add some variation to skin textures. Using it on a copy of the whole image on a new layer helps, because then you can experiment with it in tons of different ways!
👍: 0 ⏩: 1
Oh I know that technique, but I like to keep some of my sketch lines, so I don't always want to get rod of the blue lines. And thank you for the grain trick! I've got to check that out!
👍: 0 ⏩: 0

I just stumbled upon this; what an awesome tutorial!
👍: 0 ⏩: 1


This is beautiful! Must... go... colour something...
👍: 0 ⏩: 1

Excellent tutorial!

👍: 0 ⏩: 1
thank you very much! I'm glad to know this might be useful!
👍: 0 ⏩: 0

I'm am jealous of your art powers hehe. What program did you use for that?
👍: 0 ⏩: 1
I forgot to say this was done with Photoshop cs! Shame on me!
👍: 0 ⏩: 0

The noise thingy was a great suggestion!  (Smile)")
")
👍: 0 ⏩: 1
thank you for the comment!
👍: 0 ⏩: 0


The noise thingy was a great suggestion!
👍: 0 ⏩: 0

LOOK LOOK! *points at the pretty drawing* I love her! So this is how you do all the coloring..sadly I stick with colored pencils...I only use my pc sometimes to color! *fav* Love it!
👍: 0 ⏩: 1

great tutorial ...I've learned more from this than the last couple I've seen ....I still have alot of troubles tho I'm gonna sound like a complete dork but ...I do not understand how to use layers still!! ...seems like its always glossed over in tutorials and I'm entirely self-taught and ....well I have no clue!!!!
👍: 0 ⏩: 1
oh, it's kind of hard to explain like that... but you have to imagine each layer is like a transparent piece of paper you drop on your drawing. Imagine you have your lineart. Right click on the layer with your background and duplicate the layer. Then, you will have two layers, and each of them are the same. on the bottom one, do ctrl+a and backspace. It should fill it with white. Then the top layer, go in the little box right above the layers, a little on the left, where it should be written "normal". Choose "multiply". That will make the top layer transparent, as if you had a transparent sheet of paper with a dark lineart on it. Then you can start coloring, by making layers IN BETWEEN the white one of the botttom and the top one. Now you should be able to use my tutorial for instance!
👍: 0 ⏩: 1
that helps immensley!!!!! ...thanks for taking the time to help!!!!
👍: 0 ⏩: 1
I tried my best to explain... I hope it does help a bit!
👍: 0 ⏩: 1
it has ....I'm trying to implement some of it now, how many layers do you typicly use? and is there a reasoning for them? I.E: foreground, background, lighting?
👍: 0 ⏩: 1
yup, do the background color first (by filling the drawing with one colour you chose, that will help you find the right colors for the skin etc...). then, you have to think that everything that goes underneath something else should be done first (it's not an abligation, but then it's easier) For example, imagine I did the lineart of a character's portrait. I would first do the skin, because the hair is "on top" of the skin. You see what I mean? Or you have a character that is wearing a t-shirt and shorts. Do the skin first, color even the shorts and the t-shirt, and then, color the clothing on another layer! In general, this is what I do: Background, skin, hair, eyes, clothing, and then I do all the shadows. Each color for each part is on a layer of its own so that I can change the colors if something is wrong. For example, if I completely finished a pic and then realise that the color of the skin is too greyish or pinkish, I do ctrl+U and modify until I'm satisfied! what is also useful is to name your layers ("skin" "skin shadow" "skin shadow2" if you choose to do many different shades of colors for the shadows etc)
👍: 0 ⏩: 1
WOW!...you have to end up with a ton of layers then? ....and here i am using one layer, selecting a chunk and airbrushing the hell out of it! thank you soooo much for your help!!!!! ..can i bug ya from time to time if i need some more help?
👍: 0 ⏩: 1
well, in general, it goes around 20 to 30 layers! it depends! for a portrait, where there is only background, skin, hair eyes, then skin shadow, hair shadow, eyes shadow/lighting... well, that makes around 7 or 8 layers (because I always do one last one to fix little mistakes etc!) Oh, and one last little thing: I don't really recommend using the airbrush too much, I would suggert you use the normal brush for the flat colors and the light airbrush for the shadow. the more you airbrush, the more it screams photoshop!
No problem, if you need more tips, you can ask me! I'd be happy to help!
👍: 0 ⏩: 1
THANK you SOOOO much!!! I'm in your debt, if need anything dont hesitate to ask!!!!
👍: 0 ⏩: 1
thank you! 
👍: 0 ⏩: 0


Very Informative! Thank you thank you. Now I just need teh program >.<
👍: 0 ⏩: 1
yup! it's photoshop cs! you might want to download it though... the price is about 5000$... O_O
👍: 0 ⏩: 1
Bout $630.00 most places I look. I need it in legal fashion, so I can sell what I create. >.<
👍: 0 ⏩: 0
| Next =>