HOME | DD
 manic-goose — Tutorial: Coloring Dark Hair
Published: 2007-03-01 21:34:23 +0000 UTC; Views: 23244; Favourites: 174; Downloads: 328
Redirect to original
Description
How to color dark hair in photoshopStep by step
Before coloring this, it will help if you have a large file to work with. I always scan my pictures at 300% its actual size so that it is easier to do detail. I can shrink the file later, when I am finished if I wish to.
When all the coloring and shading tutorials are up, I will provide a copy of the picture uncolored so that you can try out the coloring on it if you wish.
Prior to coloring hair, you need to draw it. For a tutorial on how to draw Ko-Chan’s hair, here is a link: How to draw Ko-Chan’s Hair, click here
1. First, you need to select the hair that is already drawn. To do this, you need to:
• Use the lasso tool and outline the hair
• Go to the color select tool, which looks like a dropper, and select the color of the hair (the black from the pen marks) by clicking on the hair with the color select tool
• Go to select, scroll down to color select, and click okay
• You will see the hair in the selection box, and click ok
• Go to edit, scroll down to copy, and click
• Go to edit, scroll down to paste, and click.
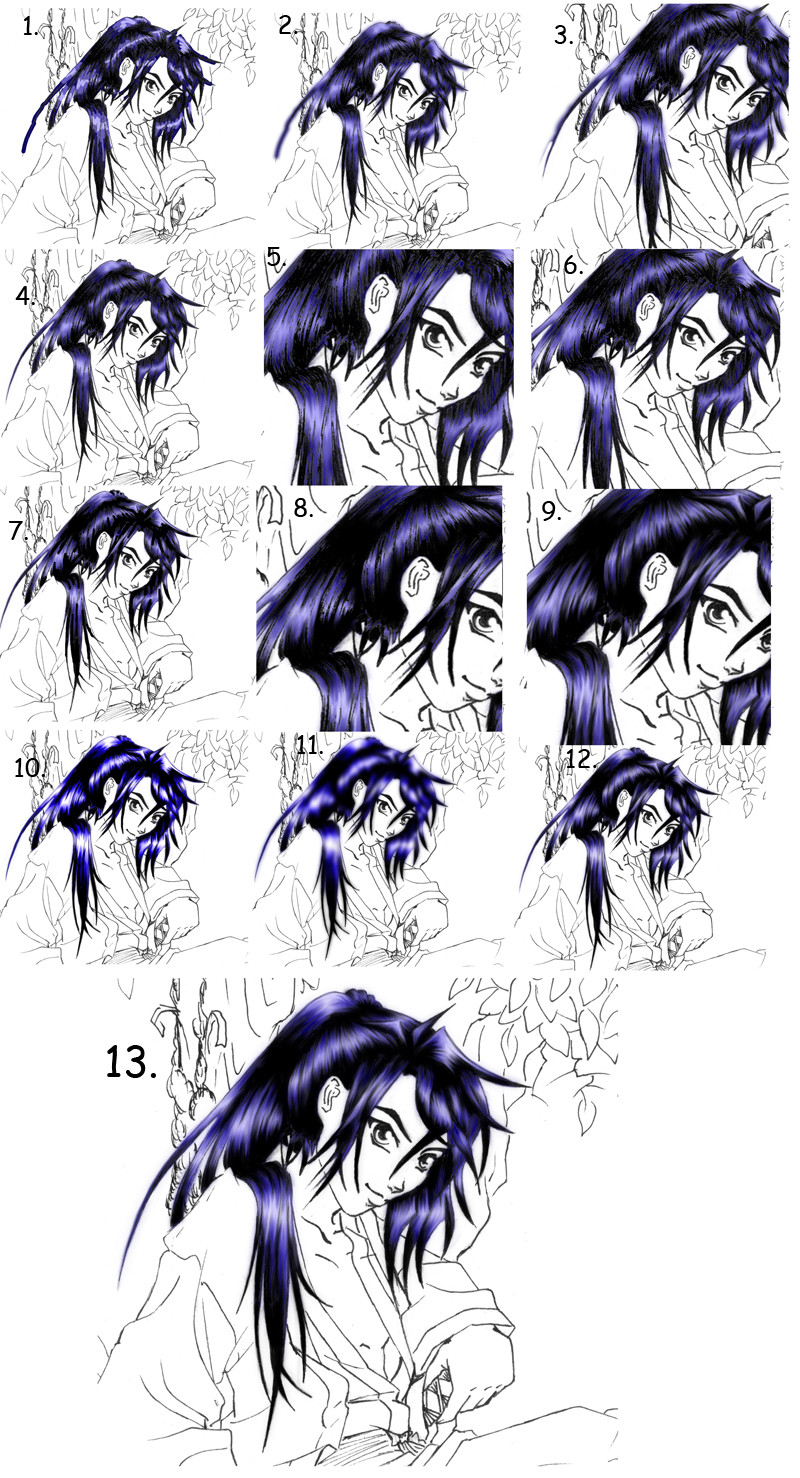
Now you have the black pen marks of the hair in a new layer. I am not showing this step because after doing all this, the picture looks the same. But it isn’t! Click on the back ground, then go to layer, select “new” and click. You want he layer to be 100% opaque. You are now ready to color under the lines you’ve drawn. For dark hair, it is helpful to do it this way, because then you don’t loose the black by coloring over the top of it. When actually, color, you need to first select a dark color and color everything in. The color I used for this part is # 090061. Then select a mid range color, and go over the lighter areas with it. For this part, I used color # 675DC3. Finally, the lightest color, I just do a little of this here and there. For this part, I used color # B8B2FC. Don’t worry about being precise, you can fix it later. Of course, you can be careful, because it does help a little to stay mostly in the lines.
2. This next step is easier. You want to blur everything together. To do this, go to Filters, scroll down to blur, and then scroll to Gaussian blur. Select that. The amount of blur you want to set when the box shows up is about 8.2. That is what I used for this picture.
3. Now you need to select the smudge tool. I love the smudge tool, and it is my best friend on photoshop. It allows me to correct all my mistakes. If you are having trouble finding it, the tool looks like a white gloved hand with a finger pressing down. You can find it in the same box as the sharpen tool and the blur tool. The blur tool looks like a drop of water, and the sharpen tool like an art knife thing. You want the smudge tool. Set it so that it is100% hardness. I used an 18 pixel sized tool. You can see in this step how I use the tool to just push the color back into place.
4. Do this with all the edges of the picture, so that no color is sticking out. Feel free to zoom in if you think it will help you.
5. Using a smudge tool that is 7 pixels big and still 100% hardness, scribble up and down on the colors inside the hair. This will give the impression of individual strands of hair.
6. Now you want to select the dodge tool, which is next tot eh smudge tool. At 0% hard and 7 pixels big, scribble up and down some more in all the areas that you want to have a little extra shine. Be careful with this too, it is easy to get carried away. This is just to add a little more shimmer into the hair.
7. It is time to make a new layer over the top of all the other layers. Click on the top layer first and then go to layer in the tool bar, scroll to new, and select layer. You want this layer to be 100% opaque as well. With the paint brush tool. Select black. This is to help with touching up the dark parts. There are places that you want to be absolutely black, so color them black. Just like with applying the colors before, don’t worry too much about being perfect.
8. Again, like before, now you use the smudge tool to push everything into place, and to scribble up and down to give the impression of strands of hair. I used the same sized smudge tool as before.
9. Now you want to merge the layers that have the hair. It is strongly advised that you keep the hair on a separate layer from the background layer, because this way, you can color under the hair later without worrying about you colors getting over the top of your work. It is just easier this way. ^__^ To merge, go to the side bar that shows all the layers, and select one of the layers you want to merge. Then click in the boxes next to the other layers you wish to merge. You will see a chain link appear in the boxes if you have done this right. Once you have the three layers connected (linked) you go to “layer” in the tool bar, and scroll down to “merge linked.” Now you have them all connected together. This is just the first part of this step. Once you have all three layers turned into one, go back to the smudge tool, and change the size to a 5 pixel sized tool, and start touching things up. Unlike before, you want to be a little careful with this that means that you do NOT want to scribble, but rather use the tool by making strokes that follow the direction of the hair flow. It is easiest to do this with quick and short strokes. Up, up, up. Down, down, down… This step turns it into a polished looking piece, but it isn’t necessary if you are going to later shrink your work. The rest of the steps are also optional.
10. Select the whole layer. Go to select and scroll down to select all. Then go to edit, and scroll down to copy. Then go to edit and scroll down to paste. Now you have the same thing on two layers. If the hair shows up in the wrong place, you can move it so that it is directly over the top of the first. Now go to image, scroll to adjustments and then scroll to saturation and hue. Turn up the saturation to +157. Go to image, scroll to adjustments and scroll to brightness contrast. Turn up the contrast to +40.
11. Go to filter, and scroll to blur and then select Gaussian blur again. Set the blur at about 3.4
12. Select the layer you are working on by double clicking on the layer in the side bar (not the title of the layer). Turn down the opacity to 19% or something similar. These last steps give your hair a softer, more misted feeling to them. Now you can merge the two hair layers together in the same way you merged layers before. Remember, if you make a mistake, you can always use the undo button, by going to edit, and then clicking on undo.
13. This last step is all about bringing out the color a little. Now that you have one layer for your hair again, go to image, scroll to adjustments, and then scroll to saturation hue again. Turn up the saturation, but just a little. I turned it up to +10. The hair is now done.
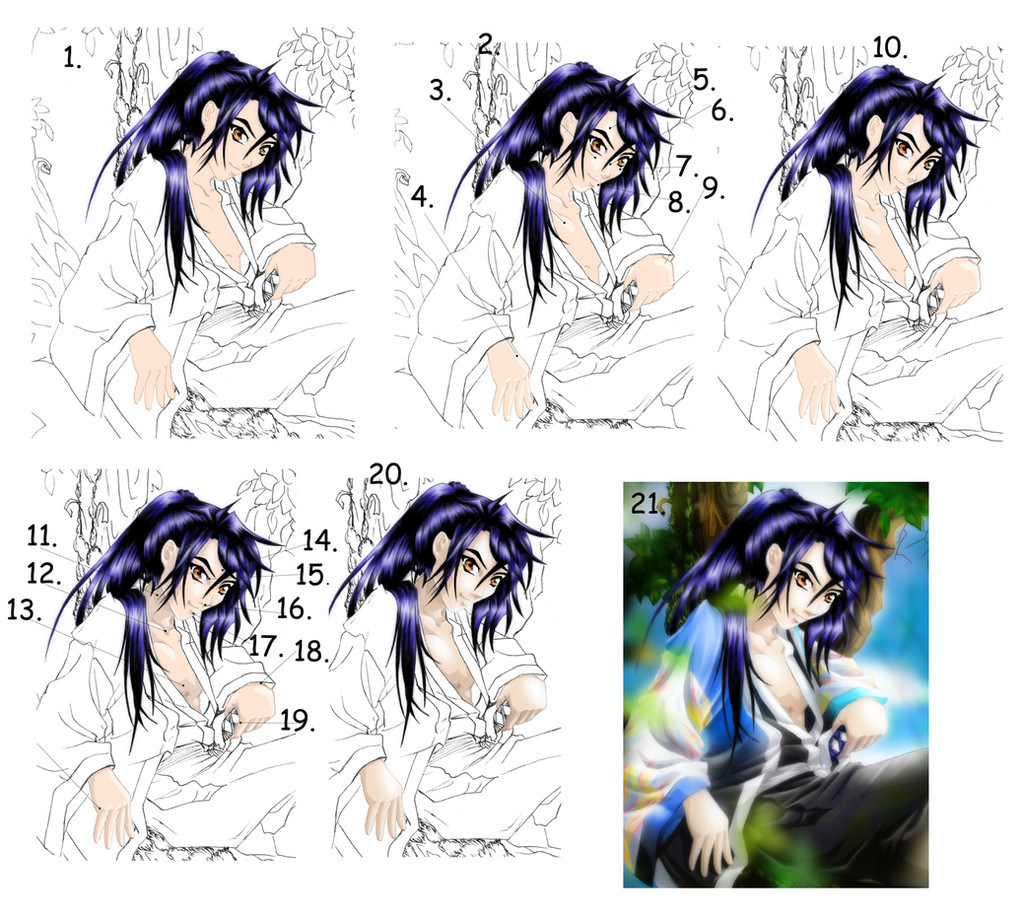
 And by keeping it on a separate layer, you can color the clothes and the skin and such directly under it without worrying about going over the hair with the colors.
Related tutorials using the same picture:
General anime drawing guide, click here
drawing a three quarter angle face, click here
drawing Ko-Chan’s hair, click here
drawing clothes, click here
shading clothes, click here
coloring skin, click here
coloring Ko-Chan’s clothes, click here
Related content


Comments: 33

which photoshop version did use...I can't find the color select button in the select thing....
👍: 0 ⏩: 1

For this tut, it was the first photoshop cs... but I can help you out if you tell me what kind of photoshop you have. they are all very similar and anything the original has, the others have, the newer ones are a little reorganized and some extra features are added, but otherwise, the same.
👍: 0 ⏩: 1
o...it have Cs2 i think...wat does cs stand for? But nvm, i just duplcated the layer and erased everything except the hair lines XD it took forever but it worked.....decently XD
Still, please help if u can ^^
👍: 0 ⏩: 1
You are trying to make a color? I have a suggestion for the lines. This technique for removing traditional lines from one layer and putting them on another is a bit complicated to explain so let me know if you are confused at anything.
First select the color black. You know how to color select I assume from this comment. Copy that layer (not cut) and paste onto a new layer.
Next make a new layer between the layer with the lines only and the backgroudn layer at the bottom. Make that layer white. This way you can see the lines you removed and see what you are still in deed of.
For now, make that layer invisible. If you need me to explain how to hide a layer, let me know.
Then you select white and do a color select for everything white on the background bottom layer. Before you copy and paste, you need to invert that. This way you have selected all the grey lines that the black didn't get.
Copy and paste.
Keep that layer separate from the other layer with the black lines only for now.
You need to turn down the brightness and maybe turn up the contrast so that all the Grey lines become black as well.
Make the hidden white layer visible and look at what you have. Do you like the way this looks or do you want the Grey lines to actually be Grey.
If you want them Grey, you need to click on the layer that the gray lines are on. Click on the layer where you see the layers displayed on the side in the layers window. A box should pop up and in it, the ability to resent the opacity of the layer. Turn down the opacity until the lines look about the right amount of gray again.
When you do it this way, the gray lines are partially transparent, so the lines are still there, but they aren't too strong and color will show through better, more similar to how ti would work on a traditional drawing.
After you have done that, lock the black line layer and the gray line layer together and merge them into one line art layer.
Then you can lock the background with the foreground and merge the background to give you a white background.
If you need me top explain how to lock and merge layers, let me know, if any of thsi was confusing to you, let me know.
I hope that helps.
👍: 0 ⏩: 1
um...actually the whole problem was that i couldn't color select.....because the eyedropper tool only selects the color 2 paint with and not lines or areas or anything........or i don't know how 2 use it......sry i didn't make it clear b4
👍: 0 ⏩: 1
No, it works both ways. It should, but here is a question, were you selecting it for the back ground color or the foreground color? That makes a difference, because the background is not how color select works. What you need to do is use the dropper to select the color, then go up to the select section, and find "color range" I believe, click on that and a box ought to open up. Then there is a bar that you can slide along to set how much of that color to select, then you click ok... I think. Try to do that, and if you are still confused, I might send you a few screen shots. Though they would be for a different photoshop, the basics ought to be the same.
👍: 0 ⏩: 1
ooooo...it suddenly makes sense!
I just couldn't find any button called color select, so i was confused, but when u say color range I can find it!! Ty ^^
But i already finished the hair XD i'll try it next time ,ty so much!!
👍: 0 ⏩: 1
Oh, I get it. Well I'm glad that helped. ^^
👍: 0 ⏩: 1
yes, ty ^^ All your coloring tutorials r helping me so much!

👍: 0 ⏩: 1
ty so much!
1 question: How do u color light hair????
👍: 0 ⏩: 1
Well it is similar to this, but where there is already dark drawn in, with the pen or pen tool, you need to fill that in with a color. I guess that would be the easiest way to explain it.
👍: 0 ⏩: 1
yes it does ^^
lol. it's my 4th time using photoshop...still trying to work out wat i need 2 use so ur tutorials r really helpful ^^
👍: 0 ⏩: 1
I see. I'm glad they help. Good luck.
When i first started using photoshop, I did the majority of my work traditionally, and edited it in photoshop, adding touch ups and the like, and over time, as AI got better, I moved away from that to doing mostly digital, to eventually completely digital. I started by doing completely drawn and shaded works and adding tints of color digitally in a variety of ways until i got the hang of that, and then I started doing partially colored works so i could use the dropper tool to pick the colors I needed and I could use the bucket tools to fill in and make adjustments from there, and when I got better still, I started giving myself less and less guide lines traditionally until I was doing almost everything digitally, and finally, I was only drawing line art traditionally, and so on to doing lien art digitally as well, that way, i learned one part of photoshop at a time, and eventually I got the hang of everything without overloading myself with too many options and still giving myself a chance to to make nice art.
That is what I did anyway, and maybe something like that will help you. ^__^ I know there are very few tutorials out there to help people who are still figuring out photoshop.
👍: 0 ⏩: 1
That sounds cool, i might try it ^^
Yeah... but i guess it's hard to make tutorials to teach ppl how to use a whole program XD
How long have u been using photoshop?
👍: 0 ⏩: 1
Since I was 17 or 18... so about 6 or 7 year now?
👍: 0 ⏩: 1

Will you marry me?! 
")
👍: 0 ⏩: 1

It is a pleasure to see how much people love my tutorials. Stalk away. Make sure you are watching scraps. i have a bunch of unfinished tuts that I plan on putting up as soon as I catch up with my art.
👍: 0 ⏩: 0


this is an excellent tut on colouring anime hair. you also answered my question...which was what to do with outlines on dark hair..koz some people make the dark hair a tiney bit lighter so you can see the outlines i think but i like this.
👍: 0 ⏩: 1
Glad it helped. I know people tended to do that... I never liked that much though. You're welcome
👍: 0 ⏩: 0

Thanks for this tutorial, it's hard to find good tutorials that you can do with a mouse, and my hair turned out really nicely thanks to this!
👍: 0 ⏩: 1
I know what you mean. Most people who think themselves good enough to make a tutorial have tablets. I've got one now, but this was made in my mouse years. ^^
👍: 0 ⏩: 1
Yeah, that's something that's still on my wishlist!
👍: 0 ⏩: 1
Eventually, you'll get one. ^^
👍: 0 ⏩: 0

Q, do you do this on a graphics tablet, or with a mouse????
👍: 0 ⏩: 1
With a mouse. I can't afford a tablet yet... but maybe soon I will have one. That is why I use the smudge tool, because it is easier to be exact with that than with drawing it straight up.
👍: 0 ⏩: 0

Thank you. I hope that it might help.
👍: 0 ⏩: 0