HOME | DD
 manic-goose — Tutorial Drawing Anime Guide

Published: 2007-02-28 20:42:29 +0000 UTC; Views: 137084; Favourites: 795; Downloads: 5463
Redirect to original
Description
If you like the picture and want to see the finished deviation, click hereHow to Draw Ko-Chan: =^__^=
Basic Guidelines for drawing anime
You can use this and all the other tutorials connected to it as a general guide to drawing anime, or you can copy this picture as precisely as you want. The choice is yours. If you actually use this to draw Ko-Chan, which I doubt most people will do, remember to give me credit for my character. If you try to copy this picture exactly, then don’t forget to give credit to me for that as well. I think this goes without saying, but it is better safe than sorry. More than anything, these tutorials are to help you in your art of anime characters in general. The title, “How to draw Ko-Chan” is just because it is fun to say, and because I am using him as a model. XD
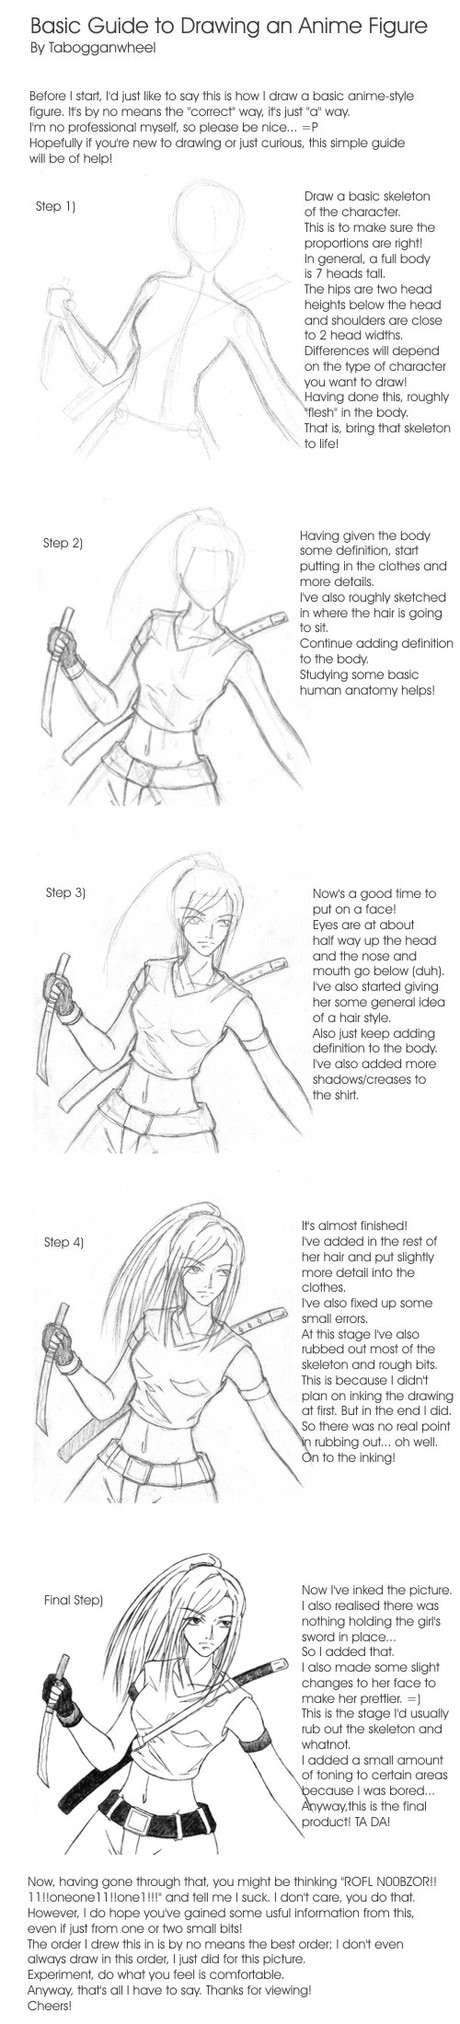
1. Before you draw anything permanent, you need to plot out the picture. This can be done in a number of ways. You can draw stick figures with names… you can draw basic blobs to represent things, and you can draw a really rough version of everything. The important elements to this are that the lines need to be reeeeeeeeeeeally light, and this is where you consider composition. Composition is basically, the overall look of the picture, where you place things, and how you are going to draw the eye into the focus of the picture. When doing this step, when composing your picture, the best thing to do is start lightly sketching something, stop, look at it, see if it looks like it will work, modify or continue… This is when you consider the proportions of the human figure. How big do you want the head in comparison to the rest of the body, how much space do you want around your character? Also consider where you are putting your character. Only when this is done, is it recommended to move on to the next step. Trust me; this quick step makes a huge difference.
2. Now you can start drawing everything. I strongly recommend that you continue to use light pencil strokes throughout. I darkened the lines on the computer after scanning them so you can see them, but trust me; the lines are really still very light. Darker than the first step, but still really light. The first thing one should always draw after plotting the picture is the center of focus; the part of the picture that you want the viewer’s eye to be drawn to. This is because that part will get the most attention, so it should be done first. This gives you more time to look at it as you work on the picture, more opportunities to get it perfect, and of course, by starting with it, you can make sure it looks the way you want, and the rest of the picture will be drawn to match it. In this case, as is in many cases, the focus is the face. If you feel comfortable drawing faces, feel free to draw it as you please. If you want more help, I have separate tutorials for that. front view of an anime face, Click here three quarter view of an anime face, click here I will later include a side view tutorial.
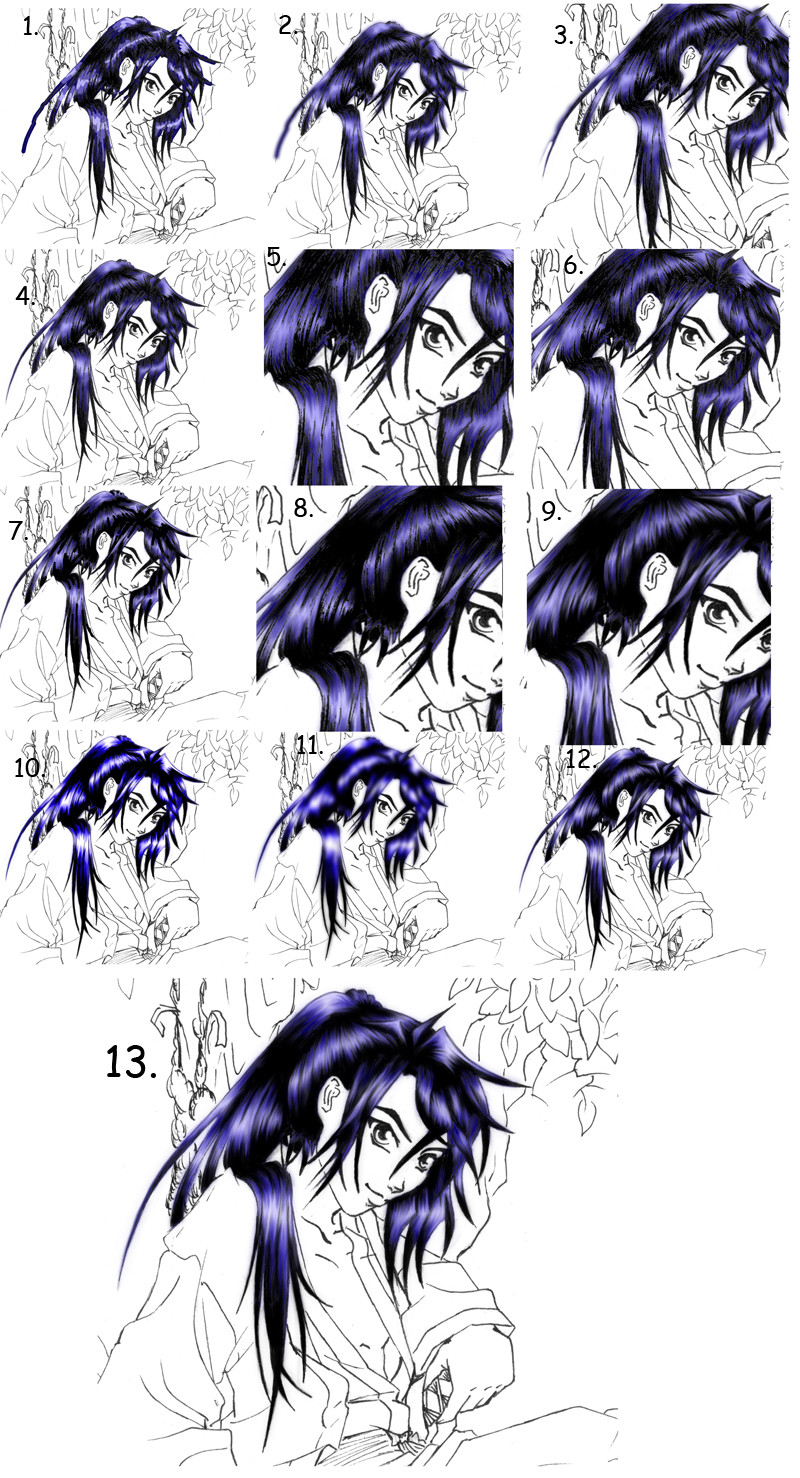
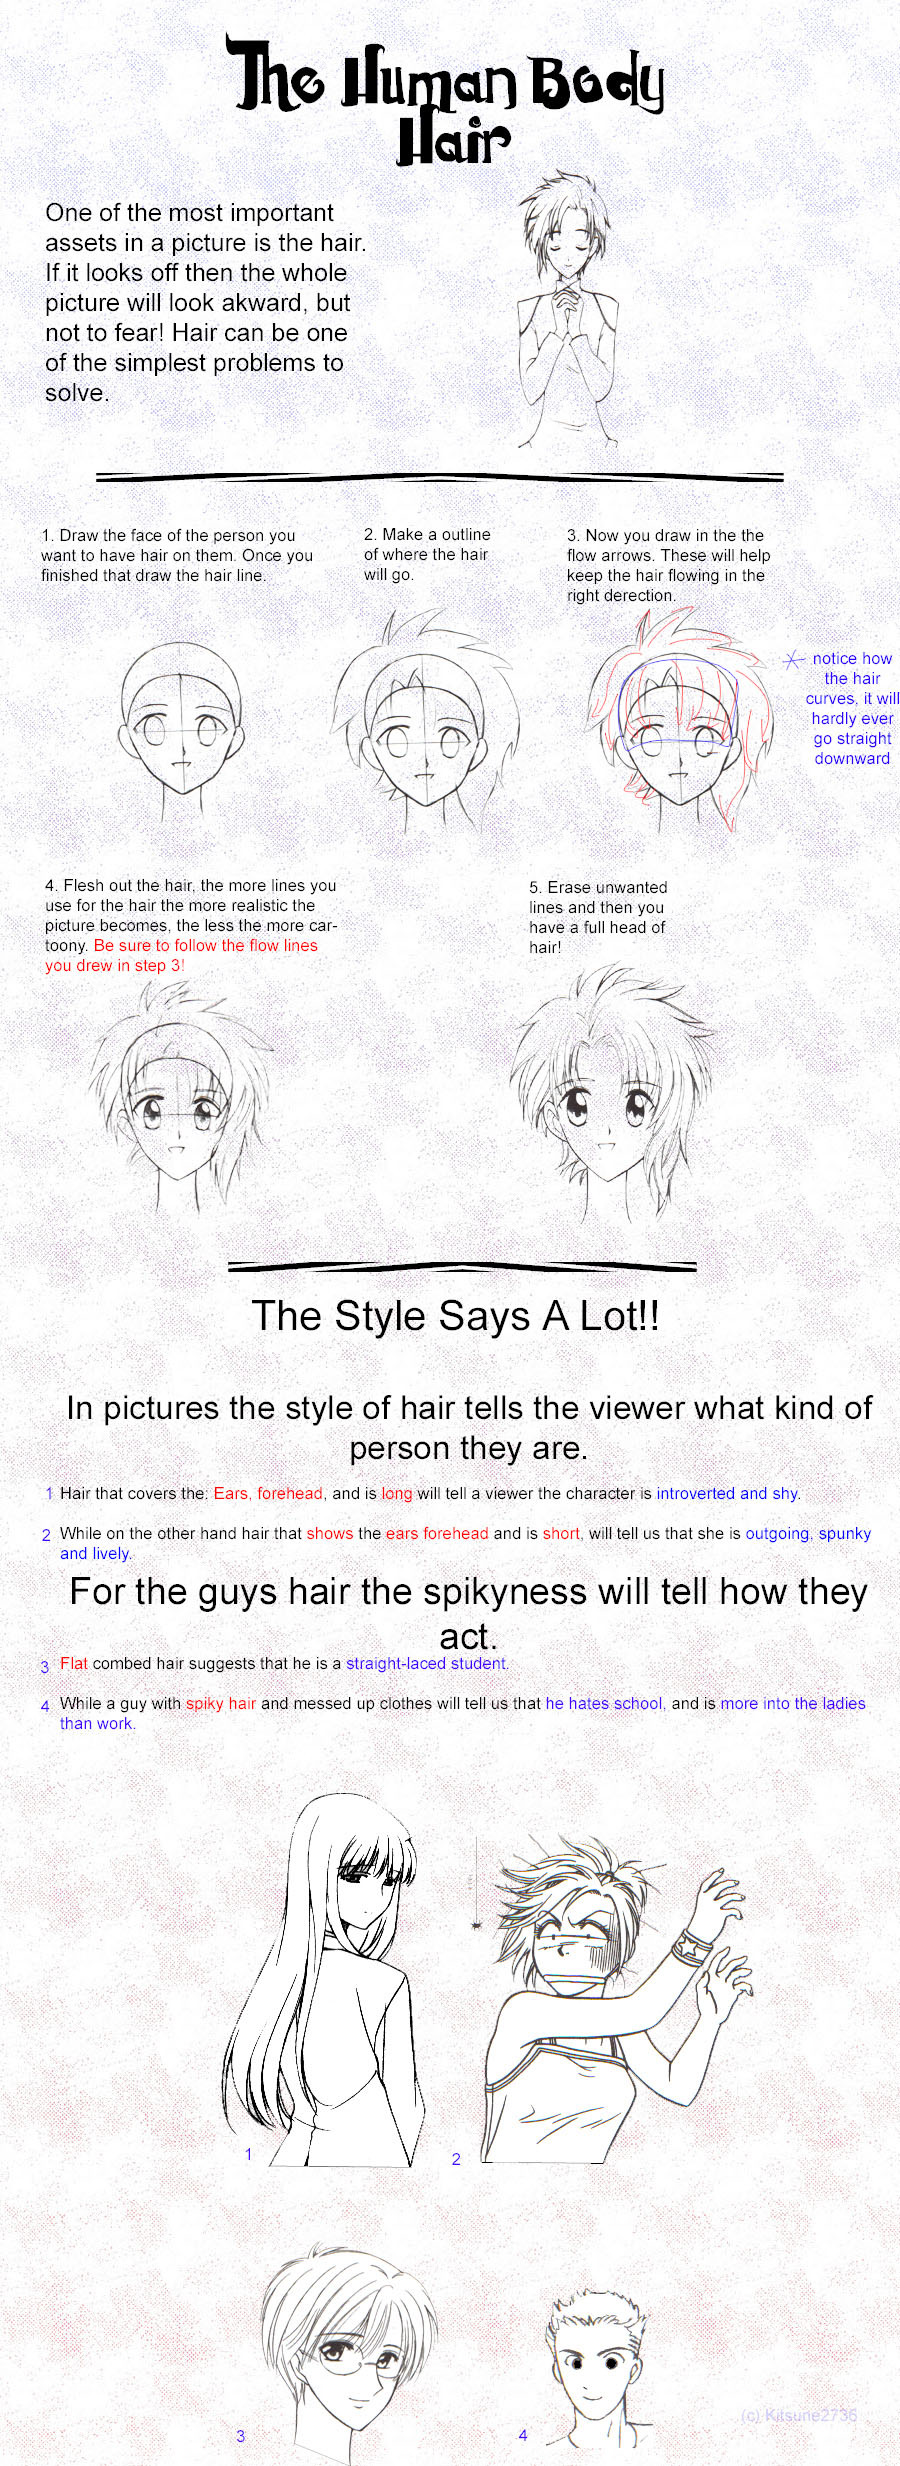
3. Naturally, you start drawing around the focus point. In this case, as is with any anime character, after drawing the face, it is time to draw the hair. If you already know how to draw hair, than do so as you please, and move on, but if you want to draw Ko-Chan’s hair, I have a tutorial just for that. Ko-Chan’s hair tutorial, click here
4. Next, after drawing the hair, it is time to draw the rest of the body. Don’t bother with clothes yet… in fact it is best not to even think about them yet… I know this means that your character will temporarily be NEKID!!! Whoo hoo! … but don’t get carried away.
 Don’t draw every detail! Not unless you want a naked character… er… yeah… just draw the shape more completely, draw the arms and legs so they aren’t blobs, and the chest and all that stuff. Any part that might not be covered by clothes, you do want to draw completely. Remember, we are still doing light sketching. The reason for this step (yes, there IS a reason) is because that when you have an actual figure drawn, drawing clothes that fit to the form becomes possible. Without this step, you run the risk of making clothes that look like they are just sort of there, not attached to anything, like they are on a hanger. The folds and wrinkles in the fabric will make more sense this way, and the end result will be the appearance of clothes that are worn, not just there. I don’t currently have any tutorials for this, everyone has their own way of drawing figures. If you do want a tutorial on drawing the human figure anime style, let me know and I might make one for you.
5. Yes, the next step is to draw clothes, and to finish details up… (like hands). I just made a tutorial on how to draw a hand, How to draw a hand, click here Remember, you are still drawing lightly. Also take into consideration the surroundings, what parts of the background touch the character? Draw these parts as well. If you want a tutorial on drawing clothes, I have one for you. It is a bit elaborate, but it is organized, so you can focus on the parts you aren’t sure about. It includes everything from how to draw folds, you how to fit the clothes to the wearer. How to draw clothes, click here
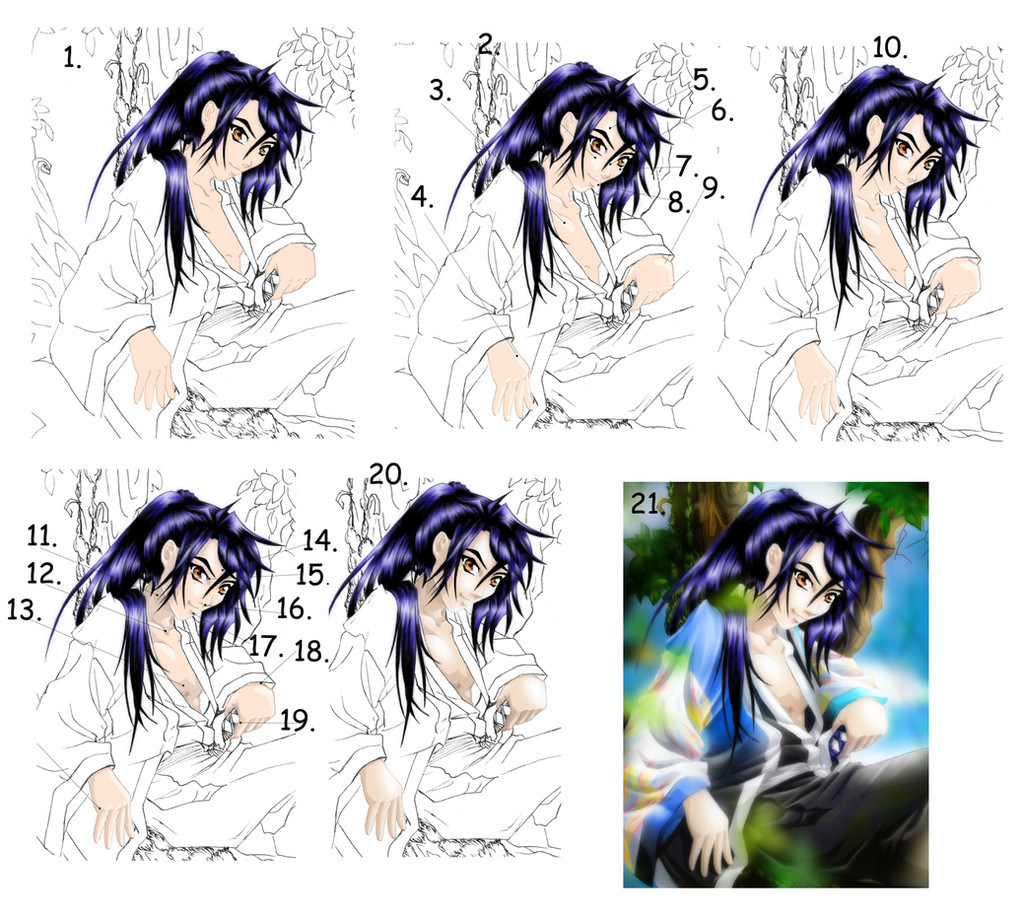
6. Now, you have the line art for the character and the surroundings that touch him or her drawn. In this picture, that would mean that Ko-Chan is drawn and the part of the tree that he touches is drawn as well. There is a place where the stump is in front of the foot, and that is drawn in front accordingly. This puts the character (Ko-Chan) into the pictures, rather then give a feeling of being superimposed. The next step is to ink the character. There is a reason why I do this before working on the background. Pencils smear. If you leave the pencil marks there too long, then the smearing will stain the paper and the picture will not look as clean. This is also why it is so important to sketch lightly. Remember, I darkened the pictures so that it would be easier for you to see them. So now, you trace your own lines vary carefully with a pen. When this is done, you can erase all the pencil marks and you will have a very clean line art of the character. IF there are still a few smudges, you can use photoshop to erase them… but the goal is to not need to do this. The picture next to number 6 is not darkened.
7. Time for detail. That means that if there are any patterns on the clothes, you can draw them now. If the hair is dark, you can color it or draw in the lines. Once again, you wish to know how I ink in Ko-Chan’s hair, I have a tutorial for that… though you may have already seen it.
 Ko-Chan’s hair tutorial, click here
 8.
 The main part of the picture is drawn. Take a breath of relief. This is the part of the picture that makes the biggest impact on the viewer, and it is done. Now draw the surroundings… you may wish to leave your character floating in space… I hope not… that is up to you. I haven’t got a tutorial on how to draw backgrounds and surroundings, there are too many kinds. nor do I have a tree tutorial for you. My best advice here is that you use references if you are not familiar with surroundings. Look at a picture of a tree, or a room… I do have a tutorial of sorts on rooms. Room Tutorial, click here . But really, this is up to you to do as you please. One more piece of advice, draw the surroundings in pencil first and then trace it in ink (with a pen) afterward… just like you did with your character. Remember, nature is imperfect and irregular, asymmetrical, and odd. Don’t draw things straight and even it you are drawing nature. The more unusual it looks, the more real it will look in most cases.
 9. When the line art is done, maybe you want to color it. The following tutorials are focused on coloring in photoshop, but they may be helpful in general shading as well, especially the skin coloring and clothes shading tutorials. First thing I like to color is the hair. I do this on a separate layer so that I can color under it later. If you want help in coloring dark hair in photoshop, here is a tutorial. How to color dark hair in photoshop, click here
10. After that is done, you might want to do the eye. This is also helpful to do before coloring skin because then you can color under it without worrying about going over the lines. Here is an eye coloring tutorial for you. How to draw eyes, click here
11. Next, you will want to color the skin. You can dot eh clothes first if you wish or the skin, but it feels more natural to do it this way. Here is a tutorial in skin coloring. If you are shading, this step is helpful to look at because in coloring, you add shading, and while you may not be using photoshop, it still helps to point out where you might want to focus, both on light and shadow. If you are just shading though, it is usually easier to leave skin white and only shade in the shadows. The more shadow you add, the darker the implied environment is, so mid day pictures need less shadow. Here is the tutorial for skin coloring. how to color and shade skin, click here
12. Coloring clothing can often be broken into two different steps. The first step is to put on the base colors. What does that mean? Well, it is the color of the clothes before the shading is added. Many anime characters have simple clothes; they are one solid color for the shirt and one solid color for the pants for example. Or a dress is worn that has one solid color. This makes it easier for the animators, but when just drawing a picture, that might be a little boring. You might want to give the character some patterns. Ko-Chan has patterns. For a tutorial in how I color the base colors for his outfit (designed by ) here is a tutorial. coloring Ko-Chan’s base colors, click here . This shows how to do tone progressions and flames on clothes. Other patterns might be pictures. The best advice I can give there is to remember to follow the shape of the folds when drawing it. Give the picture bends that match the contours of the fabric.
13. Now you can shade it. Here is a tutorial in shading. This can be helpful for people not using photoshop as well. how to shade clothes, click here
14. The last step I do not go into detail. There are too many kinds of backgrounds out there to teach you, and as for doing trees and stuff, I am just a learner, and I do not feel confident enough to tell you how to do it, but I can however give you some advice for backgrounds in photoshop in general. Number one is to toss the word background and replace it with “surroundings.” You can work with layers in photoshop, so do so. Make a background that is behind the character and a foreground that is in front of the character. You can do layers for different levels as well. For this picture, I had one layer for the tree, and a layer of the sky behind it, and a layer for the leaves on the tree and a layer for the fuzzy leaves that are closest. The closer the object is to the viewer, the higher up the layer. But putting things at different levels, you accomplish two things, depth in the picture and also a feeling that the character was NOT super imposed. Another important key to remember when coloring and making surroundings in photoshop is to NEVER forget the shadow. Draw a shadow coming off the character, draw shadows coming off objects in the picture. This gives a feeling that the character and the objects are in the picture rather than on it.
Good luck, and thanx for looking at my How to draw Ko-Chan Tutorial. I hope this all helps.
Other tutorials:
There will be more coming, but these are general tutorials that really have nothing to do with this particular picture (made long after I made this)
[link] <--Difficult Angles
Chibi drawing
[link]
Hair tricks
[link]
Related content


Comments: 134

Well you certainly don't have to read all that. It is set up that way so you can look at it, and if there is something you want clarification on, you check that part... like a dictionary, where you don't generally read the whole thing, just the part you want to know about.
👍: 0 ⏩: 1


Oh! Crap! That IS a guy! (took me a second look) I need to pay more attention. The flat chest should have given it away for me. Anyways, excellent pic! Love it. :3 The coloring is exquisite.
👍: 0 ⏩: 1
Bishi are meant to do that to people.
👍: 0 ⏩: 1
Yes i know they are, but i fangirl so much that i can usually tell which it is immediately. I 
👍: 0 ⏩: 1
i remember collecting a stamp or somthing ...(whatever it was) It said "My mom thinks one of them is a girl."
👍: 0 ⏩: 1
That would be an awesome stamp.
👍: 0 ⏩: 1
It was indeed a good stamp.  (Smile)")
👍: 0 ⏩: 0

I hate you and your damn drawing + coloring skills, jk. Your awesome, I really like this, itll deff help me
👍: 0 ⏩: 1
Thank you, its ok if you hate me... everyone does. *melodramatic music begins to play*
👍: 0 ⏩: 1

(warning this probably sounds rude)
the features are too masculant
try rounding off a few points,remember ur drawing a female,
soft,gentle,and smoothe?
...sorry..
just a tip
👍: 0 ⏩: 1


👍: 0 ⏩: 1
ah.. i see...
my mistake.
also, i like your anime style..
its semi classic,yet i dont quite remember where its from..
kind of a renewed style i guess
👍: 0 ⏩: 1
I take elements from more modern anime that are more realistic and from the classic anime... sort of pick and choose my favorite parts of each. Thank you.
No problem, it actually made me feel better that you said that, especially since it gives me a perspective on how the picture looks to other people and if that is not the intended look, I know what I need to work on. ^__^
👍: 0 ⏩: 1
maybe someday i'll put pics up of my own drawings..
but they'll probably look pretty weird..they're from last october
well the really long hair kinda threw me off to think it was a girl
👍: 0 ⏩: 0


This is very interesting, your very good at explaining ^^
The links are great too !~
Just wondering where you get the pen, that you use to ink with,
👍: 0 ⏩: 1
This pen was from Michael's an arts and crafts shop in case you don't know... but in all honesty, I found that a regular bic pen can work well... just as long as you keep an eye on when it might bleed a little blob and clean it off before applying it to the paper. My suggestion is that you try a variety of different pens, because different pens have different effects and you need to find what works for you. Sometimes more spendy isn't actually better. But the pen i used was great for fine details. If you go to Micheal's and ask for artsy drawing pens, they will show you where to find what I used. ^^
👍: 0 ⏩: 1
Thank you that was helpful ^^ I have pens that when you put it to paper its really thick and heavy ink. I will try and find a Michaels or any other art shop. Thanks for the help ^^
👍: 0 ⏩: 1

wow you made it clear to me every step
👍: 0 ⏩: 1

WOW, this is great and it really helped me alot since i'm kind of new at this and it gave me something to go off from. Keep up the good work^_^
👍: 0 ⏩: 1
Good to hear. Thank you, and good luck with this.
👍: 0 ⏩: 1
Your quite welcome, and I will^_^
👍: 0 ⏩: 0

this is REALLY REALLY SIMPLE
*was being sarcastic*
BUT IT REALLT LOOKS GOOD
👍: 0 ⏩: 1
👍: 0 ⏩: 0

Okay... so i spazzed earlier...sorry about that...i was just really happy about the tutorial. Is there any way you might be able to help with drawing trees? Those are my pet peeve. And i have to draw this thing set in a forest XP It would be really helpful
👍: 0 ⏩: 1
Well it would be easiest to explain trees if I made a tutorial, but realistically, I don't know if I will have time for that, but I will try to explain a tree to you. Lets start with the leaf tree.. if you want more, ask me. The base of course is the thickest. Each branch is a split, inwhich the width gets split between the two... with each branch, the trunk gets thinner, and with each twig on the branch, the branch gets thinner. To try to draw the splits, draw a V above and in the middle of the two sides of the trunk, pointing in the direction you wan the branch to go. Then continue the line of the edge of the trunk and draw a line that is more or less parallel to the edge of the v. Did that make any sense? You can try drawing it and it if confuses you, let me know. I usually draw the main branches all the way, but then just make basic marks to show there they go after that. I then draw the leaves that go in front of the branches so that they gater arround the branch marks. I finish drawing the branches by drawing what is not covered by leaves yet after that. Finally, I draw some leaves that go behind the branches. Good luck, i hope that helps.
👍: 0 ⏩: 0
my gods! YOOZE IZ MY SAVIOURZ!! I'VE BEEN LOOKING FOR A TUTORIAL ON SHADING SINCE I SUCK AT IT XD THNX SO FREAKING MUCH
👍: 0 ⏩: 1


Thank you. Hope it is helpful
👍: 0 ⏩: 0


Ha step 4 doesn't look like a sword XD...Ha...Sorry this is actully pretty cool im going ot try this in my spare..Ill scan my results to you if you want
👍: 0 ⏩: 1
I would love to see the results.
👍: 0 ⏩: 0
Ha step 4 doesn't look like a sword XD...Ha...Sorry this is actully pretty cool im going ot try this in my spare..Ill scan my results to you if you want
👍: 0 ⏩: 0

wow... so complicated hehe Anywaysdo you have a drawing guide on Hugging?? It so hard to draw two people hugging
")
👍: 0 ⏩: 1
No, I don't, there are a lot of different hugs, I'm not sure where to begin in explaining that... but some general tips, where their bodies meet, they should be more flat, because they are pressed agains each other, draw more shape on the backs, and you don't have to draw the whole arm, just to the elbow where it bends away. Guys usually wrap their arms around a girls waist while girls usually wrap their arms around the guy's neck, if that helps. Other than that, look at photos of people hugging and try your best. Maybe I'll do a tutorial on that some time.
👍: 0 ⏩: 1
Thank you so much! Your right! I could do that! ")
👍: 0 ⏩: 1
If I had time I would. Thank you very much.
👍: 0 ⏩: 1
| Next =>