HOME | DD
 rocketlaunch — tutorial: blue overlay

Published: 2008-05-31 16:21:00 +0000 UTC; Views: 15790; Favourites: 217; Downloads: 0
Redirect to original
Description
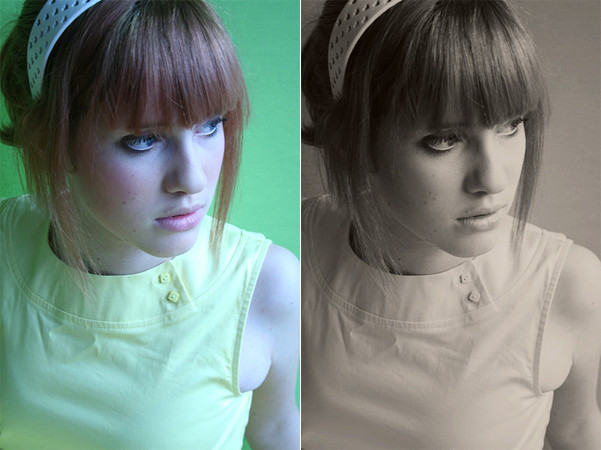
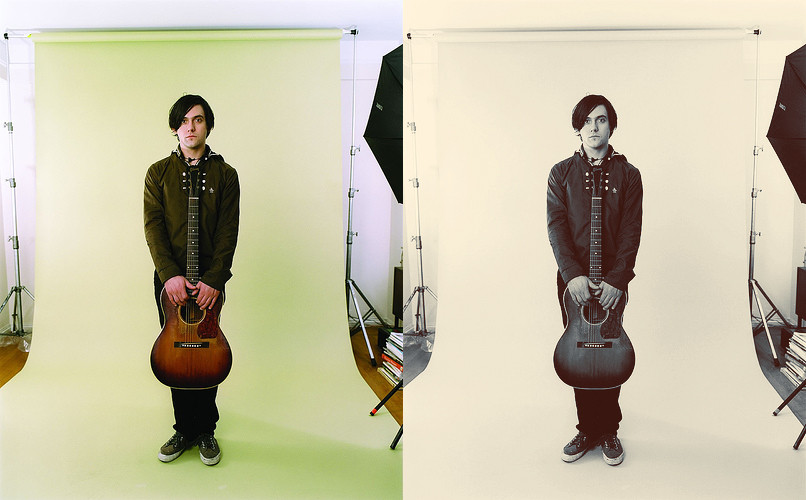
i will be using photoshop cs2 for this tutorial.1. duplicate your background/image layer, and set it to difference at 35%.
2. go to layer > new adjustment layer > levels and fill this in:
rgb
input: 20, 0.87, 169
output: 24, 199
red
input: 60, 1.36, 255
output: 14, 255
green
input: 9, 1.08, 255
output: 0, 255
blue
input: 0, 0.83, 255
output: 25, 255
3. go to layer > new fill layer > solid colour and set the colour to #a8bcd5. click ok and set this layer to hard light at 40%.
4. merge your layers by going to layer > merge visible. now duplicate your background/image layer and set it to overlay at 100%. merge the layers again.
5. go to layer > new fill layer > solid colour again and set the colour to #cb9595. click ok and set this layer to darken at 30%.
6. go to layer > new adjustment layer > colour balance. check "preserve luminosity" and fill this in:
shadows: +10, +13, -2
midtones: +11, +5, -4
highlights: 0, 0, 0
7. finally, go to layers > new adjustment layer > hue/saturation and fill this in:
hue: +6
saturation: +15
lightness: -10
now merge your layers and you're done!
stock: ~NikxStock
photo: [link]
Related content


Comments: 13

FOLLOW THESE STEPS 1.COVER YOUR MOUTH WITH YOUR HAND 2.WHISPER A WISH IN YOUR HAND 3.POST THIS ON 10 OTHER GAMES 4.LOOK AT YOUR HAND
👍: 0 ⏩: 0

what are the approximate colors #a8bcd5 and #cb9595 ?
👍: 0 ⏩: 2
KawaiiPixelNinja In reply to saunterloft [2014-03-28 23:45:41 +0000 UTC]
a bright blue for the first and a pale pink tone for the second
 (Smile)")
👍: 0 ⏩: 0

if you go to window > colour, you can click on the larger square (on top) in that window, then paste the hex codes in the box next to #. you can do the same with the larger square on top on the toolbox. hope this helps. (:
👍: 0 ⏩: 0

Really really really helpful, one day I shall paint your fence in return for my new found knowledge *U*
👍: 0 ⏩: 0


Thank you for this! It's so nice of you to share your knowledge.~

👍: 0 ⏩: 0

dunno how you're doing it..i made it for same photo and i don't have same resault @_@
👍: 0 ⏩: 1
Hmm.. I'll have a look at the process again. I'm sure I wrote it up as I did it in photoshop. :/
What version of PS are you using?
👍: 0 ⏩: 1
Ah it's okay...I was skipping a layer @_@ xD Got the right resaults now
👍: 0 ⏩: 0

Really nice effect, and your tutorial was easy to follow. Thanks for submitting this!
👍: 0 ⏩: 0
