HOME | DD
 shalonpalmer — Creating Latex Puppet Heads

Published: 2006-02-20 15:40:20 +0000 UTC; Views: 12611; Favourites: 50; Downloads: 341
Redirect to original
Description
So - I got asked to make puppets for a company in NYC. It seemed like the perfect excuse to try new things... like casting in latex. Having only cast hands before this, my work is a bit rough but I'll lead you through the process that I tried and that has mostly worked out for me.Also check out Creating Latex Puppet Hands which discusses a two part mold process.
Creating Latex Puppet Heads
The Three Part Mold
1. Using a non-baked clay (I used oil clay [link] , you could probably use sculpey types with no problem) create your - in this case - heads. I created mine on a welding rod up the center (similar to the strength of a coat hanger) - I used this just so I could sculpt with both hands free and also so I could rest it and walk away without leaving a flat spot on the back of the head. Also, I made a base on the rod of foil wrapped in masking tape to save on clay and weight - the masking tape aids in making a rough surface for the clay to stick to.
2. While sculpting determine where your seam points will be. In the case of the heads it was 1/2 way through the heads laterally - so there will be a seam through the ears, down the neck and over the top crown of the head. Beware undercuts! With undercuts you will need a multi piece mold - which is what I needed to do here because of the chin area, creating a second seam line down the jaw line of the head. These lines I scored in the surface for a guide in casting.
3. I used a shimming method to make a barrier between plaster sections. Any thin plate metal will do as long as it is strong enough to hold up the clay and the plaster, in this case I cut down a soda can for the small chunks I needed. At this point I removed the rods and filled in the holes. I inserted the metal along the scored lines in the head for the back piece only (from the neck over the top of the head, ignoring for now the line along the jaw) Be careful when doing this that you don't go too far into the clay (especially is there is nothing - like foil - inside) or you can cut the piece in half or weaken it enough that it may separate when doing the plaster. I then balanced the head on two pieces of wood - the metal resting on the wood, and braced with a second welding rod beneath the chin area.
4. Mattering the clay you have used you may need to use a release agent - and you're definitely going to need one between the two layers of plaster when making the mold. For plaster, the best release agent is potter's soap or green soap [link] . Don't use Vaseline since you need the plaster to be porous and absorb water. Oil clay doesn't need a release agent with plaster but the welding rods do. With a paintbrush or similar implement spread a thin layer over the surfaces that will come in contact with the plaster. Make sure it's not too thick as it will inhibit any details you may have.
5. This time around I didn't bother with figuring out how much plaster I needed - I just mixed a small bunch and had at it. I used gypsum #1 moulding plaster [link] - it's not the best for strength over time and use... but it worked great in this case. Plaster is used because in order to cure the latex, water needs to be drawn out. Ultracal 30 is the hardest and most resistant - but doesn't absorb water. Hydrostone is the strongest for this type of procedure, but more costly.
6. I used the island method and it worked out just fine. [link] Start out with a bucket and the plaster. Put warm water into the bucket in around the amount that you need for the pour. Sift the plaster into the water – DO NOT STIR – and continue to sift plaster in until small islands of plaster begin forming in the water and remain there after a few moments time. Let sit for around a minute and begin mixing, making sure that you’re not getting a lot of air into the mix and mix for around a minute or three. Just remember, either way you go, always sift the plaster into the water.
7. Once the plaster is mixed and ready to pour wait a bit more so that it's solid enough it won't just run off, but not hard enough that you can't spread it. I did a once over thin layer when it was a bit liquidy still just to get the surface completely covered. After that build up more layers - until it's a least an inch thick. Using a paint scraper was convenient in this step, also it's useful to make the bottom (the top of the puppet head) and the top of the pile you're forming flat - so it will have a resting point when pouring in the latex and when the mold is open. Just a reminder - make sure that the surface you are working on is level. Word of advice be careful of air bubbles in the plaster mixing and in the spreading.
8. Plaster sets via a chemical reaction, and gets quite hot. You can test where it is in the process of this and once it's coming back down in temperature again you can move it about and pull out the metal shims. At that point I poked some dents into the surface to work as keys when lining up the halves for casting. Next I spread a layer of green soap to act as a barrier and release agent for the halves of plaster.
9. Next step is inserting the metal shims on the scored jaw line. Also, when I pulled the metal out of the first line, it pulled the clay with it a bit, make sure to smooth this area back out before pouring the next section of plaster.
10. Mix up another batch of plaster and begin layering onto the face area. Once again be careful of air pockets, spread evenly and slowly. If there are details that you're worried may not fill, mix up a smaller batch of plaster and brush it on first, then do the subsequent layering. Let set.
11. Once set, pull the shims, clean up the line in of the jaw from the metal and don't forget to make key marks for lining up the mold. (yeah, it's a really small area to fit in there and mark, but it's really necessary!!) Don't forget more green soap on the fresh plaster!!
12. Mix up and pour the last section underneath the jaw. Let set.
13. Open, and remove the oil clay sculpture. Ta-Da!! You now have a mold. There is a little clean up necessary, getting clay out of the molding area and such. With the heads I had a lot of remaining oil clay on the surface, so I took a bit of fine grade sand paper to the problem areas – but be careful around the detail work!
14. Once cleaned, place the mold into an oven at 200 degrees for 3 to 6 hours mattering on the thickness. This will take out extra water in the plaster. This should be done with all sections of the mold together in case of warping.
15. Once out of the oven and cooled, strap the pieces of the mold together - large rubber bands, bungee cords... and fill the seams on the outside with oil clay for an added seal - especially pay extra attention to where multiple pieces come together - like the ear/jaw area. Stand on end in a container large enough to catch all runoff, brace as necessary.
16. The latex I used was L200 casting latex mixed with #64 Filler for strength in a ration of 1:3. [link] Mix together the latex and the filler let sit a few minutes to get an air out. Pour latex into the opening at the top of the mold. Make sure you pay good attention to the undercut areas - I ignored this the first time around and ended up with an air pocket for a chin!!! All further castings I held it at an angle while I poured and never let the level get lower than just inside the neck (You may get an air pocket in such areas as the chin.). Let sit about an hour. Continue to top off the latex as needed. After an hour, pour off the excess and let sit overnight.
17. Gently open the mold. Make sure to remove all latex on the outside of the plaster - as it may hold on to the inside casting and rip it. Be careful not to tear the casting inside as it will still be wet. If the item is large and has a larger hollow cavity it's recommended to blow some talc powder in to keep the side from bonding to each other as you remove it from the mold, I didn't and had no problems as the latex kept its shape rather well. Remove and let dry in front of a fan for 3 to 4 days. After a few hours it will be workable enough to trim some of the flashing... and they will be hard enough in a few days to sand or dremmel.
And with that you have puppet heads. So - definitely read up on this if you're going to be trying it...
The Prop Builder's Molding & Casting Handbook by Thurston James is great [link]
I also learned a lot from the pics on the puppet museum site:
[link]
- in the puppet workshop area.
All supplies for this project were bought at:
The Compleat Sculptor, Inc.
90 Vandam Street
New York, NY 10013
[link]
They are absolutely amazing, have pretty much everything and are extremely helpful and nice. If you have questions about a project, they will try their best to lead you to the supplies you need.
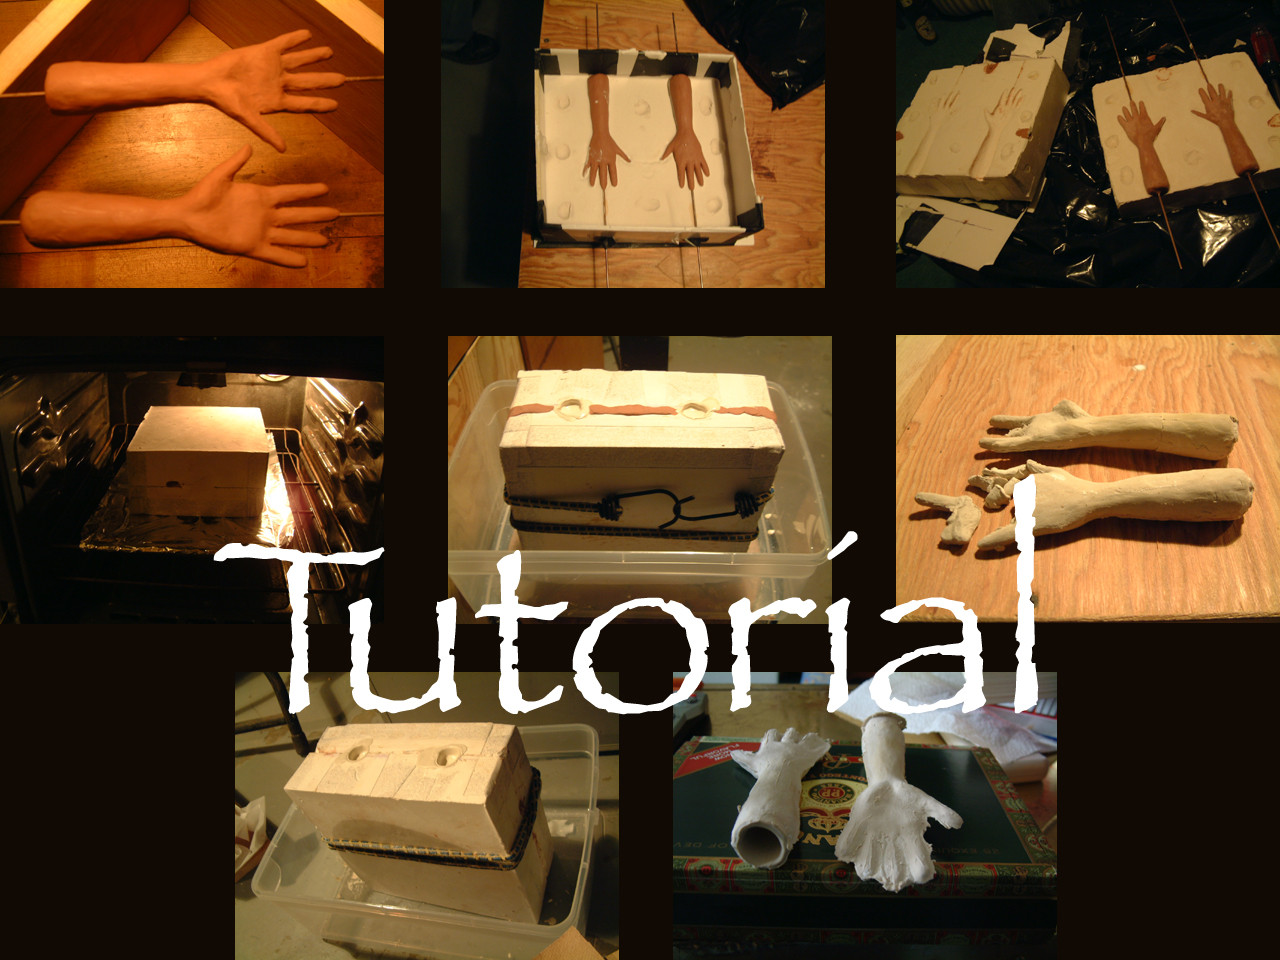
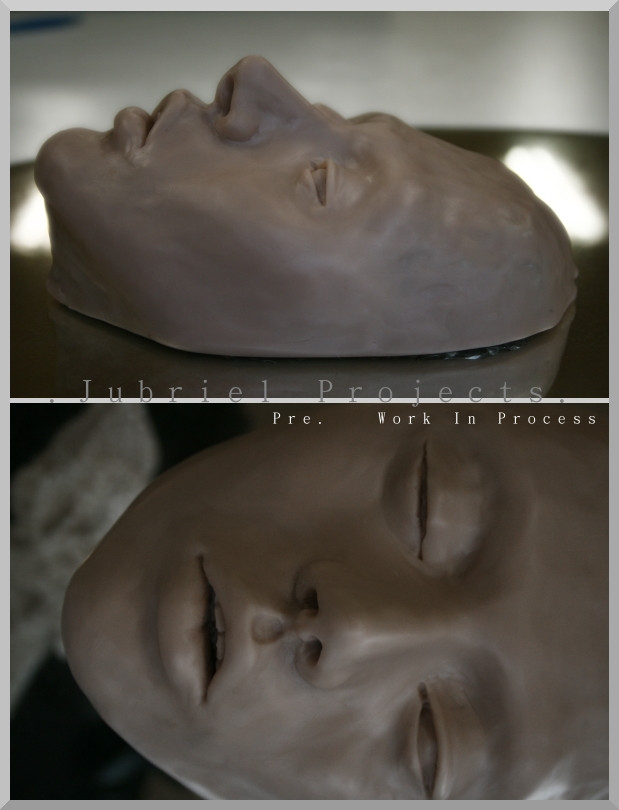
Pictures:
Basic walkthrough pictures of the process.
So the first casting - which had the air pocket chin... didn't want to come out of the mold because of the strange line and joining caused by not really cleaning up the edges where I pulled the metal out, and I hadn't sanded down where the extra oil clay film was inside the mold area.
The first cast of the female's head (there are two heads and two molds) was even worse, it completely pulled apart at the seams!!!
Going back and cleaning that up, they worked out great.
--------------------------------
oracletheatreinc@oracletheatreinc.com
[link]
sculpturalmyth@yahoo.com
[link]
Related content


Comments: 18

hi! great tutorial! is this the same kind of latex for doing doll heads? do you know any substance to mix up with the latex to make it stronger and more resistant? thanks!
👍: 0 ⏩: 0


No Problem. I hope it helps!
👍: 0 ⏩: 0

hi girl!! cool tutorial!!!! THANKS!! 

👍: 0 ⏩: 1
hey there, thanks for checking out the tutorial! I love your work!! ")
👍: 0 ⏩: 1
hahaha, me neither sometimes 

👍: 0 ⏩: 0

Very cool pics and information. Since you used oil based clay you may have been able to get away with not shimming the chin, one less thing to clean off the final piece. If you wait just a bit longer before pulling out the latex, you'd be surprised what kind of undercuts you can get away with.
👍: 0 ⏩: 1
Ya know... i think it's the consistency that I mixed in the latex - filler to latex, the mix was a bit harder than I expected coming out of the mold... and before that point it liked to rip.... of course all of this just makes me want to experiment all the more and mix it differently and see what i come up with... i also want to try the chicago latex instead... but after the cold passes... i'd hate to receive really expensive ruined by the cold latex!!
👍: 0 ⏩: 0

wow, this is really cool, ive been meaning to try my hand at casting, thanks for the info
👍: 0 ⏩: 1
You're welcome - hope this helps, and if you have any further questions, definitely ask away if you think it'll help!!
👍: 0 ⏩: 1
you're most kind, i will if i do
👍: 0 ⏩: 0

Great tutorial, with lots of detail. Thank you very much.
I have done plaster casting several times, but I have never worked with latex. I don't understand the part about it being hard enough to dremel or sand. Does this latex you are using come out hard?
I am wanting to make ball jointed dolls cast in resin, actually. This is a future project, I am just doing some of the thinking part now.
👍: 0 ⏩: 1
Well - the #64 Filler mixed with the L-200 latex creates different varients of rigidity.
2 parts L-200 to 1 part #64 filler-very flexible (generally for masks and such)
2 parts L-200 to 2 parts #64 filler-flexible
2 parts L-200 to 3 parts #64 filler-medium flexible
2 parts L-200 to 5 parts #64 filler-very hard
I didn't need that much for this project - and I really didn't want to overly screw things up in mixing (it being my first time) so I just bought 1 gallon of L-200 and 3 of the #64 filler and mixed all of it and resepartated it out into the original containers - it's technically a bit harder than the 2:5 very hard, but it remains quite flexible.
The cutoff for the arms (to have a flat level edge) I tested it's strength and flex and it held out through just about everything, bounced back to its orignal shape, except when I grabbed a hold of both sides of the ring and pulled - then it finally let go and broke. But, yes, it is quite hard - dremmel, sand, cut, file - it's been great.
👍: 0 ⏩: 1
Wow, I didn't even know you could make it that hard! I am going to have to try that for moldmaking. It would be great for casting polymer in, wouldn't it? Easier to remove than plaster, and it would keep the detail, too.
👍: 0 ⏩: 1
Well- like me think... the thing is that you need the plaster to take the water out of the latex (which is the way it sets up - not chemical but just dehydrating really) After the plaster does what it can it's just air drying from there.
I'm thinking you should look into rtv rubbers - matrix molding with silicone (plaster mother mold...) What is your original? Polymer? And what is your finished product? Resin? If your final product is hard your mold should be soft - so you can peel it off the final piece...
👍: 0 ⏩: 1
That's what I was thinking - the mold should be soft.
I haven't started this project yet- I have about 3 on my list before I get to it, but I was thinking of making an original out of polymer clay and then casting it in resin. Though, I was wanting to make multiple castings.
You are right. I need a molding latex. That's the part I have never done before. I have made numerous plaster molds.
👍: 0 ⏩: 1
I definitely recommend TCS - [link] they're a great resource. They're a bunch of people who just do these things for a living and love it and they can answer all questions (with little expectations of buying things).
They have a mold making and a casting form where you can fill in info, fax it and they'll help out pick out what you can or should be using. Also if you take a look through the products they offer, they have great explanations of all of them, a tech sheet on most if not all, and a msds on everything.
I'd recommend OOMOO 25. I was thinking of doing a similar project before (polymer to resin) and unless you have access to a nice scale or a vacuum pump to degas the other rtv's are kinda out of the question.... too much fear of air pockets and improper setup...
Also - you should take a look at this forum post I came across that was hugely informative -
[link]
it's the best and cleanest walkthrough of a matrix mold I've ever seen.
Hope this helps - toss any other questions on over and I'll see if I can help out in any other way!! And good luck with it all. I have to say molding and casting was quite frustrating but a whole lot of fun.
👍: 0 ⏩: 1
Thank you! I have browsed around TCS before, but never bought anything.
I will be checking out that tutorial in a few minutes when all the photos finally load. Thanks for that too.
Molding & casting are a lot of work, but it's all up front. Once you get a good mold, you can make multiple copies of your sculpt. (Unless you are doing lost wax, which I have done before.)
Looks like I have quite a bit of research to do on this before I go for it.
👍: 0 ⏩: 0