HOME | DD
 tamaraR — Photoshop Manipulation tutorial

Published: 2013-03-01 22:40:30 +0000 UTC; Views: 41016; Favourites: 963; Downloads: 1105
Redirect to original
Description
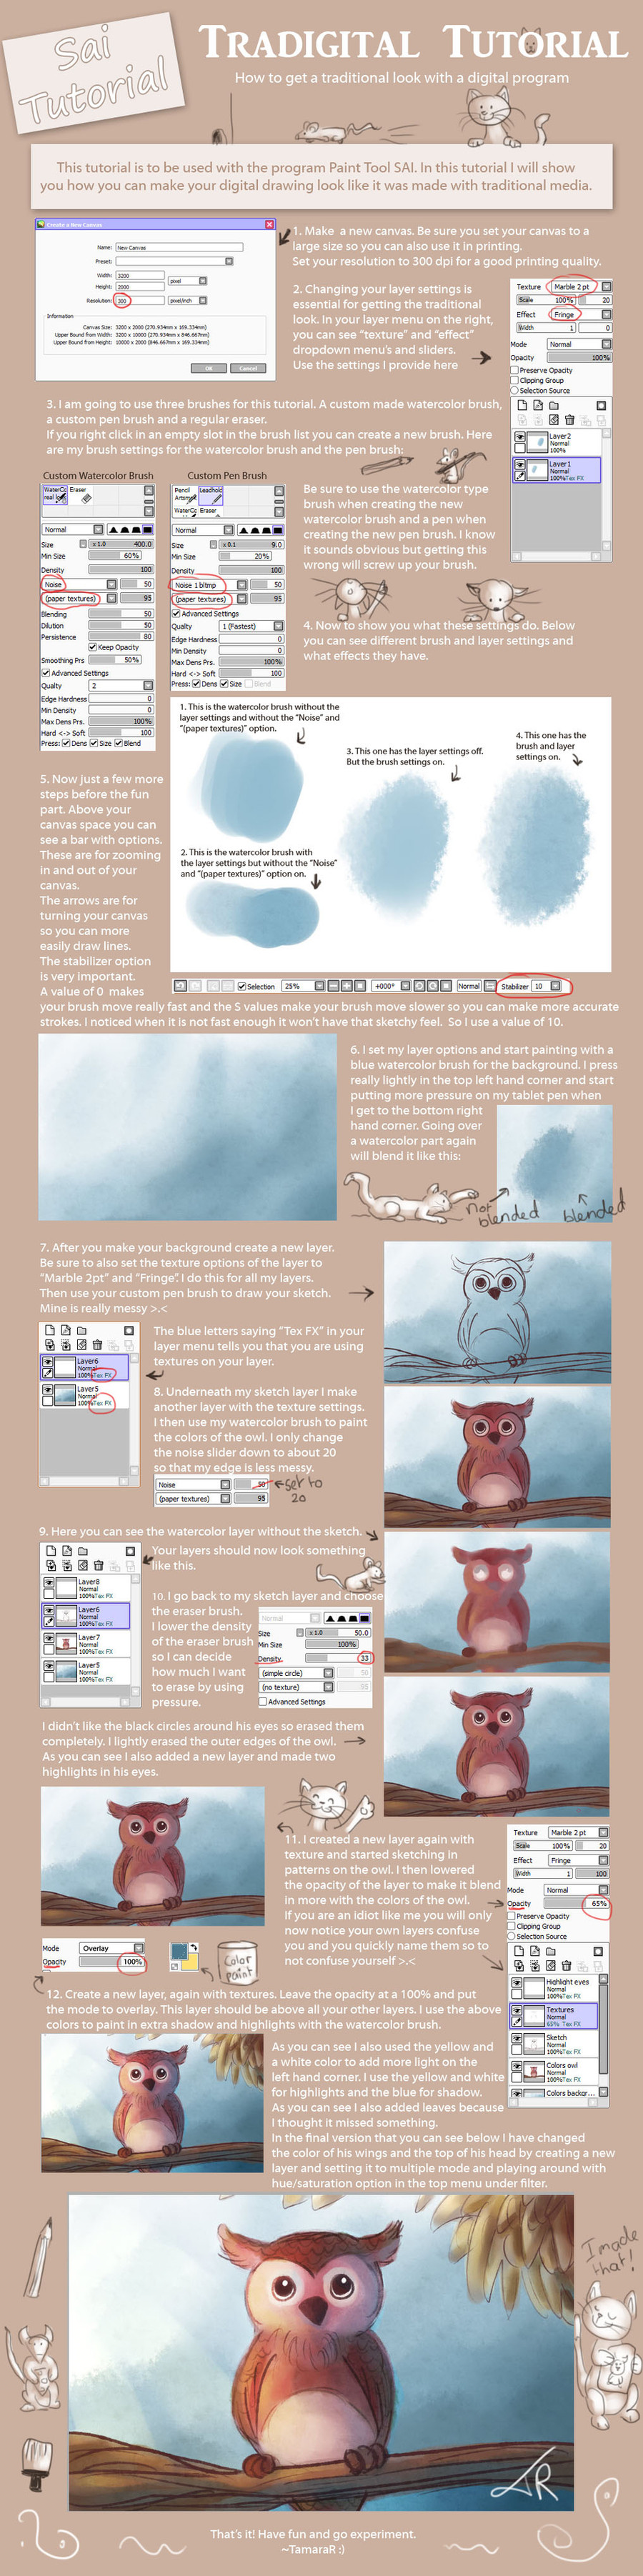
A step-by-step tutorial on how I manipulate. I don't always work the same way but I mention severaltechniques that I use more often in my work. Photomanipulation is a lot about experimenting and seeing what works.
Please use this tutorial as practice or a guideline. Don't copy my work and call it your own. Be creative!
Finished work
I wrote an article with more information on photomanipulation and techniques here:
Photomanipulation walkthroughStep 1: Idea (message, composition) You decided that you want to make a photomanipulation. But what to make? There are so many photomanipulations already out there and mostly with the same theme. So you decide you don't just want to stick a pretty girl onto a beautiful background. No you want to be original and have your manipulation portray a message everyone can relate to. Think of things that are important to you, that lay close to your heart. They can be emotions (love, hate, sadness, anger) or experiences, hobbies (art, sports etc), things you are struggling with. Or they can be global themes like (beauty, money, economy, eating disorders, war, relationships etc.) Of course if you choose to portray something as love there are many ways to do so. Do you want it to be a surreal depiction of love, or dark, fantasy, sci-fi, conceptual, humourous... your choice will of course decide the whole 'feel' of the image. So choose wisely as they say. Now that you have your theme y
I haven't mentioned this in the tutorial because I haven't used it but the group folder found at the bottom of the layer menu is another handy tool. It let's you create folders in which you can place layers so you can move them all at once.
Stock used:
Deer [link]
Forest [link]
Brushes used [link]
Related content


Comments: 129

👍: 0 ⏩: 1

Thank you so much for using my tutorial
👍: 0 ⏩: 1


Hi, this is my attempt. fav.me/da1eq8x I tried following your tutorial but got confused with some steps so I had to improvise. Thanks for sharing.
👍: 0 ⏩: 1
Thanks so much for using my tutorial ")
👍: 0 ⏩: 1


👍: 0 ⏩: 1


Nice work! Only thing I can really think of here is that it's a little tough to read the text that's sandwiched between the images. That's pretty much it though, keep up the good work
 (Smile)")
👍: 0 ⏩: 1
Thanks a lot for the feedback.
Do you mean the smaller text underneath the series of pictures at the top half? Or do you mean where I inserted an screenshot of my settings?
👍: 0 ⏩: 1
The text in the top half, where there's just one line of text squished between the pictures
👍: 0 ⏩: 0


i really happy n thanks for sharing ... keep share
👍: 0 ⏩: 1

x-Pixel-Pusher-x In reply to tamaraR [2013-10-26 11:14:52 +0000 UTC]
Your very welcome my friend.
👍: 0 ⏩: 0


Very nice and detailed. Thank you for making this
👍: 0 ⏩: 1


usually I'm not a big fan of photomanip, but this is an exception. Wonderful art and a good thorough explanation!
👍: 0 ⏩: 1
for the incredible compliment. I really appreciate it.
👍: 0 ⏩: 1

This is great. Thanks so much for sharing your expertise.
👍: 0 ⏩: 1
| Next =>