HOME | DD
 tamaraR — Photomanipulation Tutorial on blending

Published: 2014-03-05 22:05:02 +0000 UTC; Views: 20074; Favourites: 830; Downloads: 527
Redirect to original
Description
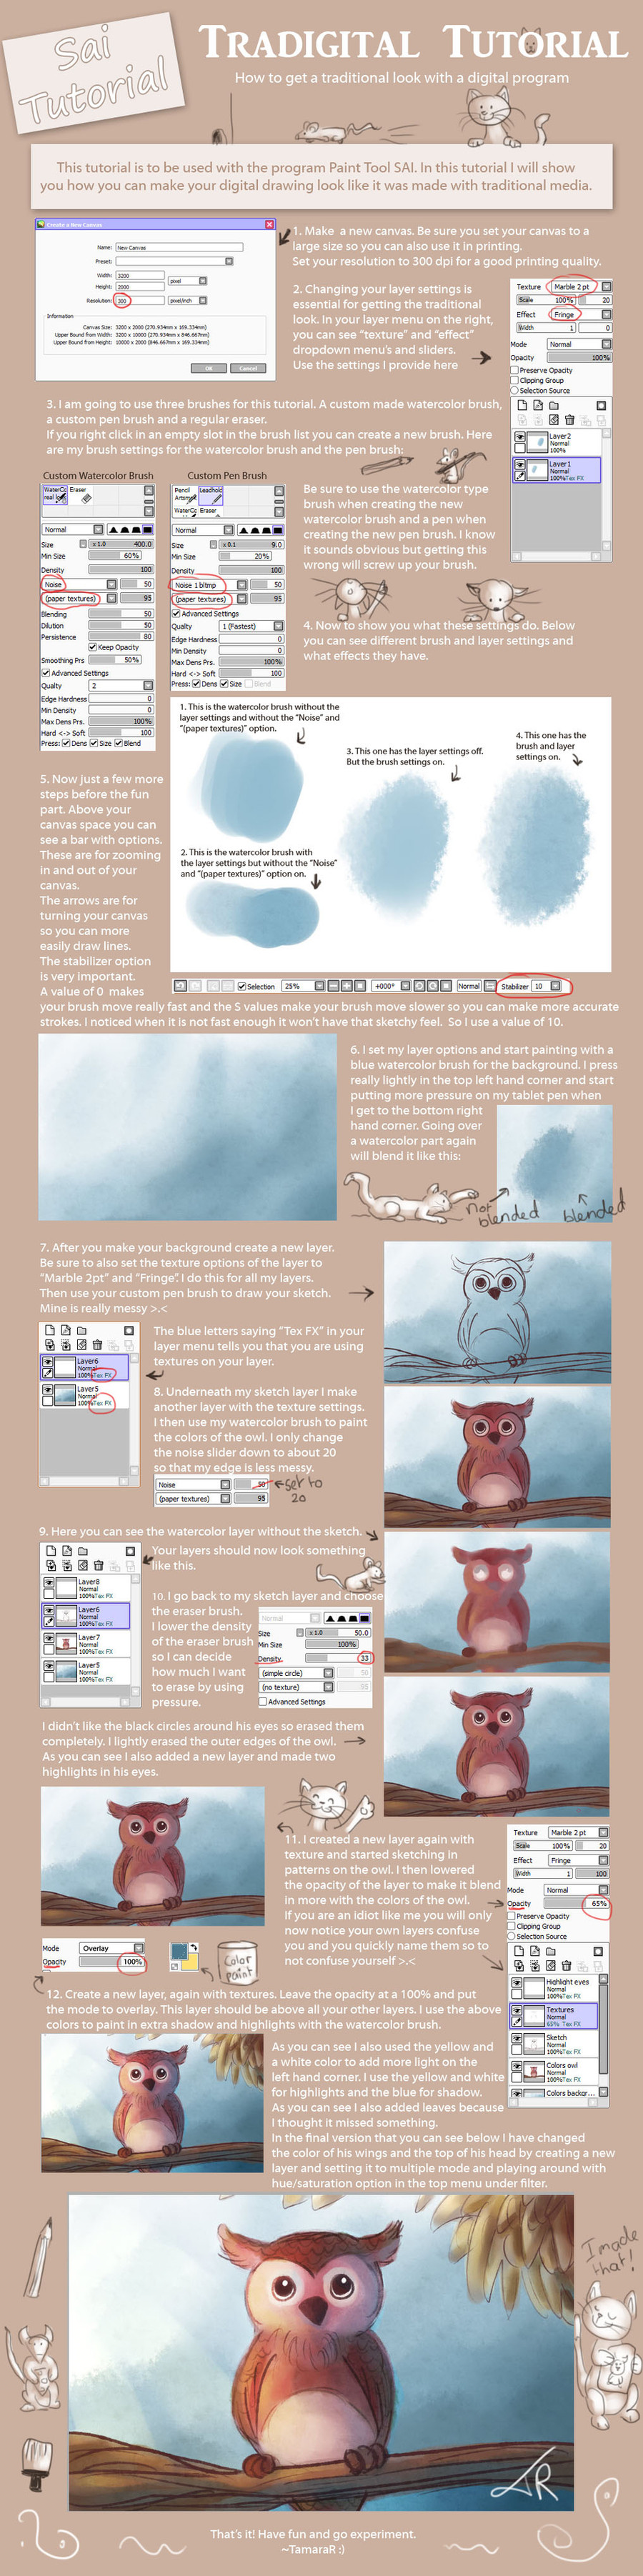
Another photomanipulation tutorial. This is pretty much the same process of how I do all the blending of my images.Please use this tutorial as practice or a guideline. Don't copy my work and call it your own. Be creative!
Stocks used for the deer image
Forest pixabay.com/en/forest-spruce-s…
Grass with deer pixabay.com/en/roe-deer-spring…
For the whale image go here for stock information --> tamarar.deviantart.com/art/Mid…
My other tutorials:
My Walkthroughs
Photomanipulation walkthroughStep 1: Idea (message, composition)
You decided that you want to make a photomanipulation. But what to make? There are so many photomanipulations already out there and mostly with the same theme. So you decide you don't just want to stick a pretty girl onto a beautiful background. No you want to be original and have your manipulation portray a message everyone can relate to.
Think of things that are important to you, that lay close to your heart. They can be emotions (love, hate, sadness, anger) or experiences, hobbies (art, sports etc), things you are struggling with. Or they can be global themes like (beauty, money, economy, eating disorders, war, relationships etc.)
Of course if you choose to portray something as love there are many ways to do so. Do you want it to be a surreal depiction of love, or dark, fantasy, sci-fi, conceptual, humourous... your choice will of course decide the whole 'feel' of the image.
So choose wisely as they say.
Now that you have your theme you nee
Artist WalkthroughThis walkthrough focuses on:
- guiding you as an artist and improving your artistic skills
So having said that... let's get started!
I have been drawing for a long time. Since I was little I would draw all the time on anything I could find. That passion for drawing and art has always stayed with me. But the problem is talent or potential will only get you so far. If you really want to become a great artist you will have to put in many hours of work. And you would preferably have someone there to guide you. Even now I am learning about basic skills I wish I had learned years ago. That is the problem of being self taught... you have to figure everything out yourself. Of course there are benefits to that too. Self taught artists are generally very motivated and passionate people. I have only come to the point where I am now just because I am passionate and slightly obsessed with drawing. But I want to know more, learn more and improve more. So that is why I am setting up this little drawi
Related content


Comments: 59

👍: 0 ⏩: 0


")


Thank you so much for this tutorial - will save me a lot of time on my pieces. Had been wondering if masks would help in my blending as I would open whatever I needed as a new file then put it in the piece I was working on.
👍: 0 ⏩: 1

I'm very glad I could be of help Kerensa.
👍: 0 ⏩: 0


 (Smile)")


You're very generous with your Ps skills and this is a great tutorial. Thanks for sharing.
👍: 0 ⏩: 1
and I am happy to share these things.
👍: 0 ⏩: 1


i love those little drawings around in the tutorial
Excellent job
So there u used pink color too for this reason for me is more interesting watch a tutorial created by a girl, because you use female tonality and they are interesting for me.

👍: 0 ⏩: 1
Hahaha thanks. I love doing the little drawings.
I think the pink thing is just a coincidence because it worked well. I actually don't like pink very much.
But it can make great light.


👍: 0 ⏩: 0


| Next =>