HOME | DD
 xXSleepieXx — step4 clarification--OLD

Published: 2010-10-23 06:21:14 +0000 UTC; Views: 4198; Favourites: 22; Downloads: 58
Redirect to original
Description
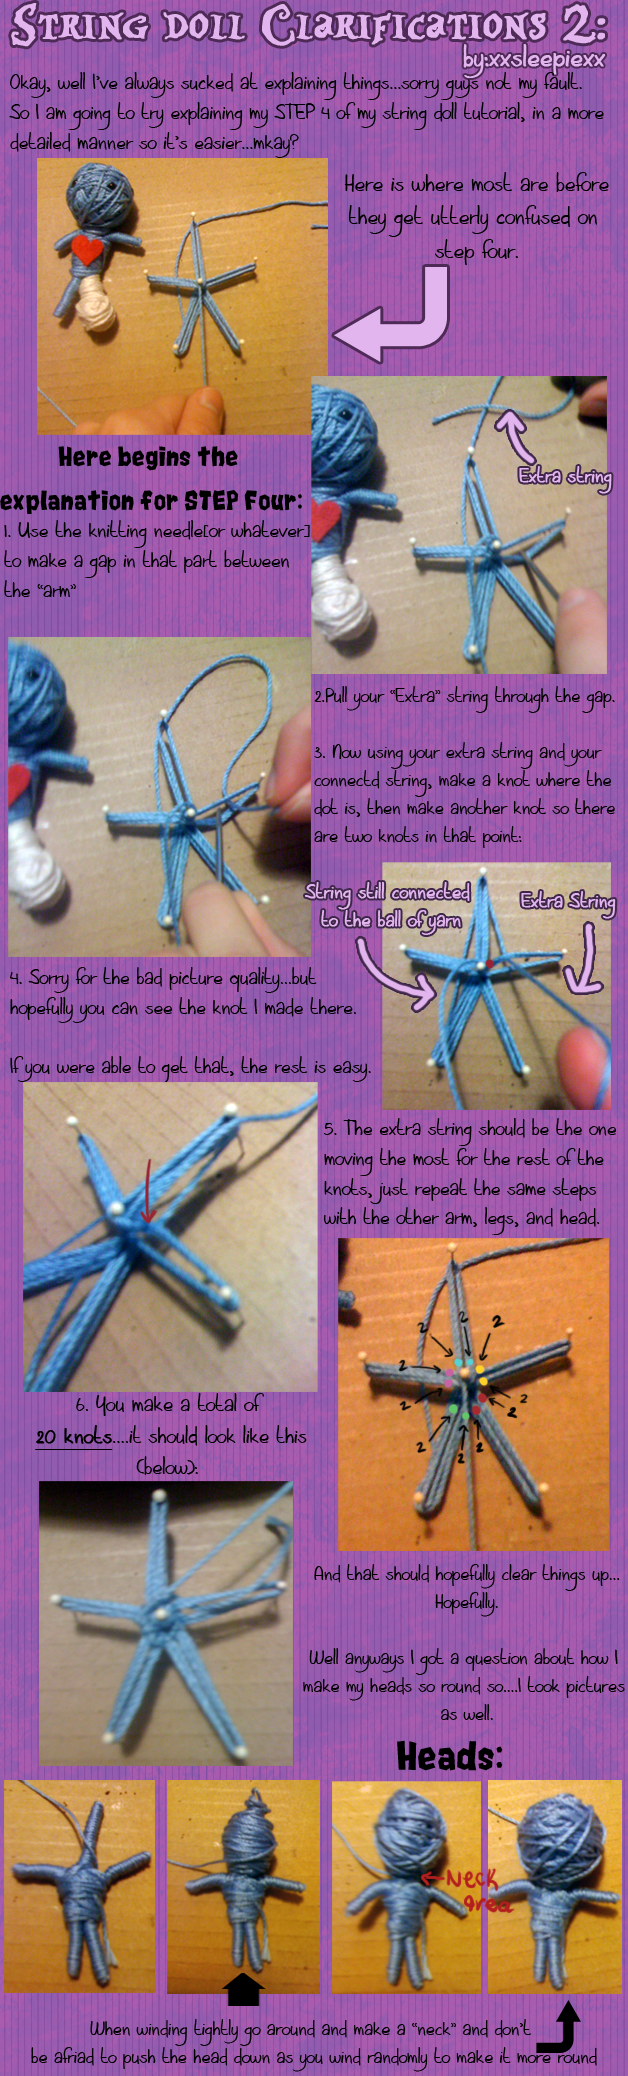
THIS CLARIFICATION IS OBSELETE....:[link] <---look at this one for more details and clearer pictures!thank is all.

Related content


Comments: 13

I still don't understand. Do you thread it through the bottom of the loop? How do you tie them together? I think a close up of the Knots would help even more.
👍: 0 ⏩: 1

This is my old clarification....my old old one....you should check this one which makes it clearer.
It was in the description, because this one was confusing...I should delete this thing, sorry about that 

👍: 0 ⏩: 0
no just knot it two times like you would in a normal knot.
It doesn't get too complex here, no fancy knots.

👍: 0 ⏩: 1

I tend to overthink the complexity of things lol It was actually simpler when I did it. Thank you for all your help!
👍: 0 ⏩: 1
no problem. ")
👍: 0 ⏩: 0
Is this the kind of double knot?
[link]
It seems making a lot of these would make the doll really thick. Not sure it just seems that way because the little doll i have has skinny arms and no bump where they covered up knots like this. I know you made this picture in responce to my question. This is my last thing I promise lol.
👍: 0 ⏩: 1
Oh...
No it's fine with the questions, I have nothing better to occupy myself with besides homework.
What bumps are you talking about?
The pink dots are where your supposed to make the knots, there isn't supposed to be big huge bumps of knots. The knots are just there so that the appendage strings don't fall apart when you move on to step 5. You tie regular plain ol' knots.
The arms being skinny, you can change the thickness depending on how many loops you make around the toothpicks/pins.It should say somewhere in the begining how many loops for what part.
...ask me as many questions as you want, seriously it's no problem


👍: 0 ⏩: 0
I feel very special to have something made just for me no one usually does things like this for me! Thank you bunches for doing this it is great I will do one right now! Thank you thank you thank you!
👍: 0 ⏩: 1

I think it's great for you to have these tutorials, especially since you're able to illustrate it with a computer diagram (which can at times be clearer than an actual picture). But if I may...
I guess I didn't really catch it in your other tutorial, but it seems that you wrap around each limb individually. I think it may be easier to have them "connected." It's probably easier with an illustration, but by that I mean:
Instead of individually winding each limb before moving onto the next one, it may be a good idea to weave around 3 pegs at a time to form loops, that is, involving different pegs each time, so that the body is more like "one." You rotate around different outer points, while always "cornering" the thread around the center before you go to another peg, connecting all the limbs together.
This also makes it easier to knot the threads in place, instead of knotting each body part together (which I believe is what you're describing).
I hope that makes some kind of sense...
👍: 0 ⏩: 1
It too me awhile to get what you meant. 

I'll have to try that to see if it works out ok.
and thanks...which I could update them though. Now that I look back on my first one it's kinda confusing.
I'll probablly make a 2.0 version in December.
👍: 0 ⏩: 1
lol, sorry. I'm glad you got it though.
Let me know how it works out for you. 'Cuz doing it this way, you can get away with as little as 3 knots and then you're ready to wind.
👍: 0 ⏩: 0