HOME | DD
 zummerfish —
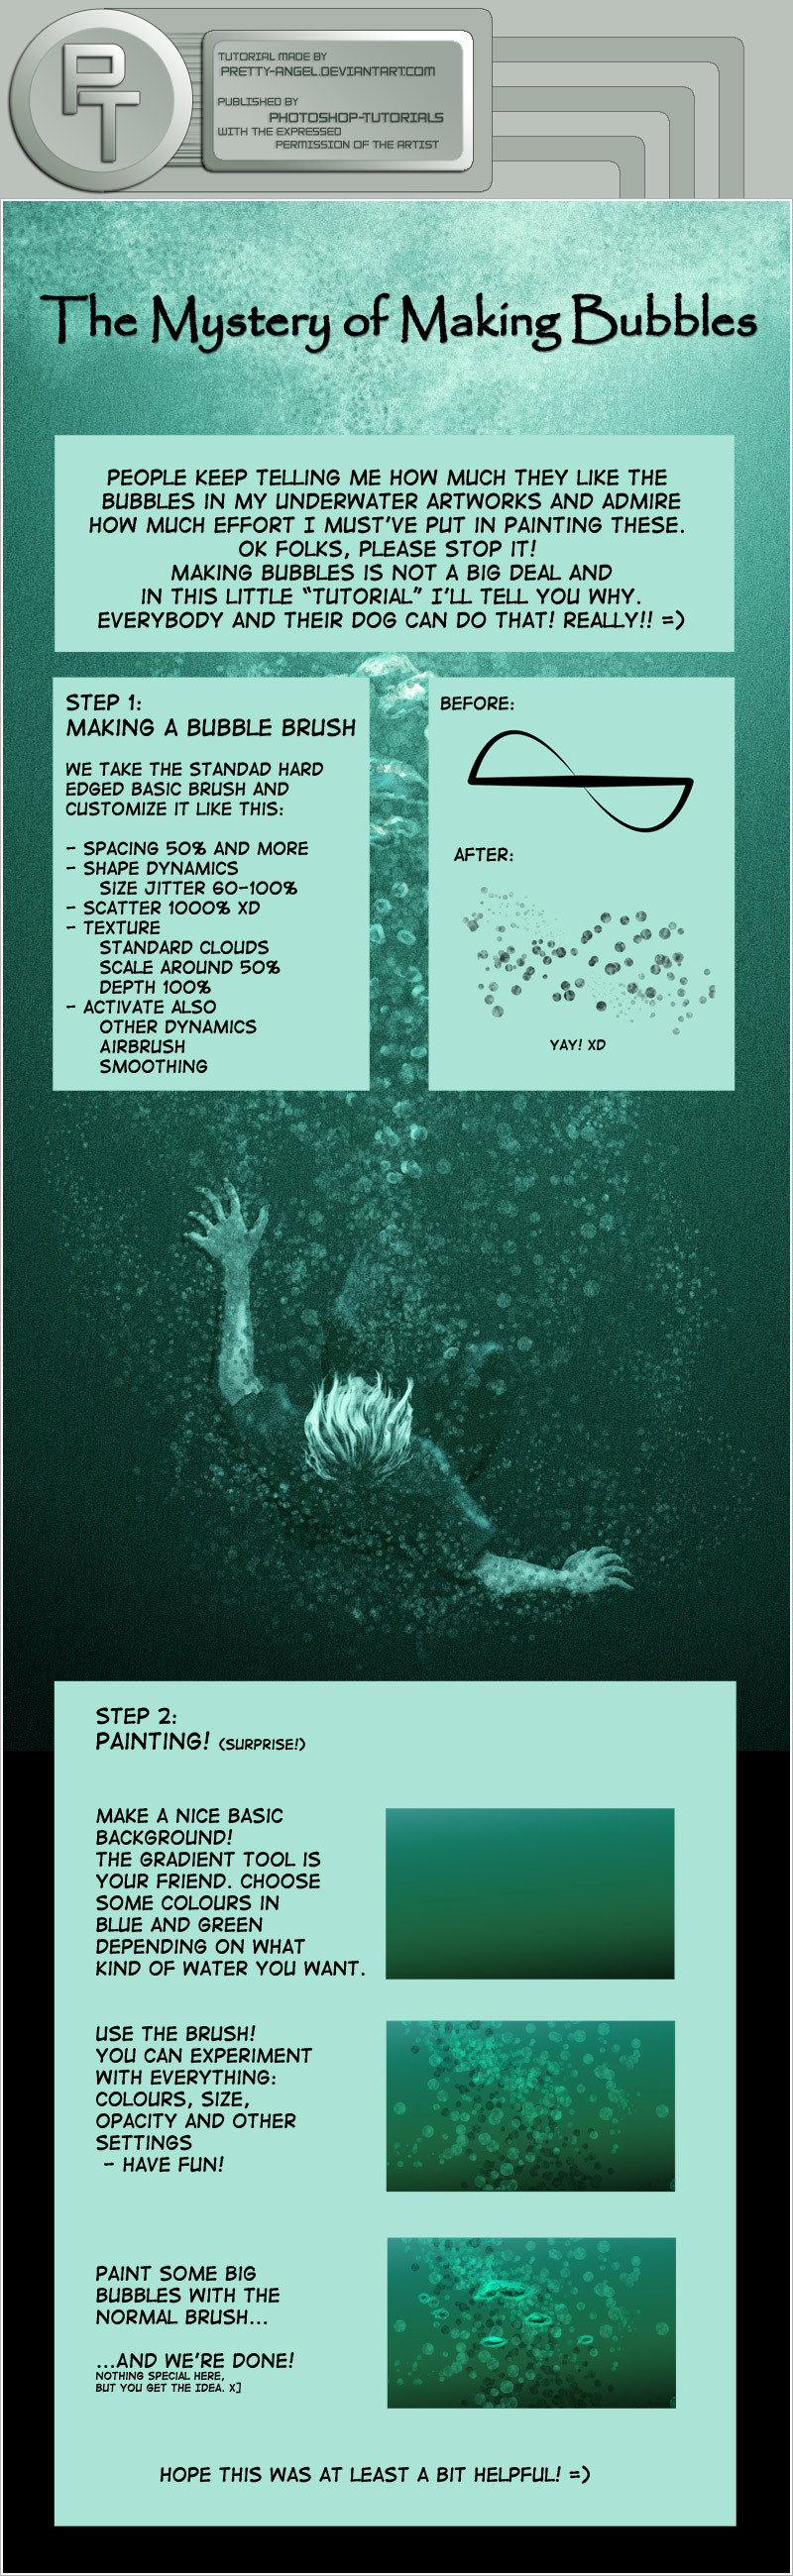
Realistic Underwater Scene
zummerfish —
Realistic Underwater Scene

Published: 2011-03-09 20:45:11 +0000 UTC; Views: 78132; Favourites: 3676; Downloads: 2551
Redirect to original
Description
1Related content


Comments: 411

<3 
👍: 0 ⏩: 1

Congrats on DD!  (Smile)")
👍: 0 ⏩: 1

Wow! this is a wonderful tutorial. your such a great artist!
👍: 0 ⏩: 1
I think ill try this tutorial today after i mow the grassy area so there wont be any grass fire on the fourth.
👍: 0 ⏩: 0


👍: 0 ⏩: 1

thank you sweetey bun
👍: 0 ⏩: 0


Congrats on the DD
Nice tutorial btw~
👍: 0 ⏩: 1

Wow, this is a pretty awesome tutorial ^^ Congrats on the Daily Deviation
I'm pretty happy I found this, it'll be quite useful since I'm working on an underwater scene! Thanks for making such an helpful tutorial
👍: 0 ⏩: 1
thanks and you are welcome :}
👍: 0 ⏩: 1

That is absolutely awesome.
I'll definitely try that out, it looks amazing
👍: 0 ⏩: 1

Thanks youu ")
I have no idea how to make the undersea and you save me
Really good tutorial, some parts I don't understand but it's cause I don't know very good english
I use it here: [link]
👍: 0 ⏩: 1


Thank you, it looks great!!! You really are my saver!
👍: 0 ⏩: 1

illusionedpixels In reply to ??? [2011-06-25 23:48:13 +0000 UTC]
oh, I've been looking for this !!! thanks for sharing
👍: 0 ⏩: 1

I didn't click on this until I realized the title was "Realistic UnderWATER Scene," not "Realistic UnderWEAR Scene." +500FailPoints.
👍: 0 ⏩: 1


where do u find the Perspective/distort?
👍: 0 ⏩: 1
Edit - Transform - Perspective or Edit - Transform - Distort
👍: 0 ⏩: 0

thanks
👍: 0 ⏩: 1

In Step 4, what do you mean by feather? .__. And what do I click on to change it?
👍: 0 ⏩: 1
When you pick selection tool (rectangular in this case), above tool palette there's a menu of its properties (it should be right below main menu, under File, Edit, etc). You might have seen it, as it has 4 different selection modes (shown as overlaying rectangular selections), and next to it you will see a box for feather amount, which will smooth selection out and gradually reduce opacity. The larger is feather amount, the smoother will be opacity transition.
👍: 0 ⏩: 1
I don't have a feather amount box. I have all the overlapping boxes, but not the feather one. I have Photoshop Cs2, if that makes any difference. Is there just a way I could do it without using the feather box?
👍: 0 ⏩: 1
Then try Select - Modify - Feather in the main menu. When it prompts you for radius, enter amount of pixels
👍: 0 ⏩: 0


thank you for this great tut'
love it
I used there (it's really not perfect but it's a first step)
[link]
👍: 0 ⏩: 1
I'm glad it helped you
👍: 0 ⏩: 0

Oooh it's like magic!
Great tutorial, I kinda realise I need to be a bit more open minded with the photoshop tool and should experiment more..
Can't wait to try those things out in a picture!
👍: 0 ⏩: 1
You are welcome  (Wink)")
👍: 0 ⏩: 0

I love this tutorial, it has helped me a lot already!!
Can you please tell me how to apply the gradient onto the noise layer though? Every time I do it, it just goes over the 'sand', and it doesn't color it like it should do. :/
👍: 0 ⏩: 1
You need to use a Gradient Map adjustment layer on top of whole image
Layer - New Adjustment Layer - Gradient map, and pick one from list or make your own.
👍: 0 ⏩: 1
Aha!! I found it, thanks a lot!!
👍: 0 ⏩: 1
you are most welcome
👍: 0 ⏩: 0


Really great tutorial, I used it here : [link]
👍: 0 ⏩: 1
<= Prev | | Next =>