HOME | DD
 zummerfish — Space Effect tut
Published: 2011-08-24 12:55:06 +0000 UTC; Views: 20415; Favourites: 786; Downloads: 2725
Redirect to original
Description
 PLEASE DOWNLOAD. IMAGE IS OVER 20 000 px so fullview doesn't display it properly.
Program: Photoshop CS Extended
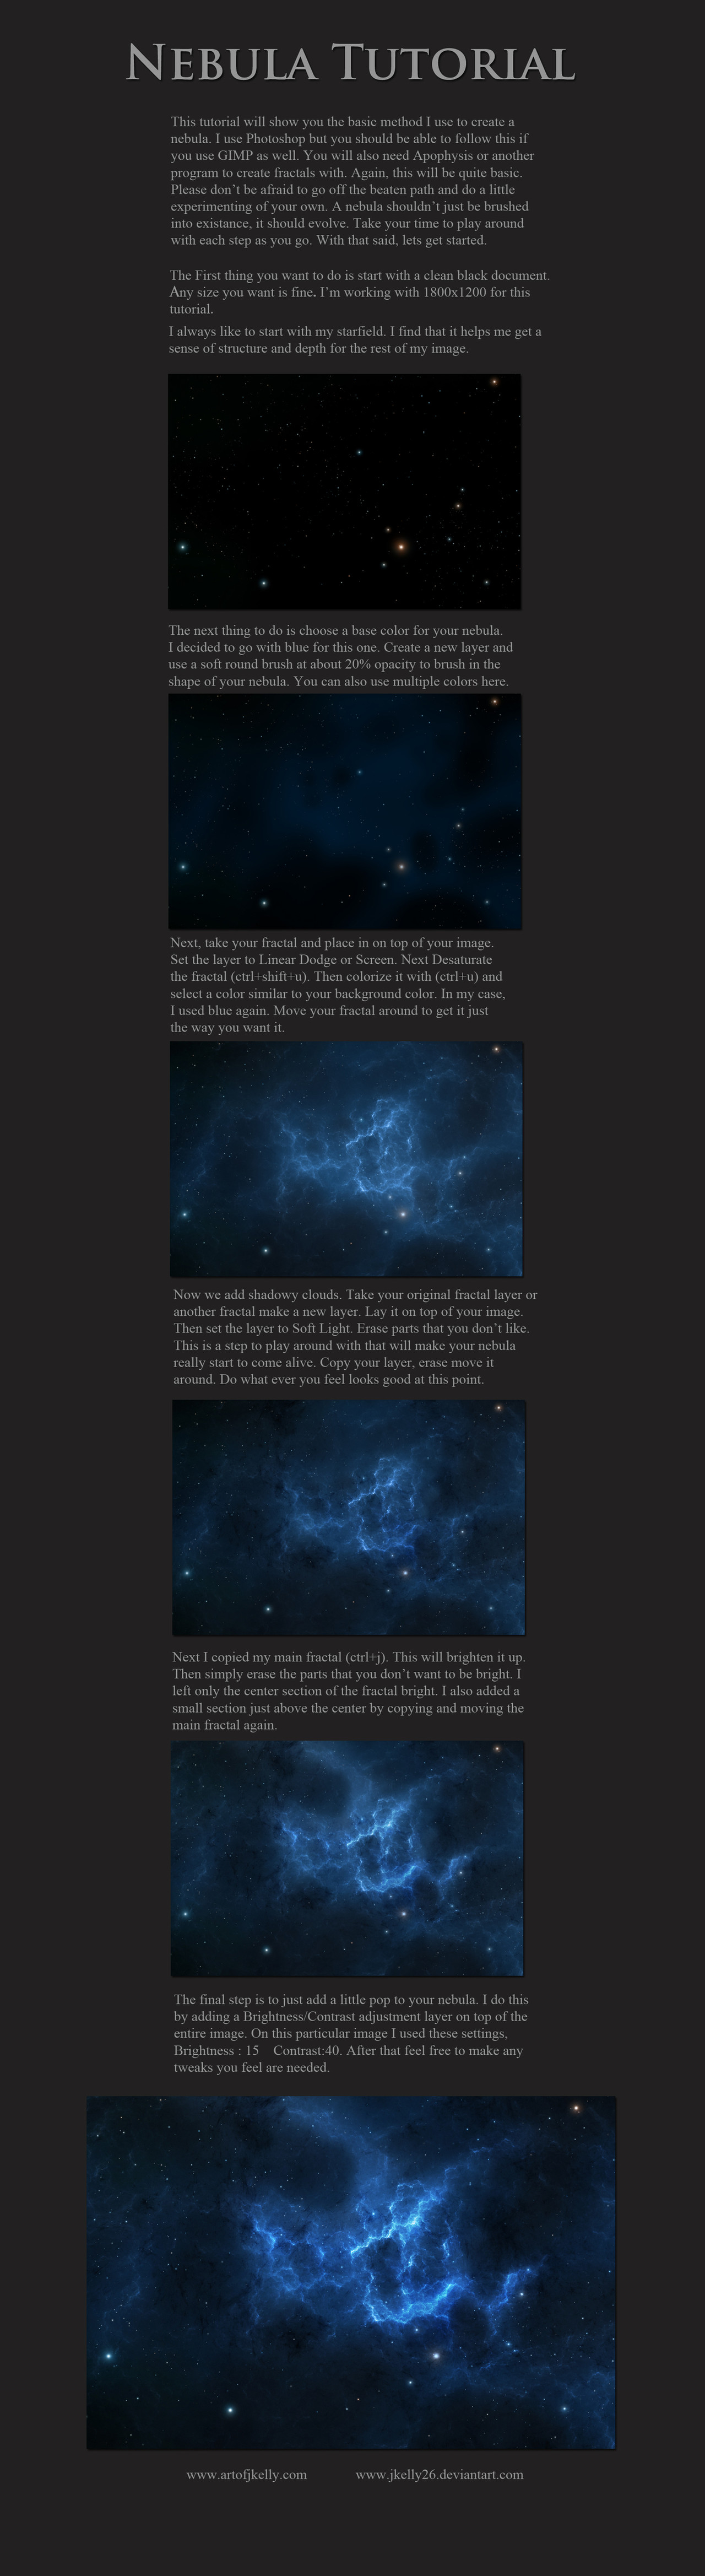
A simple space background effect for those who can't draw very well, made in several steps which require minimum brushing and painting. Please note that all values may vary depending on documents size, colors you choose and personal preference.
 Level: Intermediate as knowledge of Photoshop interface is required
ZIP pack includes FULLSIZED tutorial as well as a sample alternative layered .PSD file.
~~~~~~~~~~~~~~~~~~~~~~~~
Last fx tutorial (I dragged on posting it long enough already >.>). I really need to change tut template sometime *sigh*
Stock thanks to
Check out other tuts here [link]
Related content


Comments: 74

WOW!! It's a really awesome tutorial!! Thank You for Your time and effort

👍: 0 ⏩: 0

This was amazing! Thank you SO much for making this tutorial!
👍: 0 ⏩: 1

you are very welcome, glad it helped
 (Smile)")
👍: 0 ⏩: 0


I wouldn't call this simple, since it took about an hour for me to create a nebula of my own, but it was helpful nevertheless. The end result looked awesome, so thank you for posting!!
👍: 0 ⏩: 0

Thanks for letting us feature this on our group, nice use of the filters!
👍: 0 ⏩: 1
thank you for requesting it
")
👍: 0 ⏩: 0


thank you T_T lets see how it comes out rofl.... i hope i get a beatifull sky
👍: 0 ⏩: 0

& now I can design my own album covers, backgrounds & a freaking lot more...xD LOL thanks a lot for this tutee
👍: 0 ⏩: 1

Wow okay, this was a hell of a lot of work to go through (for me at least) but it helped me a lot. Thanks a bunch!
👍: 0 ⏩: 1

I think Adobe PS is a bit different from the prog you use.. a few tools weren't available to me.. like setting a layer for color dodge for example.. i have less settings to apply to layers... couldnt take snap shots either (No apply image i dont think) and I had trouble generating star feilds specially after all the erroneous substitutions I made along the way.. to say the least my nebula looked like cat puke when i was done.. mb its just me being dumb.. but I think at least some of it is Adobe PS being a little limited.. I thought i remember "Apply Image" in Corel and PhotoImpact 
still very helpful.. learned how to use a bunch of things I never used before thx
👍: 0 ⏩: 1
You probably misunderstood the description then XD There are Photoshop Elements and actual Photoshop. A fully functional Photoshop bears the extension of "CS", so it's put there so people don't confuse it with PS Elements. Of course I'm not using the old program here, very little people use it nowadays, however most of these functions are available in CS versions starting from CS2
👍: 0 ⏩: 1
well, i probably understood the words fine cuz I saw that, just didnt know the difference from experience (or lack of in my case).. so basically I am limited with Adobe Elements.. right? Kinda what i was saying.. still a nice tutorial I know more then i did going in
i used to use photoimpact, but it was a cracked version and i got this adobe with the wacom pad, cant afford to upgrade to fulla and not gonna use crack progs anymore since i have this.. and to be on the up and up too
Id ask how you might substitute "apply image" cuz im pretty sure there is no counterpart in Elements, but no worries, i'll figure it out in time
👍: 0 ⏩: 1
Well you could merge/flatten all the layers, copy the result into clipboard, undo merging/flattening and paste the copied image on a new layer. That's basically another way to do it.
👍: 0 ⏩: 1
im not sure whats up with "flatten image" in this prog.. pbly user error.. everytime i do it, i get a literally flat solid grey layer more or less..
what i did in mine when i was to apply layer.. i copied all layers i was using then merged them... and got my "snapshot".. so as i went along i had several snapshot layers.. problem came when adding star o of the last steps.. cuz they wouldnt show through so i changed opacity in each layer and erased different from each for sum depth then adjusted hue/sat brightness/contrast etc until i got sumn i liked.. and i added stars manually to each layer with dodge tool pin light lens flare and so on
👍: 0 ⏩: 0


 (Wink)")

Thank you for making this great tutorial, I used it to create the background for this: [link]
👍: 0 ⏩: 0


This looks like a very useful tutorial, I might read it over properly at a later date.
👍: 0 ⏩: 0


Interesting! I've never seen plastic wrap used to such great effect.
👍: 0 ⏩: 0


Oh my god. I love drawing space scenes, but this is a really neat way to do it, I think! I might have to try this out sometime!
👍: 0 ⏩: 0

GREAT tutorial! I have a simple way of creating my stars, but this is much more beautiful! 
👍: 0 ⏩: 0
GREAT tutorial! I have a simple way of creating my stars, but this is much more beautiful!
👍: 0 ⏩: 0

that.. is so good.. i wouldnt have thought of that way; very nice
👍: 0 ⏩: 0


thanks! that was most educational! especially the filters!
👍: 0 ⏩: 0


ooooooooooooooohhh shittttttt!!!!! this is awesome!!!
👍: 0 ⏩: 0


| Next =>