HOME | DD
 DraconianRain — Clip Studio Paint Animation Tip Inking and Colour
#clipstudiopaintpro #clipstudiopaintex #clipstudiopaintanimation #clipstudioanimation #clipstudiopaint
Published: 2016-03-21 02:36:01 +0000 UTC; Views: 4257; Favourites: 46; Downloads: 14
Redirect to original
Description
youtu.be/UbmiFbE1XCo HD video version on youtube
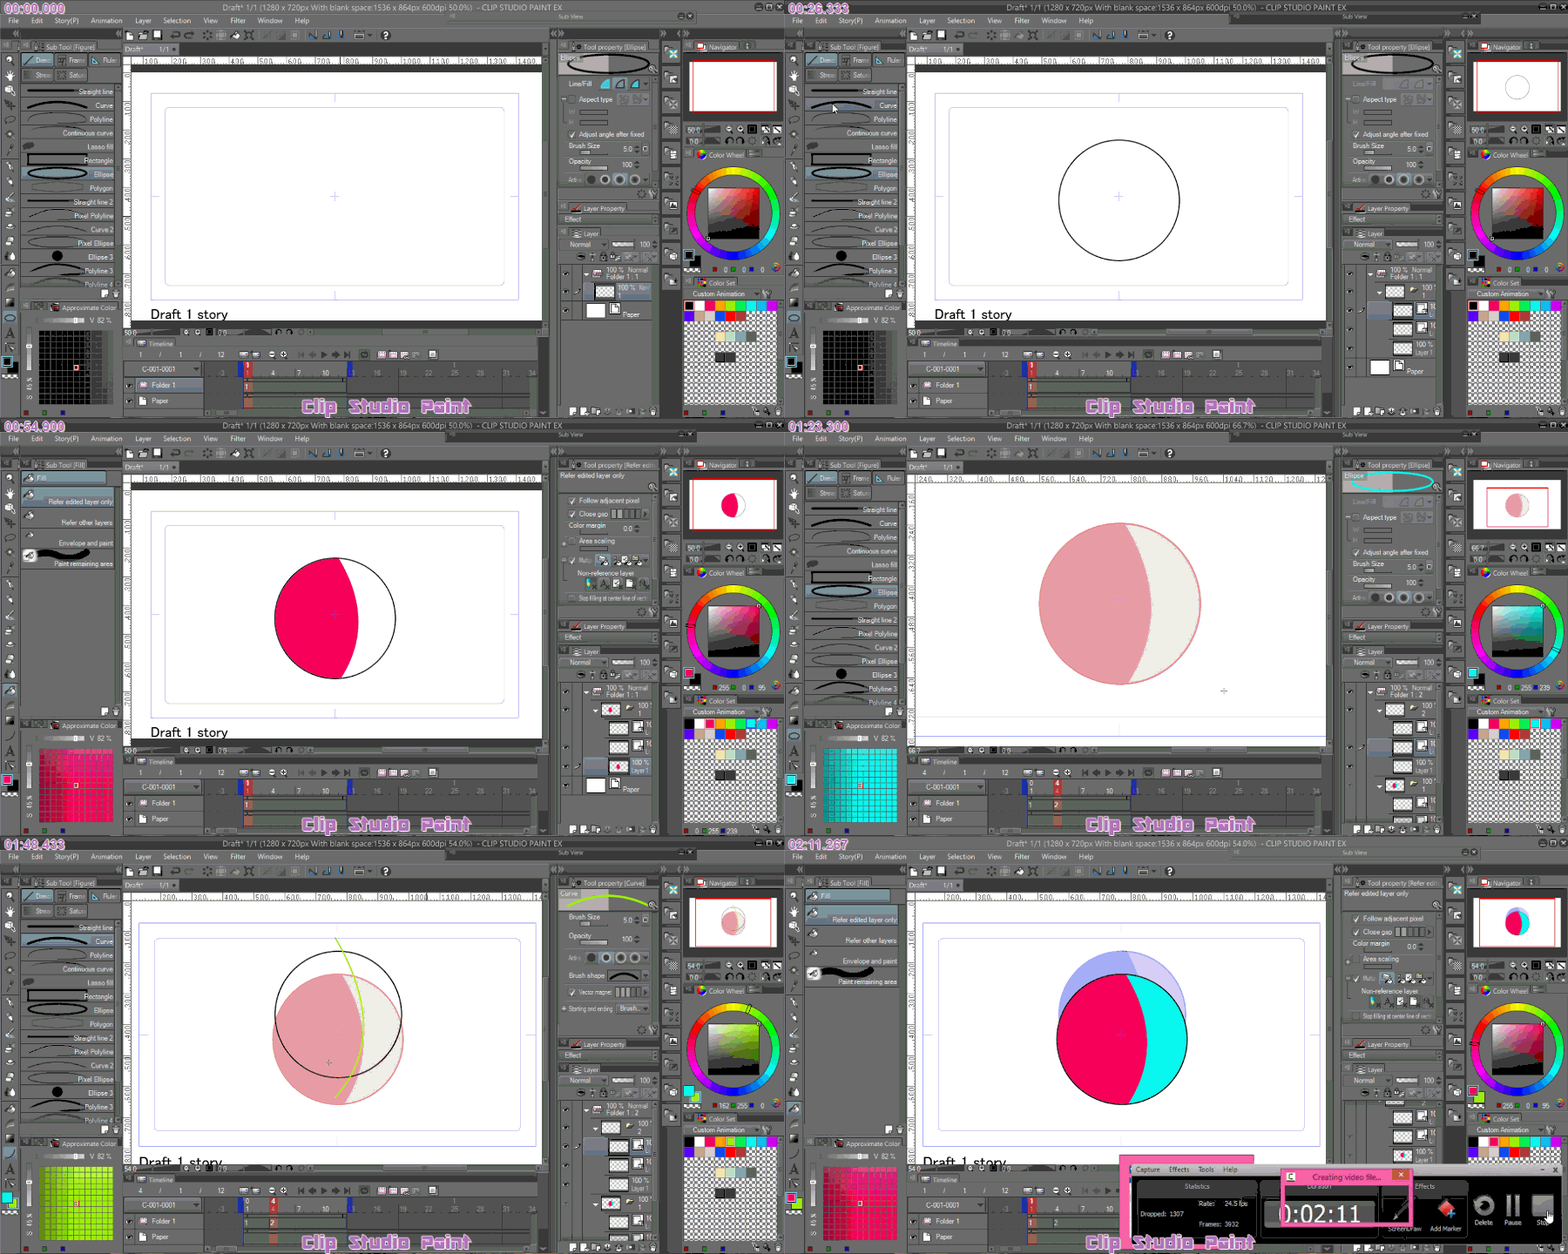
Assuming you already have an animation folder of your sketched out animation draft and you’re ready to move onto inking add a New animation folder above your draft animation folder.
Before you begin, skip back to frame 1 in the timeline.
In your new animation folder delete the first frame. Click on the animation folder and then add a new grouping folder. It will be auto-named to 1 as in frame 1 as it adds itself to the animation folder. If you added it outside the folder, drag and drop it in and name it 1.
Add a raster layer for colouring and two vector layers. One vector layer for inking, the other for shadow and highlight markup.
Ink on the vector layer above the raster layer like in the video. Add animated shadow/highlight markup on the vector layer above your inks.
Go to bucket tool and enable multilayer fill. Enable gap fill and if you need it, area scaling.
Select the bottom raster layer.
Fill in only one side of your animation. Go back and hide the shadow markup on each animation frame then fill in the other side with your other colour.
This is the easiest and bare basics way to ink, colour and shade your animation. Other techniques you could use would be the use of clipping layers and painting them in manually. The onion skin does allow for some shadows to be visible but it’s difficult to tell which is which when you have a lot of frames.
This isn’t the only way to do this, it’s just one method.
If you do not use grouping folders in the animation folder, each frame outside a grouping folder is a single separate frame entity of it’s own meaning it can’t be referred to as a fillable option for the bucket tool.
If you create a grouping folder as your first frame it will auto add a new folder and the same amount of frames for each frame making it quite convenient. Just try to plan your folders in advance so you don't have a whole lot to add later.
Related content
Comments: 6

sorry last question (i know i keep bothering you) but do you have something that explains, when you add a new timeline, what the frame rate, playback time, scene number, etc. mean? And also what are the settings you use? Does EX export gifs? and umm.. what does timeline even mean?
if theres a link on the csp website thatd be great.. sorry im such a bother OTL
👍: 0 ⏩: 1

You're not a bother at all!! As long as people are polite I don't mind answering lots of questions.
I'm going to be fairly blunt in my replies, I don't want to come off rude but I don't want to give you a super long winded reply but it might turn that way. Also if you have skype you're more than welcome to add me and ask questions there whenever you need it.
1.) Frame rate is the frames per second. This means how many frames also known as cels in clip are played per 1 second. 24fps is the standard for TV, 32 for disney grade movies back in the days of hand drawn. Youtube videos are frequently only 12 and 15fps. Sometimes less frames drops quality but so does over doing frames.
2.) Timeline is a timeline. I know that sounds like a stupid answer. But the timeline is the timeline of your animation from start to finish. You plot out your animation scene along the timeline. Your frames per second will effect your over all timing and playback greatly.
3.) Scene Number is an interesting one. With large scale animations (since in EX it's aimed at studios as well) are used to break up an episode. Think of them as chapters in a story. Scene 1 is like Chapter 1. It's breaks up the main story of the episode as a whole. It also lessens the strain on your system as well as lessens the work load during compositing. Smaller sections are much easier to manage.
4.) Could you be a little more specific with etc 
5.) Yes it exports gifs png sequences and jpeg sequences for outside compilation or compositing. It also exports AVI video files though I think uncompressed.
As far as a link to all this info as far as I know, it's not well translated just yet but it will be.
👍: 0 ⏩: 2

oh also in the playback time, theres 4 options:
- frame number starting from 1
- frame number starting from 0
- seconds + frame
- time code
what's that all about..?
👍: 0 ⏩: 1

That's how you want it displayed so you can pay attention to specifically the frame rate. Playing the frame from the very first frame or frame 0 which is blank. I don't know why some animators like to but apparently it has it's pro's and cons. I play from frame 0.
Seconds and frames displays the frame number plus the seconds it's taking. So if 24 frames = 1 second of animation and I playback 134 frames. I will have 2.04 ish seconds of animation. Also say it's playing back very slowly because I Lowered the framerate to 8fps. I can spot the mistake pause and take note of the frame number go back and fix, add or remove. This is a really important feature during drafting and adjusting animation time/speed.
Time code is just a time code. It's an extrememly accurate timing. Like 00:00:00 just as you might see in after effects. Sometimes down to a split second depending on your needs. I don't know how far clips time code measures.
It all revolves around timing and the speed of your animations playback. Depending on what you use will depend on how it aids you in making edits and adjustments.
👍: 0 ⏩: 0

1. etc: cut number and division line
2. so in EX do the scenes divide itself on one timeline? i still dont quite understand its purpose on csp
3. lol i dont mind the bluntness, this is very informative thanks again! what's your skype, if i might ask?
👍: 0 ⏩: 1

1.) Cut number I assume is where it's cut at the scene. The manual doesn't explain it well. I've been using it like that. You can basically chop up your timeline and it's good to number it. Division line is just that, it's where the animation is divided for whatever purpose at the time. It's best to try and use it to understand it better.
2.) It divides itself more like book and page style, just like if you were making a manga because like I said, you just need to think of scenes as chapters in a story. Like a scene is a chapter, the whole book is like a whole episode and the scenes are easier to manage and edit if your animation is in segments like that. You'll get use to it if you start making huge stories. But for now I doubt you will use it much.
3. That's good. Some people feel I'm being mean or aggressive. I don't mean to be. I just tend to ramble and try to keep tutorial stuff as clear as possible. Also I'm glad to hear it. My username should either be TheDraconianRain or DraconianRain. Please mention your DA name when you send the invite so I know it's you. I actually get a lot of spamers.
👍: 0 ⏩: 0


