HOME | DD
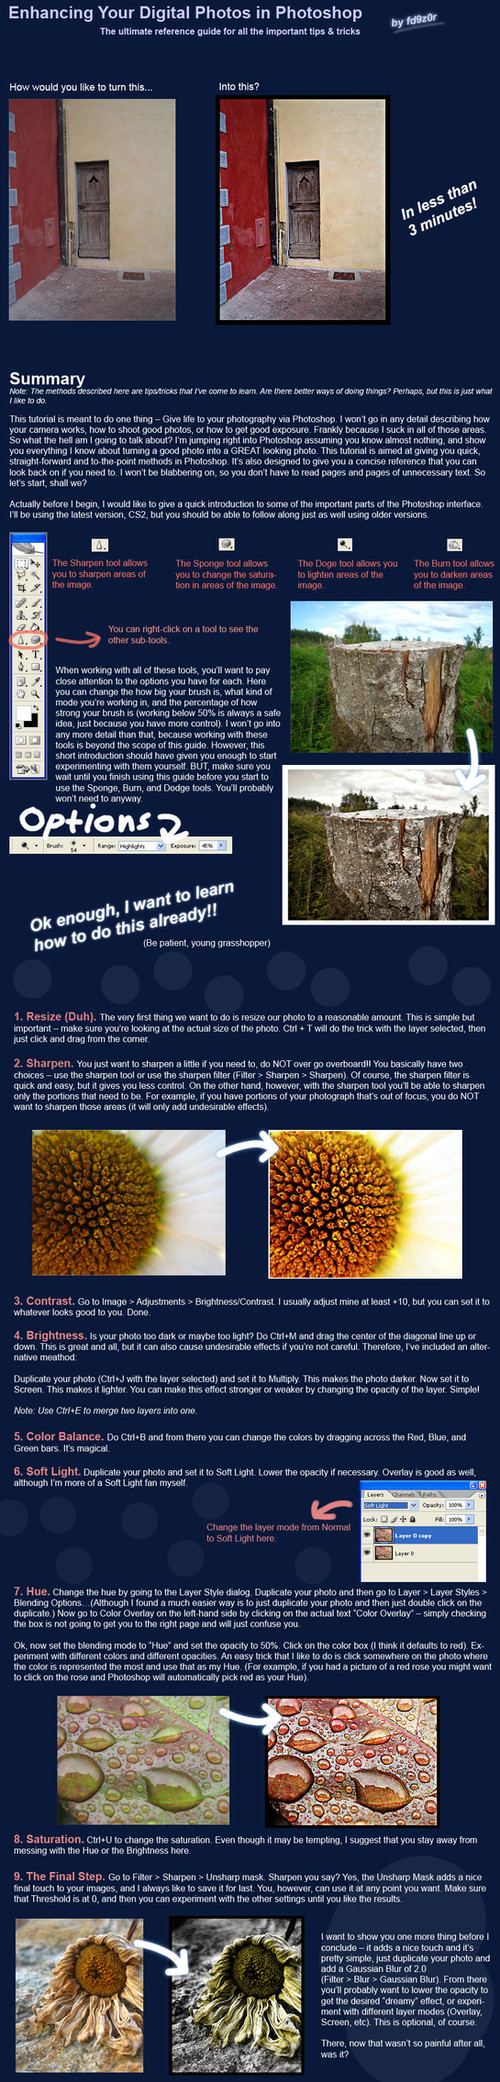
 fd9z0r — Enhancing Your Digital Photos
Published: 2005-07-17 21:00:15 +0000 UTC; Views: 16167; Favourites: 417; Downloads: 5233
Redirect to original
Description
Guaranteed to work, or your money back.Related content


Comments: 114


damn dude this is awesome, will use it next time i make a new photograph
 (Smile)")

👍: 0 ⏩: 0


GREAAAAAAAAAAAAAAAT! I was looking for a similar tutorial for a looooooooooong time! Thank Youuu!
👍: 0 ⏩: 0


No, really, this was ASTONISHING.. I knew these things already, but you drew my attention to more little and important things. thanks alot MAN!
👍: 0 ⏩: 0

very well absolutely adore it !
just tested it
my item looks great
")
👍: 0 ⏩: 0

Good tutorial, i use a lot of these techniques as well.
The only thing where i dont agree is the resizing at
the beginning. I always work on full res., when i am
done i save it for printing and the final step before
putting a frame on it for dA photos is downsizing and
sharpening with a very small USM again.
Nevermind, a million people a million ways.
.:.
 (Wink)")
👍: 0 ⏩: 0


FINALLY...Someone who actually shows what things do in different pics. My friends and family tried to show me, but they never showed the advantages to using the individual tools.
👍: 0 ⏩: 0


For what version of PS will this be useful? I have version 7.0
thanks!
👍: 0 ⏩: 0

This is a great tutorial.. I'll definitely come back to it when It's time to enhance my photos
👍: 0 ⏩: 0


thanks, I've been working with photoshop for quite some time, but this tutorial was quite educational
👍: 0 ⏩: 1

Oh, and the first picture in your example has a bad angle for the distortion, should be rotated CW, or free transform it to correct the distortion of wideangle. But if you cropped it from bigger, do it on that one.
👍: 0 ⏩: 1

You mean the picture of the door?
👍: 0 ⏩: 1
I'm not sure I understand what you mean.
")
👍: 0 ⏩: 0
My 2 (this time 3) cents:
-Resize should be 2nd to last thing to do. All adjustments you make in PS increase noise in the picture and resize helps to get rid of them. So don't resize it too early.
-Why sharpen after resize, and unsharp mask at the end? Unsharp mask is an adjustable form of sharpening. Knowing this, sharpening at the start is not only not necessary, but a bad choice.
-I preferr levels to brightness.
👍: 0 ⏩: 1
- The reason I like to resize early is because then I can see the the adjustments I'm making on the actual size of the photo and not something that I'm viewing at, say, 25%. It's aslo simply because it's easier to work with. To remove noise, I usually use a program that automatically removes it from the picture.
- Sharpen after resize again because its easier to work with, and I see exactly how sharp it's going to be in the final picture. I like to use a combination of the sharpening tool and the unsharp mask, because I find the unsharp mask does not sharpen it quite enough in some instances (like I said in the tutorial, you don't have to do it this way). Most recently though I've been finding it better to use the unsharp mask first, and sharpen tool very last.
👍: 0 ⏩: 0

nice tutorial with all the basic functions of ps you can use to enhance a photo
keep it up
👍: 0 ⏩: 0

a very nice and helpful tutorial with tips that even the experienced photoshopper might take of interest!
-teski, sweden

👍: 0 ⏩: 0

great tutorial, although i'm already aware of all of the stuff you mentioned, i'm sure it'll be immensely useful for people just getting into the photo touchups ")
👍: 0 ⏩: 1
the link you provided looks very, very interesting ... I am going to give it a shot especially since it is free
👍: 0 ⏩: 0

Great tutorial. I'll definitely be keeping this in mind the next time I edit my photos.
👍: 0 ⏩: 0


I discovered this effect a few months ago:
Duplicate your chosen layer and set it to overlay.
Apply a diffuse filter (Filter > Stylize > Diffuse) and set the radio button to Anistrophic.
This works extremely well in photos where there are natural curves, it eccentuates them and gives it an old-style fantasy effect.
Fur, hair and clouds are perfect examples, photos with sharp lines and sinuous shapes won't have much effect.
Make sure you're working with a small image, a diffuse filter won't look any different after being applied to an A3 sized document.
You can see a prime example of how well this effect works on this deviation.
👍: 0 ⏩: 1

Nice that your sharing this info... most people think the images come out of the camera looking this way...but as most will find out...editing can be your best friend...and sometimes your worst nightmare! Great article
👍: 0 ⏩: 0

really a great tute. easy for beginners and experts
powerfull!
thanx by all
-v
👍: 0 ⏩: 0

Wonderful tutorial - I never upload anything non-computer generated (be it a sketch, photo, print) without first ringing it through photoshop. Another tool that is *incredibly* helpful (especially for people who want to get results really fast) is the "Levels" tool, in the "Adjust" menu. Anyway, I enjoyed learning a few more tricks to add to my routine!
👍: 0 ⏩: 0

What's OC, besides being a series on TV?
👍: 0 ⏩: 1

Open Canvas. I use that program often, but I NEVER see any tutorials on it. Out of the two, I enjoy OC more than PS.
👍: 0 ⏩: 1
Feel free to write a tutorial for OC ... I would be interested in seeing one
👍: 0 ⏩: 1
Lol, maybe once I learn everything about it, I will. XD I never thought anyone would be interested in what _I_ do, so this is definitely new to me. Sure my friends love my work, but I can't say I've ever gotten many requests at all.
👍: 0 ⏩: 0

Oh snap!
Thanks to you, I've discovered color balance.
Mannnn it is helpful!
👍: 0 ⏩: 1

Heh, I know all of this already, but an awesomely useful tutorial nonetheless.

👍: 0 ⏩: 0

cool tutorial going to help me in a big way once you do this does it count as photo manipulation
like when your making it a devation does it have to go into Photomanipulation section ?
👍: 0 ⏩: 1
No, I believe not. Photo manip is different.
👍: 0 ⏩: 0

Great tutorial, I'll definitely refer to this next time i'm photoshopping my photos!
Thanks man!


👍: 0 ⏩: 0

Yeseree, some I just haven't submitted to my gallary yet.
👍: 0 ⏩: 1
| Next =>