HOME | DD
 fd9z0r — Enhancing Your Digital Photos
Published: 2005-07-17 21:00:15 +0000 UTC; Views: 16167; Favourites: 417; Downloads: 5233
Redirect to original
Description
Guaranteed to work, or your money back.Related content


Comments: 114


Really nice tricks
But I would rather use adjustment layers for most of the things you've shown (I know you used PS CS2, and I'm not sure in what version Adobe first introduced adjustment layers, but anyway.) I'm working in CS4, but the things I'll talk about also works fine in CS3:
All the tricks where you copy the background layer, that duplicated layer can be switched for one of the contrast-changing adjustment layers (Brightness/Contrast, Curves and Levels). If no changes are made to these layers and you set the blend mode to whatever you want, the effect would be the same as if you had a copy of the background layer set to any blend mode. But there's no pixels on a adjustment layer, so it takes almost no space at you hard disk.
The effect with the burn and dodge tools can easily be created with a curves adjustment layer that is masked with a layer mask. Make any contrast adjustment that you think looks good in the area you want to affect, then fill the layer mask with black. Use the brush tool set to white and paint over the area you want to affect (make sure you're painting inside the layer mask!), and don't forget to use the Fade command (Ctrl+Alt+F) to get different shades of gray and thereby different opacity settings for the effect. Piece of cake.
Using adjustment layers gives you the great freedom of going back and tweak the adjustments after that they are applied and after the image is saved (with it's layers.) So there's no need to go back in the history palette and erasing steps that you did after you applied the effect you want to change.
Sharpening is generally adviced to be the last thing you apply to an image, and that you don't save your original image file with sharpening applied, because sharpening is very tricky to undo if you would change your mind about it in the future.
This is some alternative ways of doing it but still obtain the same result.
And I must say learnt some useful tricks from this tutorial and I appriciate it alot.
Thanks!
👍: 0 ⏩: 0

Amazing tutorial! Thanks so much for making it!
👍: 0 ⏩: 0


Nice!! I already knew some of this tricks, but it is always nice to read tutorials like this one, cause there is always something else to learn  (Wink)")
👍: 0 ⏩: 0

")
👍: 0 ⏩: 0

Wow, that was amazingle helpful. I had no idea how to do any of that. Thanks!
👍: 0 ⏩: 1
that's supposed to say "amazingly"
👍: 0 ⏩: 0

We have Photoshop at school lol
I'll use that.
Thanx for the tutorial!!
👍: 0 ⏩: 0


Thank you so much. It makes things so much simpler.... I will now take those other tools in consideration.

👍: 0 ⏩: 0


Thank you for this.
I really don't know how to use photoshop and am new to deviantart.
👍: 0 ⏩: 0


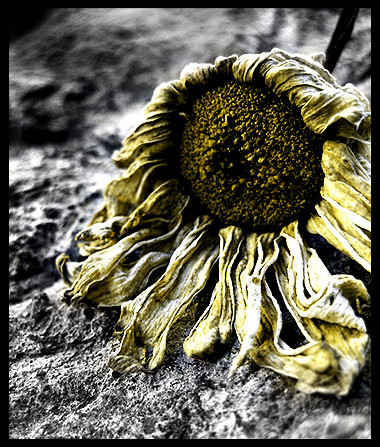
This is a great tutorial! Straight-forward and to the point without being "over your head"! Great job! Thanks for sharing your tricks! Also, I love that last photo of the dying flower!
👍: 0 ⏩: 0

good tips, i know some though but it's really helpful and handy how you compiled them

👍: 0 ⏩: 0

Looks very helpfull, next thing is to buy photoshop
👍: 0 ⏩: 0

Awesome tutorial. Everything works quite nicely except for the sharpen tool, when I go over an area I get wierd dots, I am at 26% strength, any advice?
I'm also using PS:CS2
👍: 0 ⏩: 0


I don't have photoshop, but I'm sure I could figure out how to do this with GIMP.
Awesome tut!
👍: 0 ⏩: 0


Wow...this has really helped me. Thanks so much for making this *huggles* XoX
👍: 0 ⏩: 0

Lovely tutorial, I'll have to try it out just for fun some time ;D
👍: 0 ⏩: 0

Hey, may I ask how do u do the final picture in that tutorial? (one with b/w bg and coloured flower)
👍: 0 ⏩: 0


I've actually been looking for a tutorial like this for some time now.
👍: 0 ⏩: 0


Thanks for these tutorials you put out..!!!.


👍: 0 ⏩: 0

Great. I'm gonna fav this so I can find it again. I dont have Photoshop yet... Still find it to expensive.... But when I do, I'll be sure to try this out!
👍: 0 ⏩: 0

Amazing tutorial! Defiantly one to keep in mind!
Thanks for sharing  (Smile)")
- Katie
👍: 0 ⏩: 0


👍: 0 ⏩: 0

Nice tutorial ! I think only a line or two on the colours balance (shadows, midtones, highlights) but overall nice shit! i will use your sharpen tips for some style really appeciated to tak a look on that kind of document !
👍: 0 ⏩: 0


wel as a beginer in PS this sounds like something really worth learning..Thnx
👍: 0 ⏩: 0

This is a great tutorial, Im gonna go mess with my photos now!
👍: 0 ⏩: 0

This is awesome 
👍: 0 ⏩: 0


| Next =>