HOME | DD
 GriswaldTerrastone — Perspective Tutorial: 1VP 8

Published: 2010-10-06 22:56:23 +0000 UTC; Views: 8230; Favourites: 64; Downloads: 240
Redirect to original
Description
Whoa- this certainly looks fancy, and if I had to try it back in 1986- or even 1987- it would have been intimidating!Unless you keep those laws of perspective, and use that single vanishing point. It's true- this is the same as the previous images here, except it has more of the same.
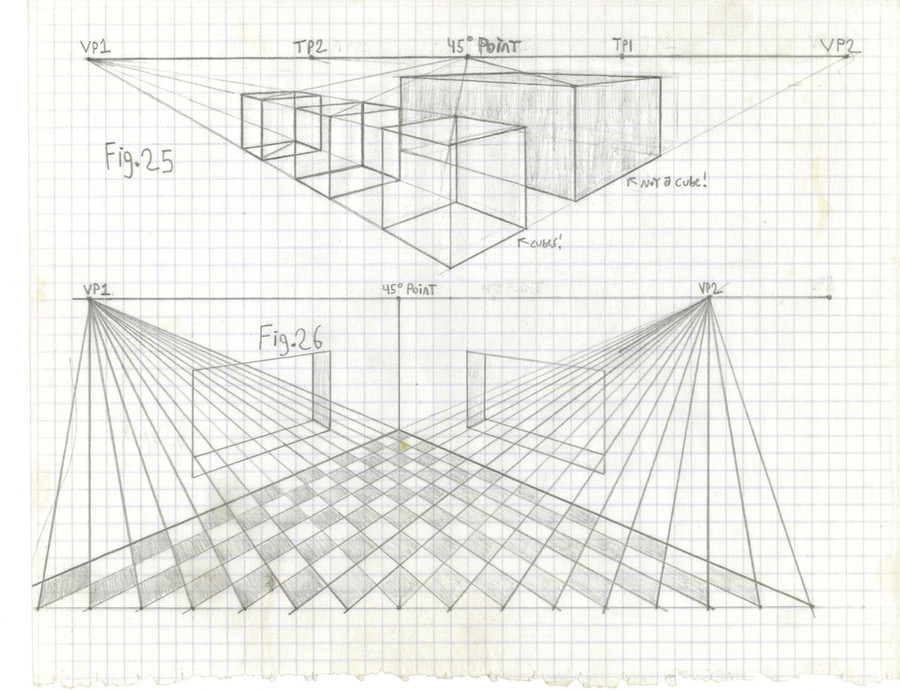
First, this is actually a variation of the rectangular corridor- the one with the center vanishing point. The most obvious difference is the peaked roof; this is a pentagon. If you look at the "X" for the side walls, you can see this.
The peaked roof was done merely by drawing in two raised lines instead of a straight horizontal line. Just make sure they start from the ends of the vertical lines and meet in the same place in the vertical line drawn from the vanishing point. It'll work automatically.
The checkered floor was done the same way as before, except I drew the horizontal lines where they were from the first corridor picture- I did not bother to measure angles this time (you can, if you'd like, but then this should be done before drawing the roof in). Do not fill this in yet, though.
The transparent block on the left side was done similar to the walls from the checkered floor picture.
The doorway on the right? Same as before.
HOWEVER...
The most significant difference here are the supports. These help give a real 3-D look to this corridor.
They can be tricky!
But not as much if you look this over, and take it one step at a time.
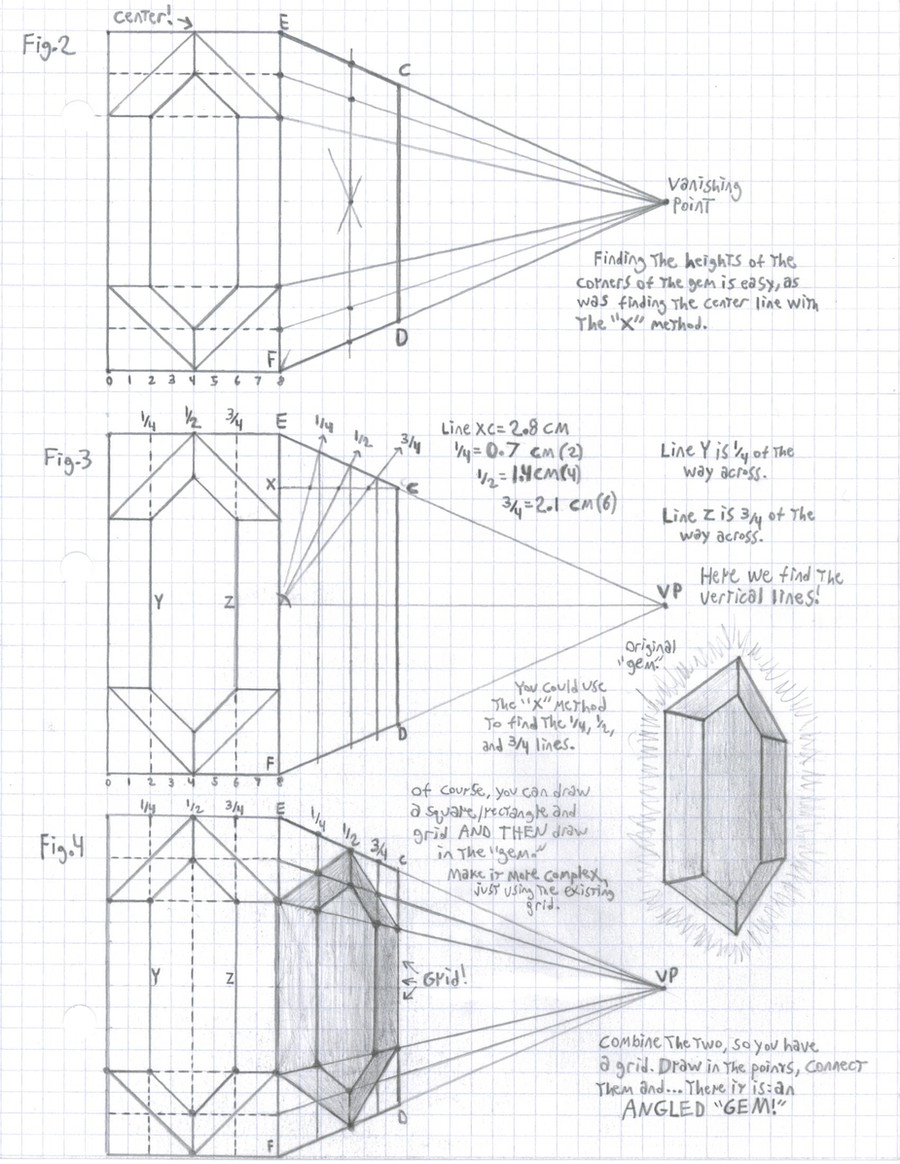
First, draw lines parallel to the big pentagon here on all sides except for the floor- I deliberately left crossed lines there, but once finished, you can erase them. You should have the big pentagon, and a smaller one without the bottom line, neatly aligned with with the big one. This is the side of the support facing you.
Now- lightly draw in the "inside" of the support, making it as thick as you want. Start at the sides connected to the floor. With a straightedge, line up the end of the vertical line of that inner, bottomless pentagon with the vanishing point, and connect that point to the the line next to it, the faint line you just drew. THIS is where the support meets the floor there, and you can see that that diagonal line DOES NOT line up with the one where the floor meets with the wall. This is vital for the 3-D effect.
Do the same for the other side.
Now, draw in another bottomless pentagon, making sure its lines are parallel to the other two pentagons, as shown. With small lines, connect the corners of the smallest pentagon to the corners of the middle one.
There you have it. Try it a few times, and it'll become easy enough!
On the ceiling, on the right, there is a skylight. You can see where lines from the vanishing point were used; and the far side and near side are merely lines parallel to the supports. But for the thickness, I drew two short perpendicular lines from the support, and merely drew in lines parallel to the inside of the skylight.
The rectangular block on the left side is similar, but I pushed it up against the support.
Important tip!- On the support next to the door, to its right, I drew in a faint line in the support; look at the arrows. This is to warn you about a common mistake: when deciding how much space to put on either side of the door, you must know how far it is from the part of the support that TOUCHES THE WALL ON THE DOOR SIDE. This cannot be seen because the support here is not transparent. So keep that small distance in mind, or the it may look a bit "off."
Well, that's it for now, fellow DA artists and guests. You've been given a quick look at the places the Single Vanishing Point can take you, but there's even more! This will be covered in "Subjective/Objective Viewpoints," but that's a different topic.
There are places the SVP cannot take you, though- like drawing a cube at an angle, or a mack truck. Something's missing...
And that will be for the SECOND AND THIRD vanishing points! See you there!
Hope this helped...
Related content


Comments: 2

i understand perspective but it was interesting to read through your stages...its really insightful...
")
👍: 0 ⏩: 1

The next part involves the two- and even three!- vanishing point methods (there are up to six, but the most I can even understand is three, and a little of four). It was ready before, but I had to scrap it...because my style advanced during that time.
It was, as of that moment, outdated!
As a result, the new one is much clearer and more informative. That very night, I was able to do draw a "towering temple" much better than even a week before.
It was at once thrilling and weird, because this has happened only twice before.
The first time was in 1986. This was when it all started "coming together" with a notebook sketch of Petra the Librarian in the theater hall of Dutchess Community College.
The second time occurred after the dark years, mainly from late 1988 through 1993, when my style devolved. It was probably 1997, with a picture that started to return to the old style, but with better angles and the "outline in colored pen" method. I'll upload that one very soon.
Now- it has happened again! And since it is a base technique, it can be applied to many things, in any of the four basic styles!
It was largely because of the tutorial, which in turn was inspired by the folks here at DA. Interacting with other artists absolutely has a synergistic effect.
When did your "big breakthrough" happen?
👍: 0 ⏩: 0