HOME | DD
 Kyttias — SAI Tutorial - Seven Steps to Faster Coloring
#coloring #guide #sai #tutorial #painttoolsai
Published: 2015-12-10 08:47:36 +0000 UTC; Views: 33109; Favourites: 296; Downloads: 133
Redirect to original
Description
Below is an exact transcript of the above.
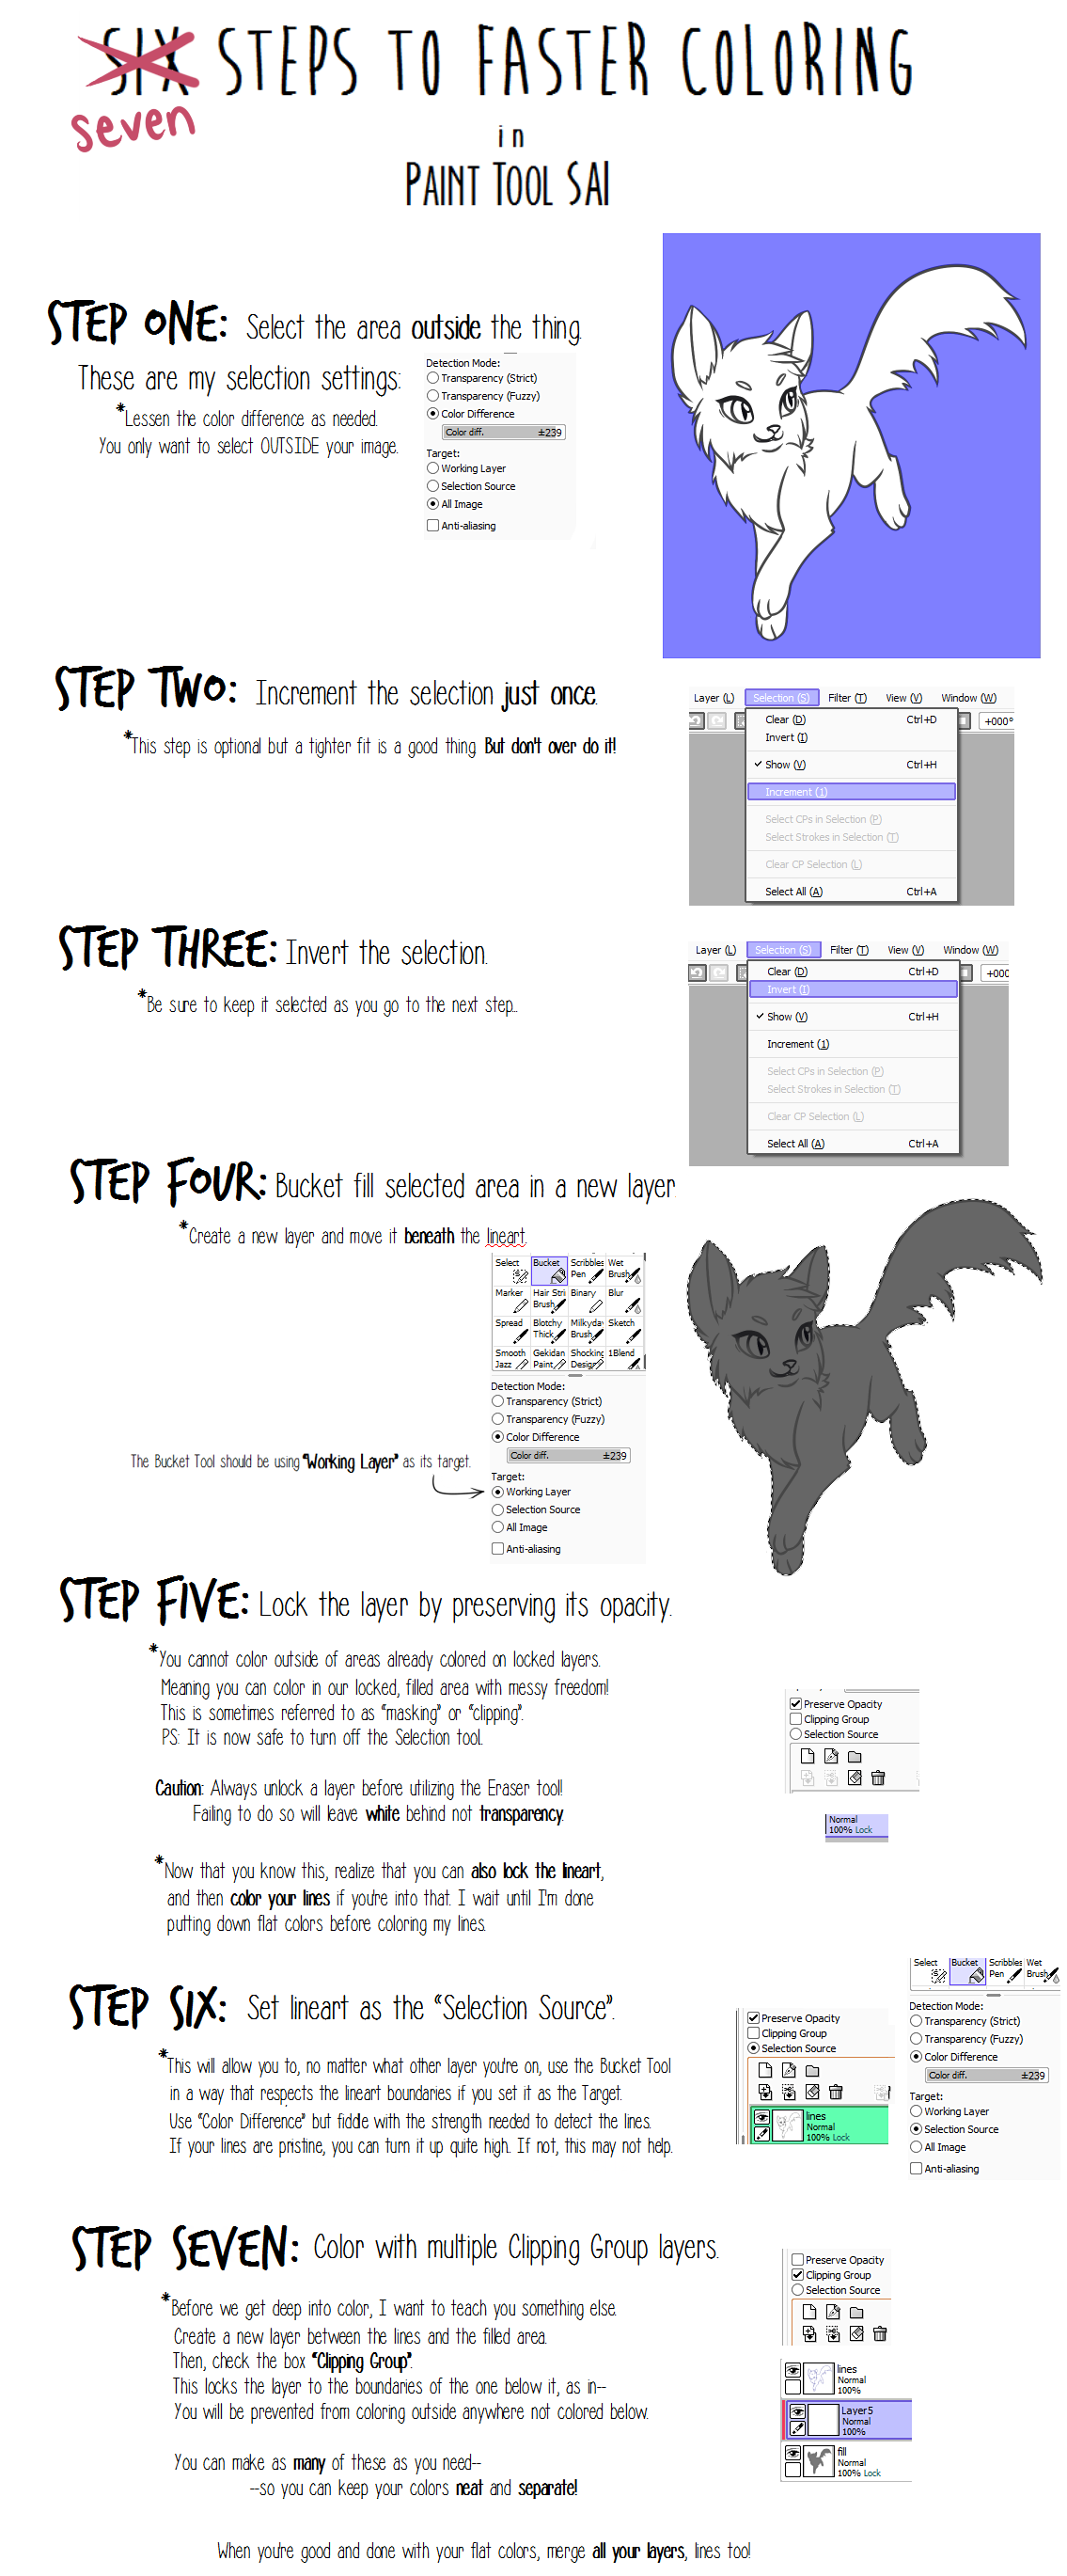
Six Seven Steps to Faster Coloring
in
Paint Tool SAI
Step One: Select the area outside the thing.
These are my selection settings:
*Lessen the color difference as needed.
You only want to select OUTSIDE your image.
Step TWO: Increment the selection just once.
*This step is optional but a tighter fit is a good thing. But don't over do it!
Step Three: Invert the selection.
*Be sure to keep it selected as you go to the next step...
Step Four: Bucket fill selected area in a new layer.
*Create a new layer and move it beneath the lineart.
The Bucket Tool should be using “Working Layer” as its target.
Step Five: Lock the layer by preserving its opacity.
*You cannot color outside of areas already colored on locked layers.
Meaning you can color in our locked, filled area with messy freedom!
This is sometimes referred to as “masking” or “clipping”.
PS: It is now safe to turn off the Selection tool..
Caution: Always unlock a layer before utilizing the Eraser tool!
Failing to do so will leave white behind not transparency.
*Now that you know this, realize that you can also lock the lineart,
and then color your lines if you're into that. I wait until I'm done
putting down flat colors before coloring my lines.
*This will allow you to, no matter what other layer you're on, use the Bucket Tool
in a way that respects the lineart boundaries if you set it as the Target.
Use “Color Difference” but fiddle with the strength needed to detect the lines.
If your lines are pristine, you can turn it up quite high.. If not, this may not help.
Step Seven: Color with multiple Clipping Group layers.
*Before we get deep into color, I want to teach you something else.
Create a new layer between the lines and the filled area.
Then, check the box “Clipping Group”.
This locks the layer to the boundaries of the one below it, as in--
You will be prevented from coloring outside anywhere not colored below.
You can make as many of these as you need--
--so you can keep your colors neat and separate!
When you're good and done with your flat colors, merge all your layers, lines too!
-
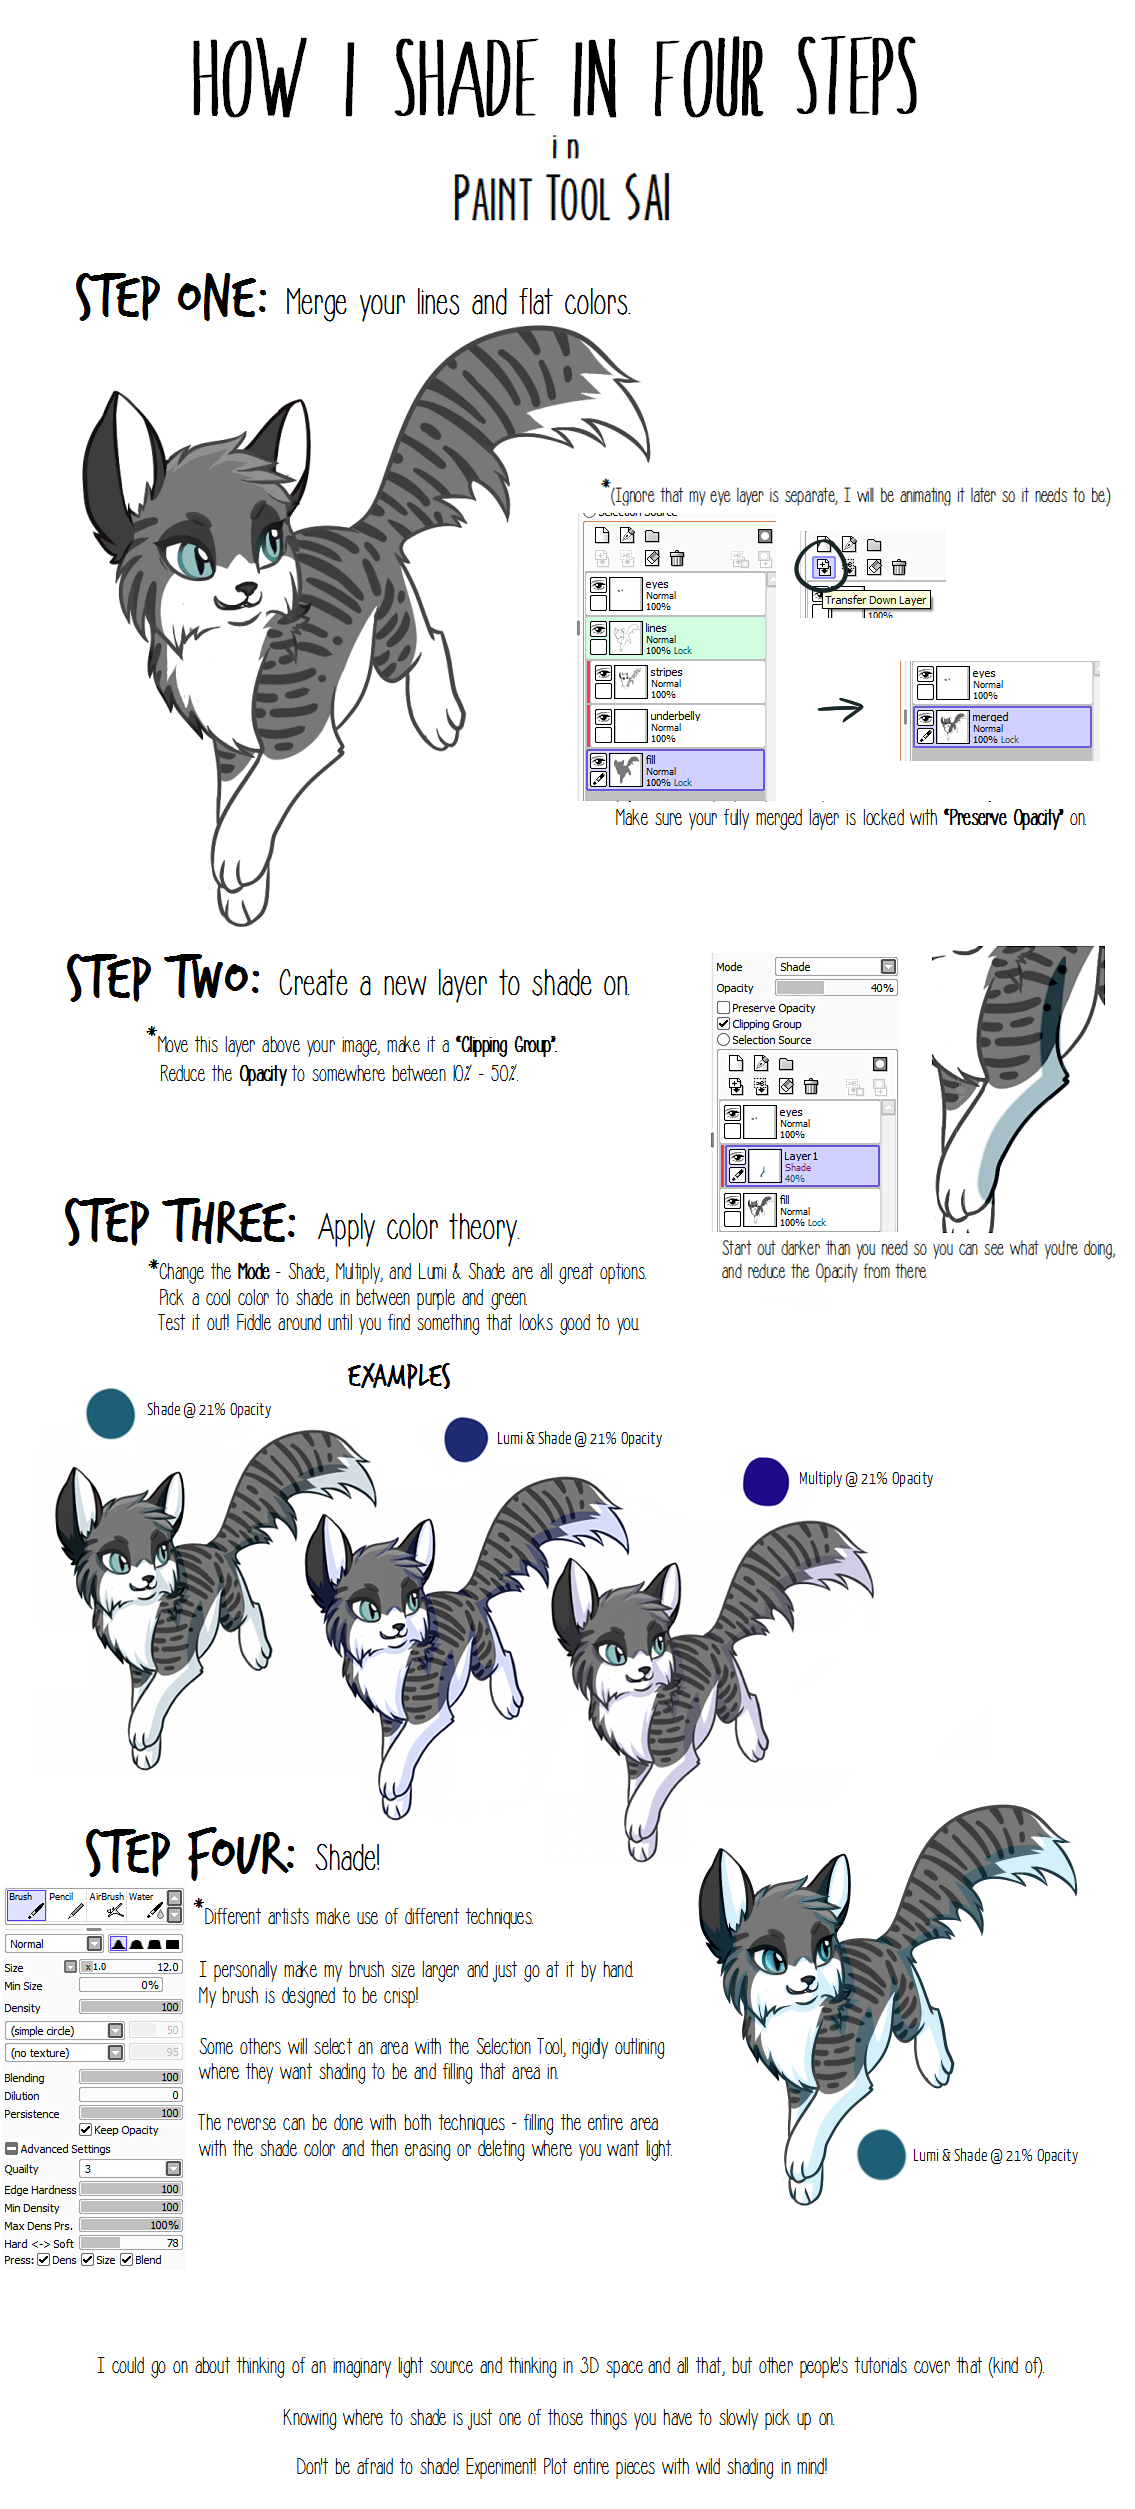
Part Two (for shading) can be found here:
Related content


Comments: 18

BLESS UR SOUL you have no idea how happy this makes me that I've finally worked this out
👍: 0 ⏩: 0


Does your lineart have its lines closed?
👍: 0 ⏩: 1

I don't understand how am I supposed to select the area outside the thing? Like, draw around the thing with the selection tool? Cause that way I might as well just paint the thing manually as well. You probably meant something else?
👍: 0 ⏩: 1
I mean it 100% as seen by the blue in the image beside step one. Unfortunately, since this is a digital art tutorial, this technique works best for clean, digital lineart, without any breaks around it. If you usually work digitally, you'll need to make sure you've created digital line art before you begin. The more you lessen the 'Color Difference' of the selection tool, the less tight the fit will be, but the more likely you might get it to play nicer with paper artifacts left after scanning that normally distract the tool. You may have to use the 'Increment' option several more times in step two to tighten it up as result. (You can also try giving the traditional art a 'binary' layer mode and move the opacity of the layer to better understand how the program is 'seeing' the image.)
Here's how it is supposed to work: orig00.deviantart.net/2886/f/2…
👍: 0 ⏩: 1
Thanks for the helpful reply!  (Smile)")
👍: 0 ⏩: 0

OH MY GOD THANK YOU
IVE USED SAI FOR AWHILE NOW BUT I COULD NEVER FIGURE OUT HOW PEOPLE DID THIS
THANK YOU SO MUCH YOUR A LIFE SAVER
👍: 0 ⏩: 0

I'm relatively new to SAI, so this tutorial will definitely help. Also, if you don't mind me asking, I've seen several artists that use SAI do their colouring on separate layers (one for the eyes, one for the skin etc). I don't want to sound rude or anything, but is there a reason for this? I'm just wondering in case it makes colouring easier.
👍: 0 ⏩: 1
Hmm... I think it's because of the way layer clipping works? If I use clipping on a layer higher than the one I want shaded, then the shading will never leave that specific place I'm working at. There also certain brushes that too easily pick up the colors around them, so coloring with only one layer while using those specific brushes would be impossible if you don't want those colors to muddle together.
👍: 0 ⏩: 0


is there a way that I can have the fill layer show through without having to have the lineart on 'multiply'?
👍: 0 ⏩: 1
Your lineart layer should be a 100% empty, transparent layer with nothing but digitally drawn black lines on it. There should never be anything other than your lines on your lineart layer - no filling, nothing white. In short, I think your problem is that you have lines drawn onto a white canvas and you can't see through the white. Note that SAI has a transparent canvas by default, so I'm not sure how you managed this without merging layers or intentionally putting white down at some point. Obviously, if you're working with scanned artwork, it's not transparent. Setting layers to multiply gives the illusion of transparency, but it's not the same thing, no.
The only solution is to create lines on a completely blank layer. Without a digital lineart you can see through, you will have trouble following my tutorials.
👍: 0 ⏩: 1

What guide says: "Make sure you use this this and this.."
WHat I read: "AHMAGAHWHATISTHISITLOOKSSODIFFICULT *FLAILS*"
XD, even though I don't use this SAI thing, this is pretty helpful lookin'
//runsaway

👍: 0 ⏩: 0

Aaaah.. So this is how you use different colored lines.. I just use the normal pen in black, then I use a new multiply layer to color different parts of the body. (New layer for hair, paws, legs, head, etc)
👍: 0 ⏩: 1
I used to sketch and then draw my outline in various colors before I found out I didn't have to do that! I make use of your technique when it comes to shading things with tinted color, so I understand how it could work just as well for coloring lines. ^^
👍: 0 ⏩: 0