HOME | DD
 nico89-fx — Lightsaber tutorial
Published: 2007-05-05 20:24:27 +0000 UTC; Views: 90382; Favourites: 904; Downloads: 4771
Redirect to original
Description
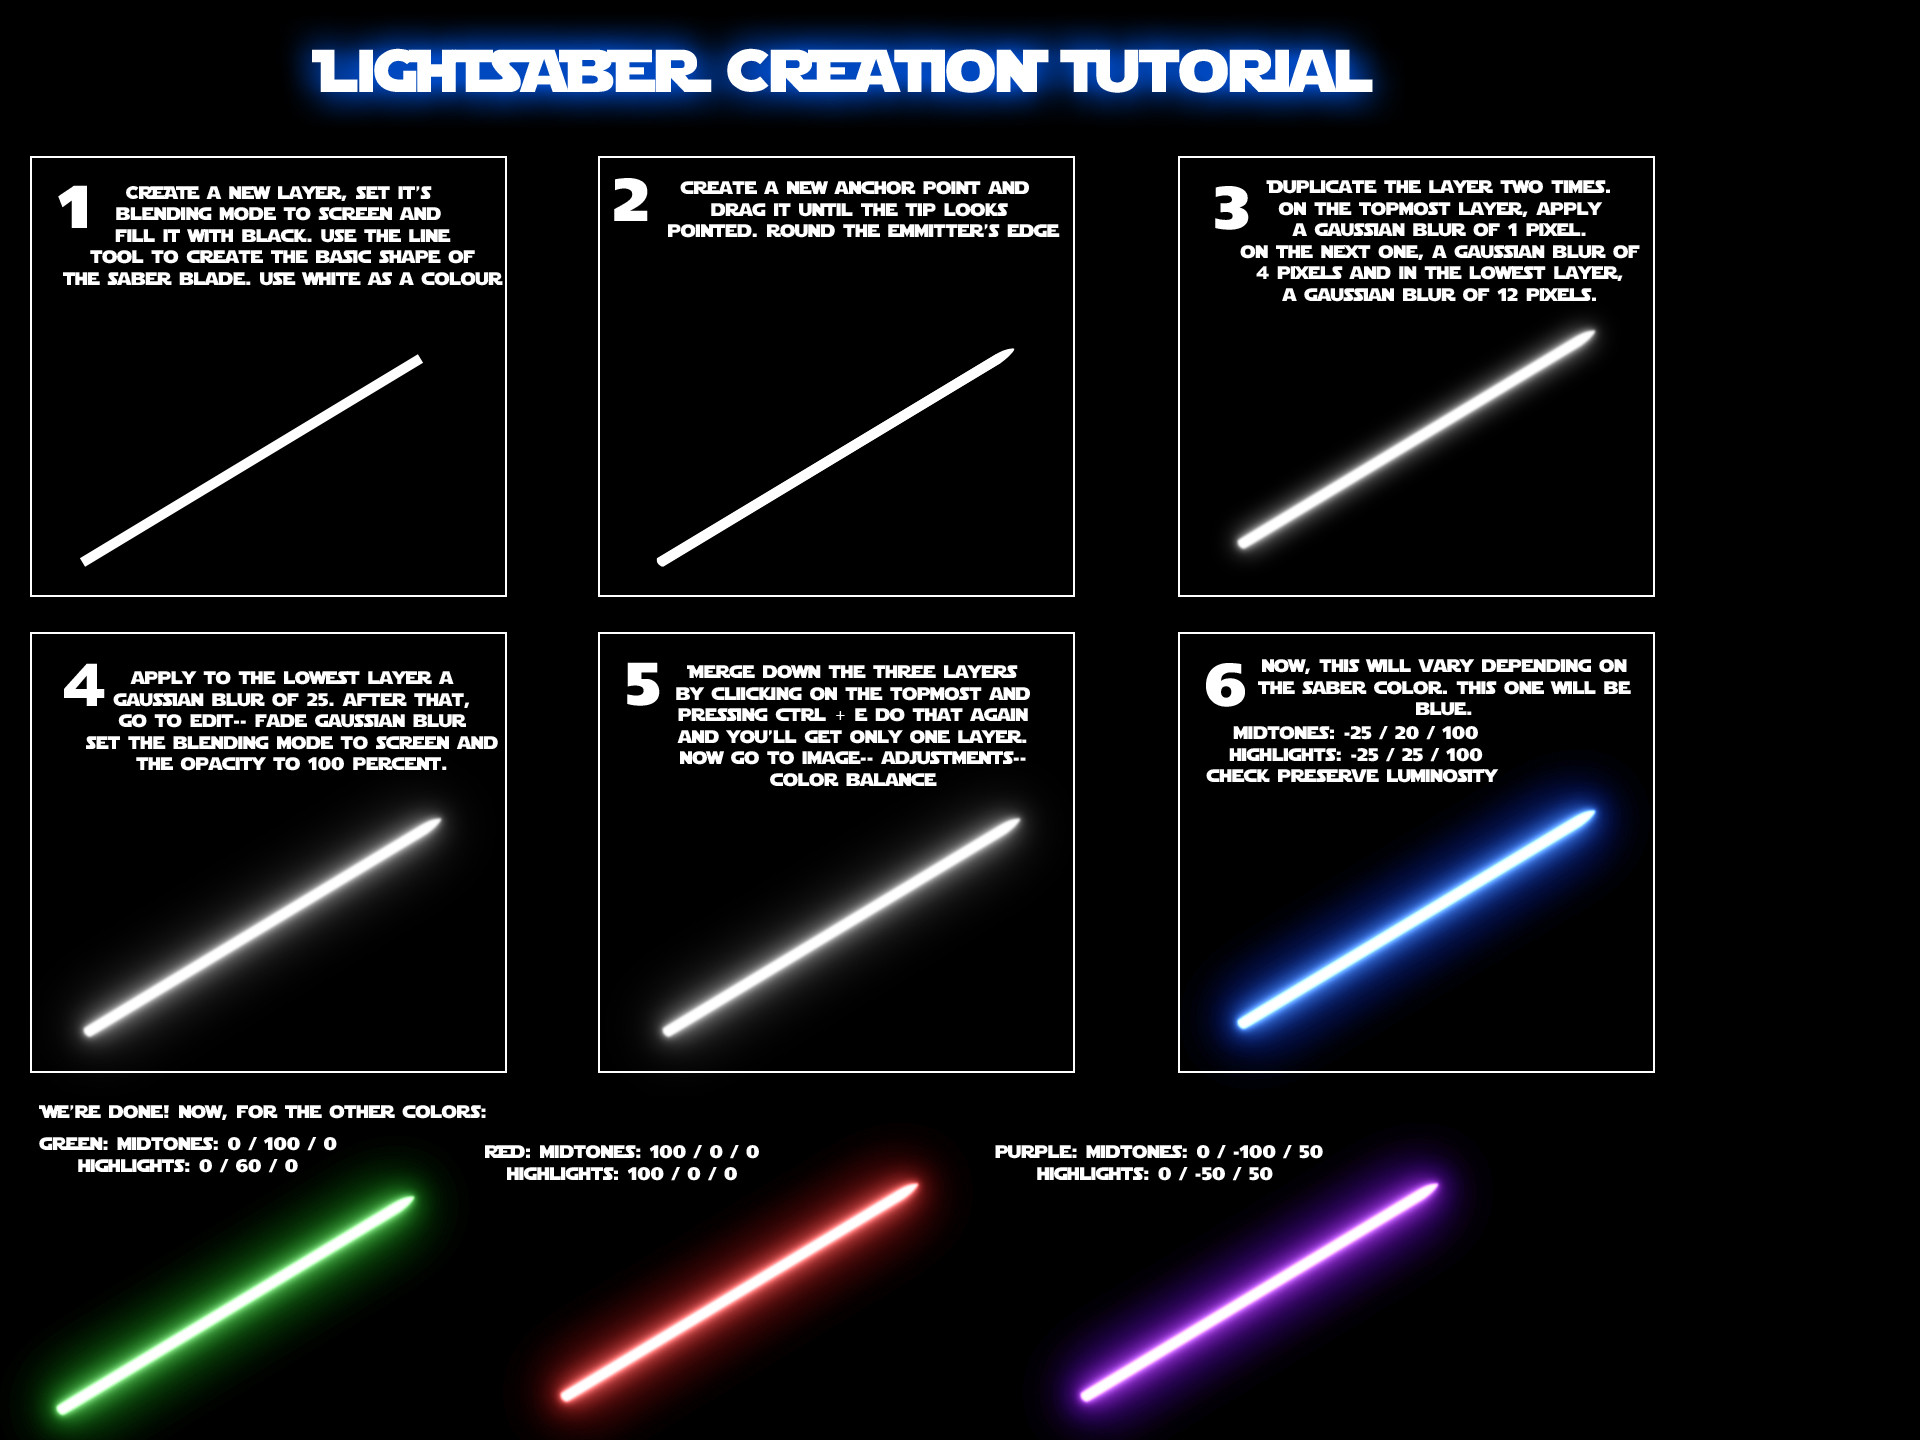
A simple lightsaber tutorial, showing the way i do lightsaber effects in Photoshop. It shows only the movie's colors, but you can tweak 'em to achieve other effects.EDIT : More than ten thousand views! Thank you all for your comments, faves and views. Thanks, really.
Related content


Comments: 173

Great tutorial.
My first attempt to color my lightsaber effect [link]
👍: 0 ⏩: 1

Very nice, especially for a white background, on which that is nigh on impossible..
Thanks for the credit, btw
")
👍: 0 ⏩: 1


hmm this will be most useful to me in the future

👍: 0 ⏩: 0

Thanks for a great tutorial...helped immensely! [link]
👍: 0 ⏩: 1
Thanks to you for the credit  (Smile)")
👍: 0 ⏩: 0

I LOVE this tutorial! Only thing is, if it's already white, then it doesn't change colors for me...
👍: 0 ⏩: 2
It does, but it's an usual mistake. No worries!
👍: 0 ⏩: 0
That has to be because you aren't merging your glow layers with a black background set to screen or add. You may have missed that step. Give that a try.
👍: 0 ⏩: 1
Oh, it was because I didn't have it on the black background. Sorry about that. I didn't know it mattered so much!
👍: 0 ⏩: 0

So much love for this tutorial right now. You don't even know.
👍: 0 ⏩: 1
Well, thank you, I'm glad you found an use to it
👍: 0 ⏩: 0


Yes, but you could replicate pretty much every step in other apps like GIMP.
👍: 0 ⏩: 1

You can do most of the steps (if not all of them) using the GIMP which is free. This isn't really a complex effect.
👍: 0 ⏩: 1

Interesting way of doing it, but what if I want the saber in another image? I'll wind up with black behind the blur over the image
👍: 0 ⏩: 2
Well, this tutorial wasn't about compositing, but I'd hardly call flatenning it all and setting it's blending mode to screen or add compositing.. Is that what you asked?
👍: 0 ⏩: 0
doh, never mind. just realized that the pen tool creates on a new layer or an image mask
👍: 0 ⏩: 0
anytime, glad you found it useful (=
👍: 0 ⏩: 1

i have not used it yet but i will soon....
👍: 0 ⏩: 0

This is a brilliant effect, thanks!
👍: 0 ⏩: 1
No problem, glad you think so. It's pretty much useful for any glowing stuff you may ever do as well. Looks far better than "outer glow" too...
BTW, thanks for commenting.
👍: 0 ⏩: 0

I am loving the simplicity of this, but it looks so authentic!

👍: 0 ⏩: 1
I'm glad you liked it
👍: 0 ⏩: 0

Thanks very much, I appreciate the comment.
Glad you liked them.
👍: 0 ⏩: 0

Glad you think that
Thanks for the comment
👍: 0 ⏩: 0

Glad you found it useful then!
Thanks for commenting.
👍: 0 ⏩: 1

Black is tricky.. I tend to think of "black" as "Black Light", as in, you know, the dark purple light that makes white shine.
But if you are indeed going for a black glow, you'd have to take quite a different setup.
If your core is gonna be white regardless of the glow, then you could duplicate the core layer, hit Ctrl+U to bring up hue and saturation, set lightness to minus one hundred (-100) and click ok. Set this layer's transfer mode to multiply and duplicate it some times and blur the layers in a 1/2/4 fashion (as in 10 for the first, 20 for the second, 40 for the third) in the gaussian blur amount. You may wanna play with each of these layers opacities.
I'd reccomend having a 2/3 px gaussian blur on an extra layer duplicated from the white core and use some noise on it and a purple /blue color to make it more interesting, as black will be quite plain and uninteresting otherwise.
PM me if you have any more questions..
👍: 0 ⏩: 1

Thanks to YOU for commenting!
Glad you liked it..
👍: 0 ⏩: 0

Not sure how the 'anchor point' trick works; maybe you could help with that? I ended up using the Eraser around the tip and got a good effect, but I like learning new PS tricks. Might not help that I'm using 5.5, but it may be me.
Otherwise, lovin' it! The color trick is nice and looks really sharp.
👍: 0 ⏩: 1
Hey there.. I'll try to explain it really quick..
Basically, when you create a line with the line tool you get four "dots" at each vertex of the shape. Those are called anchor points. You can drag those to modify the shape. And you can add more of them to create more detail using the Pen Tool. if you click on the pen tool and get to hover with your mouse over the middle line in between your top two anchor points a plus sign appears next to the pen cursor and if you click another anchor point is created. If you click and drag, a bezier anchor point is created, meaning the lines that protude from it will be curved.
Play around with it until you get something nice. And remember Ctrl Alt Z is always your friend
👍: 0 ⏩: 0
| Next =>