HOME | DD
 rockgem — 'Fake Fractal' Tutorial
Published: 2011-09-08 15:59:26 +0000 UTC; Views: 5218; Favourites: 70; Downloads: 193
Redirect to original
Description
For an absolute age I’ve been asked how I make some of my abstract images and for ages I’ve been intending to do a tutorial on how I create what I call my ‘fake fractals’ - pieces of work that I make entirely using photoshop ( in my case photoshop elements) but that have the look of fractals or fractal art about them.Never thought this would take me over 5 hours to put together!


 but here it is…
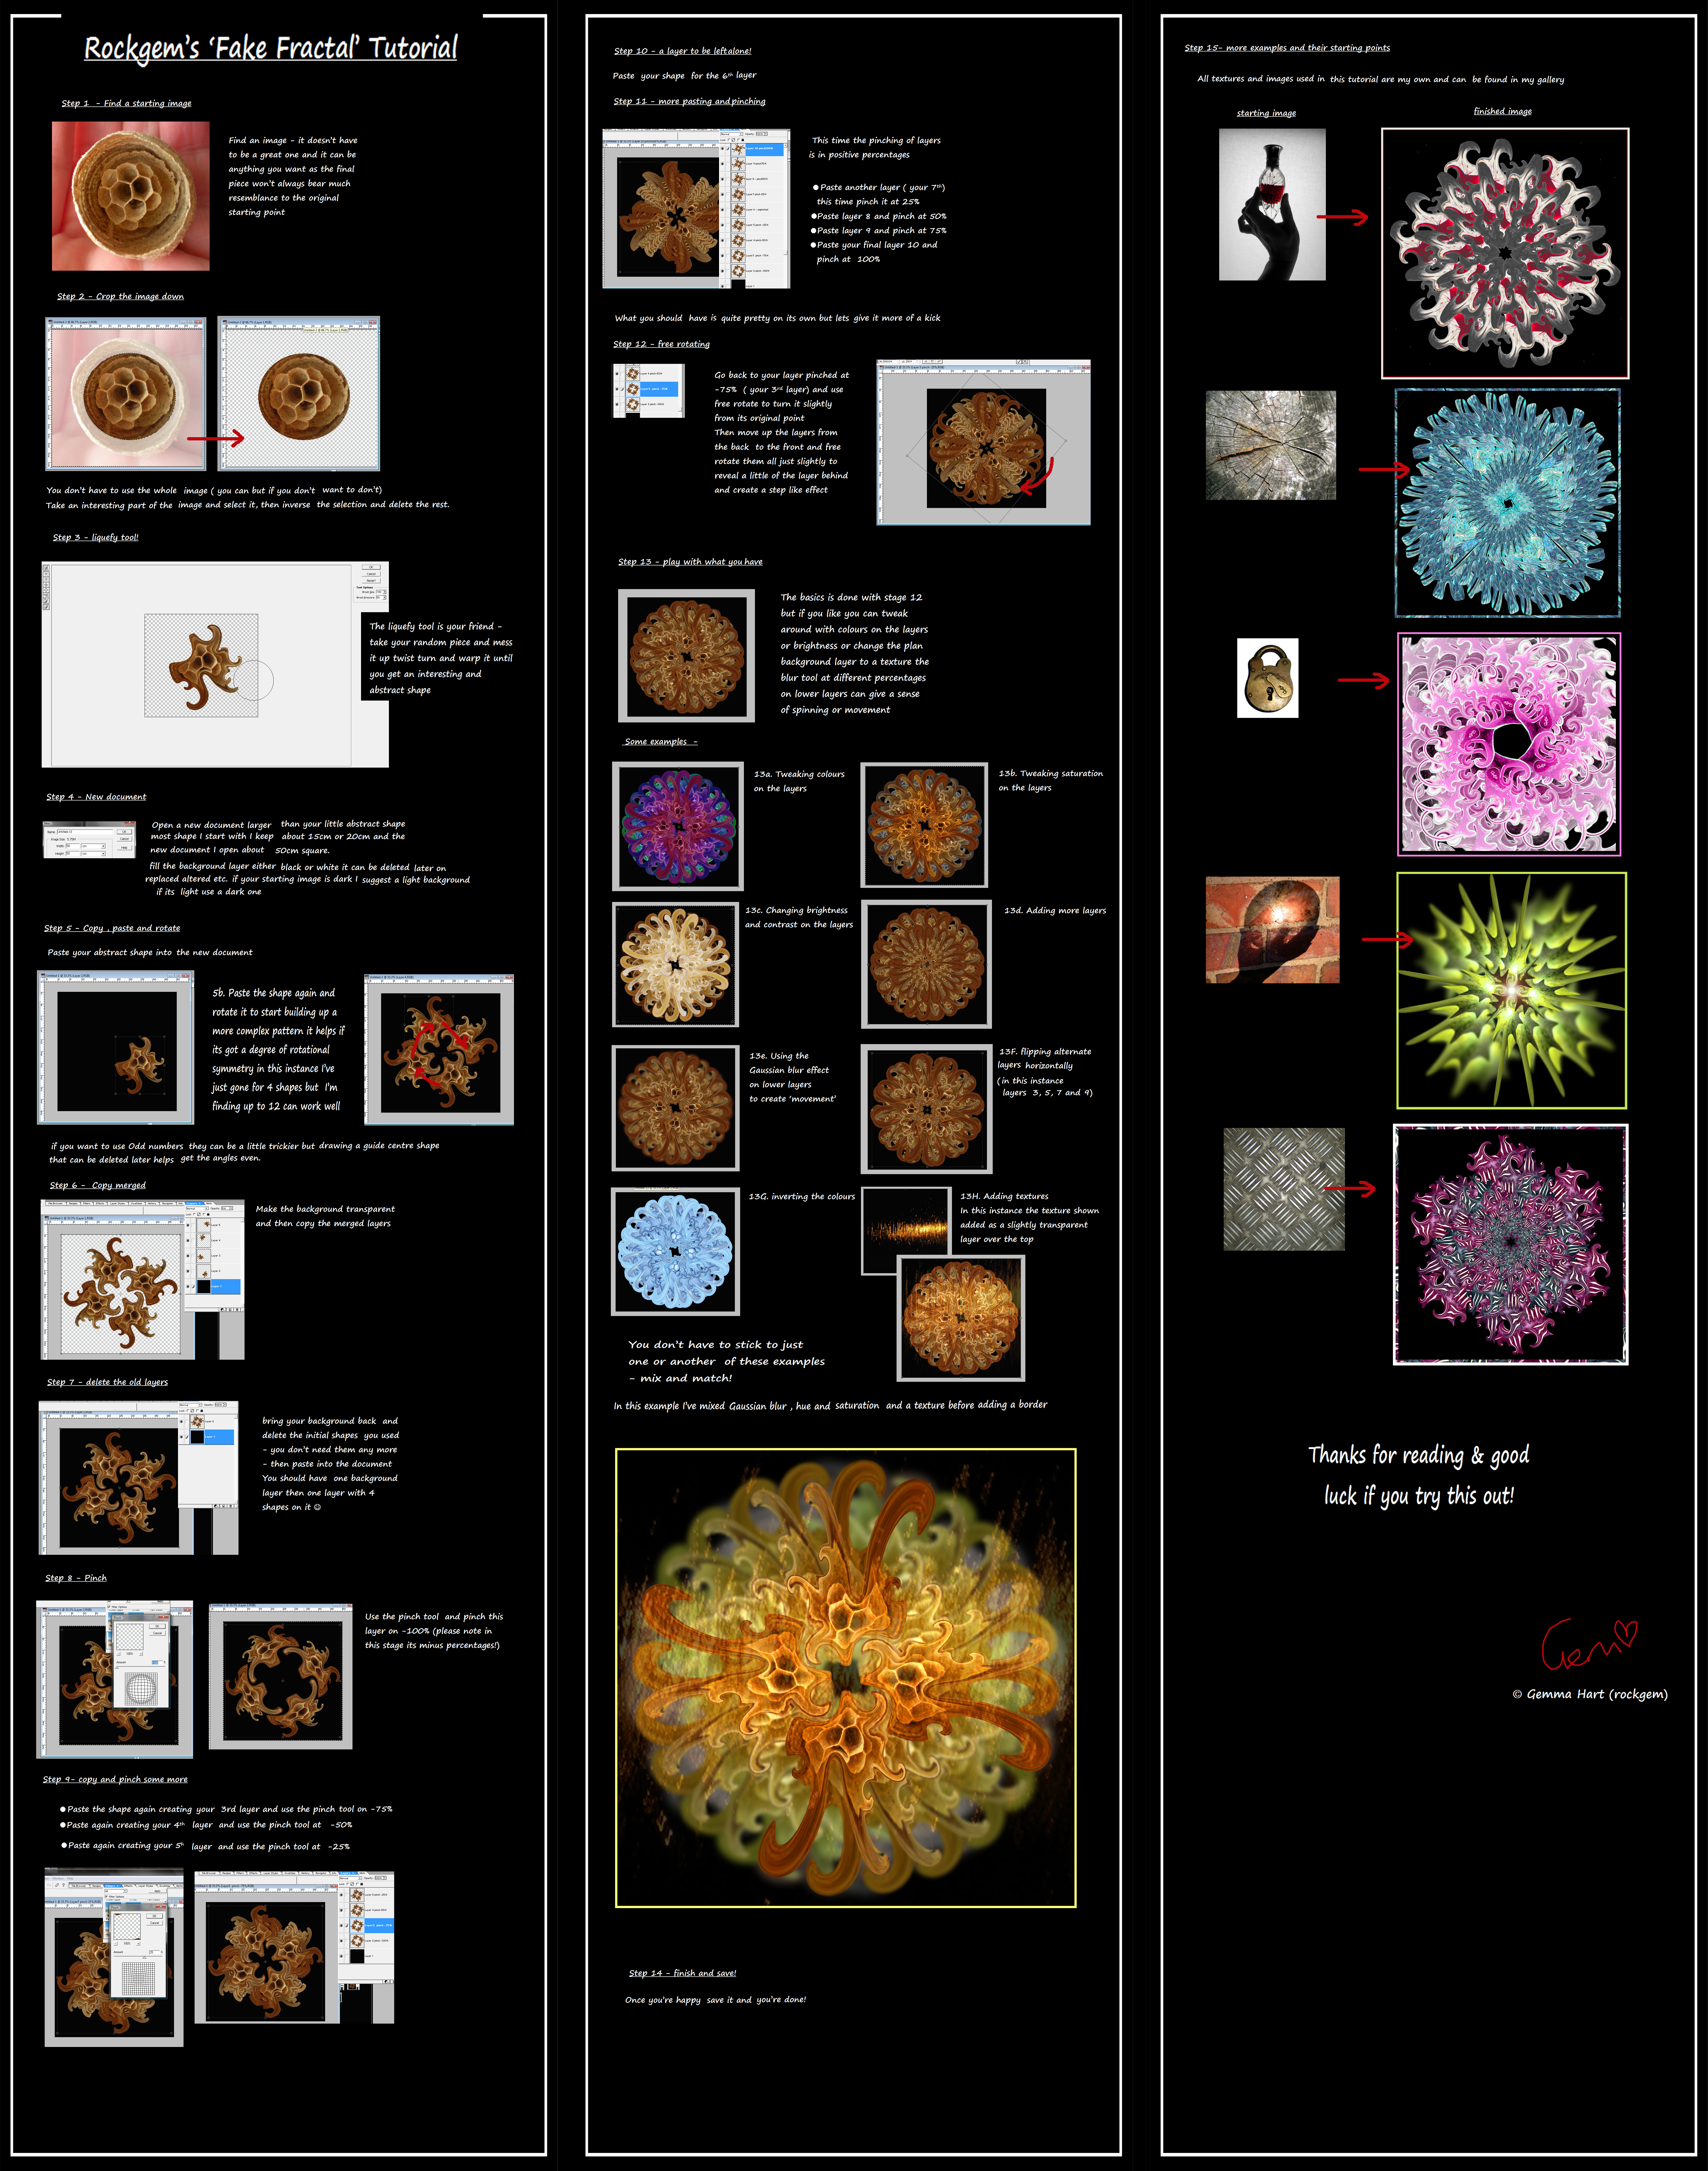
 rockgem’s ‘Fake Fractal’ Tutorial


 Step 1 - Find a starting image
 Find an image - it doesn’t have to be a great one and it can be anything you want as the final piece won’t always bear much resemblance to the original starting point


 Step 2 - Crop the image down
 You don’t have to use the whole image ( you can but if you don’t want to don’t)
Take an interesting part of the image and select it, then inverse the selection and delete the rest.


 Step 3 - liquefy tool!
The liquefy tool is your friend - take your random piece and mess it up twist turn and warp it until you get an interesting and abstract shape


 Step 4 - New document
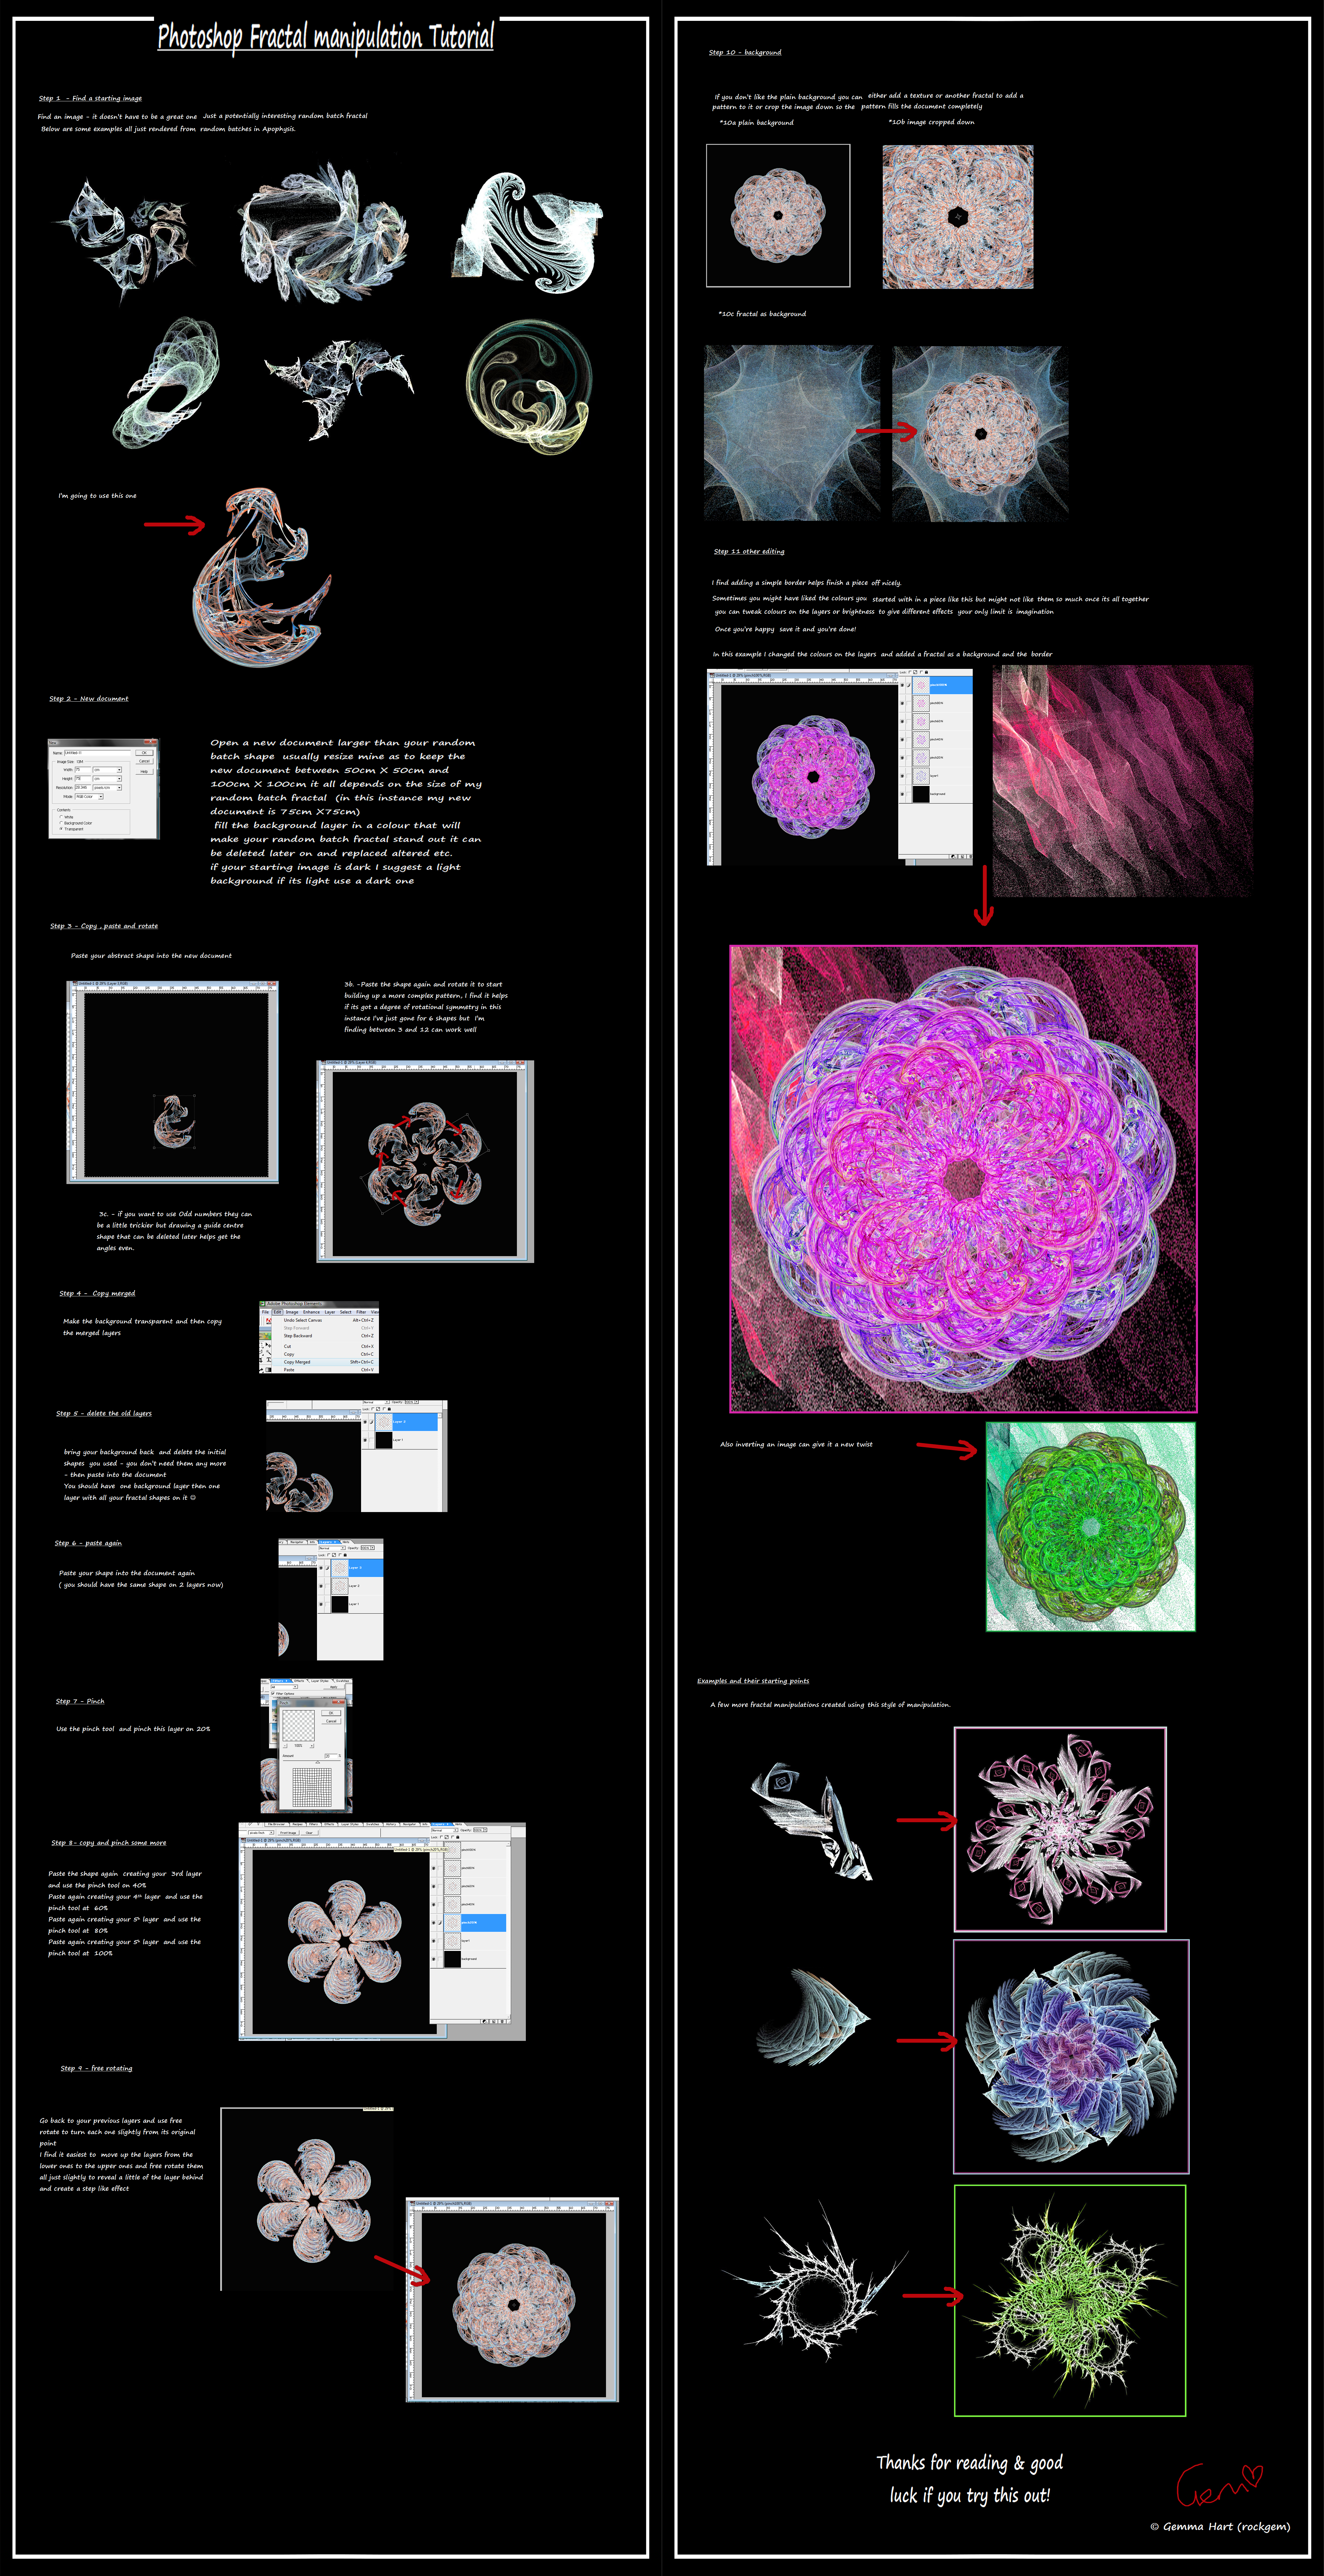
 Open a new document larger than your little abstract shape most shape I start with I keep about 15cm or 20cm and the new document I open about 50cm square.
fill the background layer either black or white it can be deleted later on and replaced altered etc.
if your starting image is dark I suggest a light background if its light use a dark one


 Step 5 - Copy , paste and rotate
 Paste your abstract shape into the new document
5b. -Paste the shape again and rotate it to start building up a more complex pattern it helps if its got a degree of rotational symmetry in this instance I’ve just gone for 4 shapes but I’m finding up to 12 can work well
5c. - if you want to use Odd numbers they can be a little trickier but drawing a guide centre shape that can be deleted later helps get the angles even.


 Step 6 - Copy merged
 Make the background transparent and then copy the merged layers


 Step 7 - delete the old layers
 bring your background back and delete the initial shapes you used - you don’t need them any more - then paste into the document
You should have one background layer then one layer with 4 shapes on it


 Step 8 - Pinch
 Use the pinch tool and pinch this layer on -100% (please note in this stage its minus percentages!)


 Step 9- copy and pinch some more
Paste the shape again creating your 3rd layer and use the pinch tool on -75%
Paste again creating your 4th layer and use the pinch tool at -50%
Paste again creating your 5h layer and use the pinch tool at -25%


 Step 10 - a layer to be left alone!
 Paste your shape for the 6th layer


 Step 11 - more pasting and pinching
 This time the pinching of layers is in positive percentages
Paste another layer ( your 7th) this time pinch it at 25%
Paste layer 8 and pinch at 50%
Paste layer 9 and pinch at 75%
Paste your final layer 10 and pinch at 100%
What you should have as it is is quite pretty on its own but lets give it more of a kick


 Step 12 - free rotating
 Go back to your layer pinched at -75% ( your 3rd layer) and use free rotate to turn it slightly from its original point
Then move up the layers from the back to the front and free rotate them all just slightly to reveal a little of the layer behind and create a step like effect


 Step 13 - play with what you have
The basics is done with stage 12 but if you like you can tweak around with colours on the layers or brightness or change the plan background layer to a texture the blur tool at different percentages on lower layers can give a sense of spinning or movement
Some examples -
*13a. tweaking colours on the layers
*13b. tweaking saturation on the layers
*13c. changing brightness and contrast on the layers
*13d. adding more layers
13e. using the Gaussian blur effect on lower layers to create ‘movement’
*13f. flipping alternate layers horizontally ( in this instance layers 3, 5, 7 and 9)
13g added textures
*13h inverting the colours
You don’t have to stick to just one or another of these examples - mix and match!


 Step 14 - finish and save!
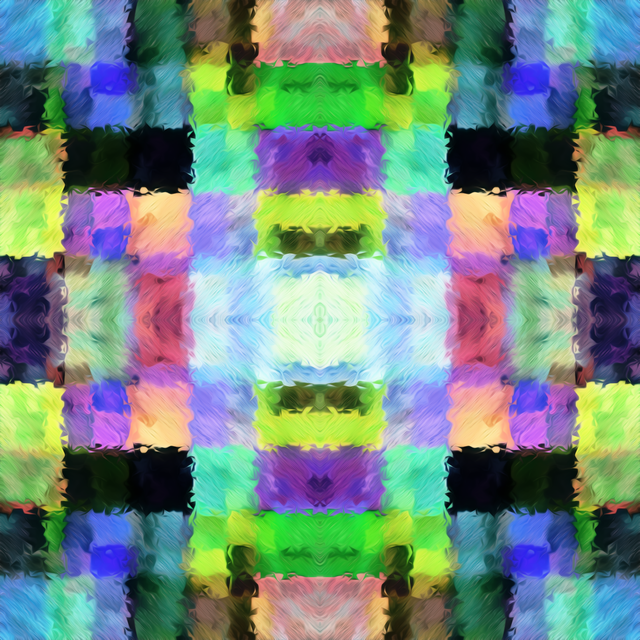
In this example I’ve mixed Gaussian blur , hue and saturation and a texture before adding a border
Once you’re happy save it and you’re done!


 Step 15- more examples and their starting points
A few more images created using more or less this style.
All the stock used (which is all my own)


 Stock - wasp nest IV : [link]


 Stock Texture - Glow : [link]


 Stock - Vial III : [link]


 Stock texture - Weathered Wood : [link]


 Lock Stock - I : [link]


 Stock Orb Shadow II : [link]


 Stock Texture - Metal Plate : [link]
 Final images from this tutorial can be found in my gallery.


 If you try something out using this tutorial please leave a comment on the deviation drop me a note or leave a comment on my main profile I’d love to see what you make


All images and literature/written work in =rockgem's gallery are © Gemma Hart. All rights reserved. Reproduction and/or retransmission of all or any part of this gallery are prohibited under copyright law. Users desiring to reproduce or retransmit all or any part of this gallery must first secure in writing the appropriate copyright and other authorization from the copyright owner. My work is not public domain.
Thankyou.
Related content
Comments: 76

they are fractal in form but as they are not made with a fractal software then they are not 'fractals' to be fair there is much photography that to me is fractal as the mathematics dictates pretty much all forms in the natural world ( and in manmade structures) so then technically 'fractals' made digitally are also 'fake fractals' as they only echo what is already in nature 
👍: 0 ⏩: 0

thankyou, i started off dabbling with images like this some time back and a friend of mine on seeing them encouraged me to try apophysis - so a few years later i finally got around to putting together this tutorial
👍: 0 ⏩: 0

its so hard to find tutorial for Elements thank you thank you thank you lol
👍: 0 ⏩: 1

you're most welcome - hopefully it will be a useful tutorial for you
👍: 0 ⏩: 1


👍: 0 ⏩: 0

thankyou for the compliment 
👍: 0 ⏩: 1

The ones youve produced are wonderful 
👍: 0 ⏩: 1

to be fair i think you can produce similar effects using GIMP or something like that so have a play with it is all i can say.
good luck with it if you try it out
👍: 0 ⏩: 1

True. The whole idea of finding a shape and copying it and making it look like a mandala. Amazing. Thanks for the wishes. If I produce a deviantart worthy one youre the first Im going to credit it to
👍: 0 ⏩: 1

its an interesting thing to be fair and quite fun and certainly with this style of abstract it does have similarities in its features to true fractal work - hopefully you will have many dA worthy results 
👍: 0 ⏩: 0

thankyou 
👍: 0 ⏩: 1

You are I'm afraid I haven't yet had the time to try it, but I shall eventually
👍: 0 ⏩: 1

i look forwards to seeing anything you create if you do find the time
👍: 0 ⏩: 1

I shall definitely let you have the link as soon as I manage anything worthwhile
👍: 0 ⏩: 1

Super cool - thank you for this - I might just give it a go!
👍: 0 ⏩: 1

thankyou for the compliment 
👍: 0 ⏩: 0

A very good tutorial and very well presented. Perhaps I'll buy PS after all!
👍: 0 ⏩: 1


👍: 0 ⏩: 1

Many thanks, I'll certainly try Artweaver. Actually Gimp (free) has pretty good swirl & pinch effects too.
👍: 0 ⏩: 1

i've tried GIMP before now and a friend of mine occasionally used it to make some fractal manipulations similar to some of my more figurative ones i shall try coax him into trying out this 'fake fractal' tutorial and see what he manages to create
👍: 0 ⏩: 0

thankyou - hopefully it will be useful to someone out there
👍: 0 ⏩: 1

you're welcome! indeed 
👍: 0 ⏩: 0

Awesome Gemma!!! If anyone does not have Photoshop - Artweaver (freeware) is excellent for doing pinches and swirls - actually a lot better than Photoshop does. I'm going to play with this and if I make anything worth posting I'll give you all the credit.
👍: 0 ⏩: 2

hmm, I have been totally addicted to PS forever,
but more then willing to give this a try
thanks for letting us know about it !
👍: 0 ⏩: 1

thankyou and its good to know there is some freeware out there that could make this sort of thing accessible to more people
good luck with trying it out ~The-Apparition made a nice piece using this already
👍: 0 ⏩: 1

I saw her work - very pretty!
👍: 0 ⏩: 1

Wonderful!!! Thank you so much for sharing this!!!
👍: 0 ⏩: 1

thankyou - hopefully it will be of some use
👍: 0 ⏩: 1

Always a pleasure...definitely, it will be useful...
👍: 0 ⏩: 1

lol I cannot seem to find pinch or any way to do negative settings in regular PS,
I did try with other things to get a somewhat decent result....
I think however, after viewing this, [link] that I better stick with apop <3<3
👍: 0 ⏩: 2

thankyou for at least giving it a go 
you don't always have to do the negative settings you can always just work with the positive ones.
this is pretty much just a basic tutorial to be fair but you can tweak and alter it as much as you want or not necessarily include all the steps and stages its just sort of an idea and like everything else it does take practice ( most my early attempts along these lines have been lost intentionally in the dark recesses of the interwebz the same thing applies to a lot of my earlier fractal manipulations! haha!) and to be fair this is my first tutorial i posted on here
i'm planning on some similar for fractal manipulations so
👍: 0 ⏩: 1

Awesome, tutorials are always great in my book <3
I did search and I am assuming the 'pucker' is the new pinch...
no neg settings though so I compromised and reversed the order of things
with positive settings as I assumed it was to "stack" the layers
👍: 0 ⏩: 1

i think it might be not sure i'm a wee bit behind in the photoshop world lol
the effect i get with the negative pecentages on the pinch tool might be able to be got with a separate tool now and generally i just use them like i use the positive settings to create a stack effect
👍: 0 ⏩: 0

(yes with liquify lol)
👍: 0 ⏩: 0

If I get chance I will try this in Paint.net (it's supposed to be as good as Photoshop but so far I've only persuaded it to do simple things). Not sure I can do this but if I can, I will definitely have a go.
👍: 0 ⏩: 1

i've never tried paint.net if you do get the chance let me know if it works out any
👍: 0 ⏩: 0
| Next =>
