HOME | DD
 sculptor101 — Making a horse pen tutorial progress

#claysculpture #figurine #pen #sculpting #sculptor #sculpture #supersculpey #tutorial #wip #armaturetutorial #horse
Published: 2018-01-21 13:49:58 +0000 UTC; Views: 4233; Favourites: 104; Downloads: 0
Redirect to original
Description
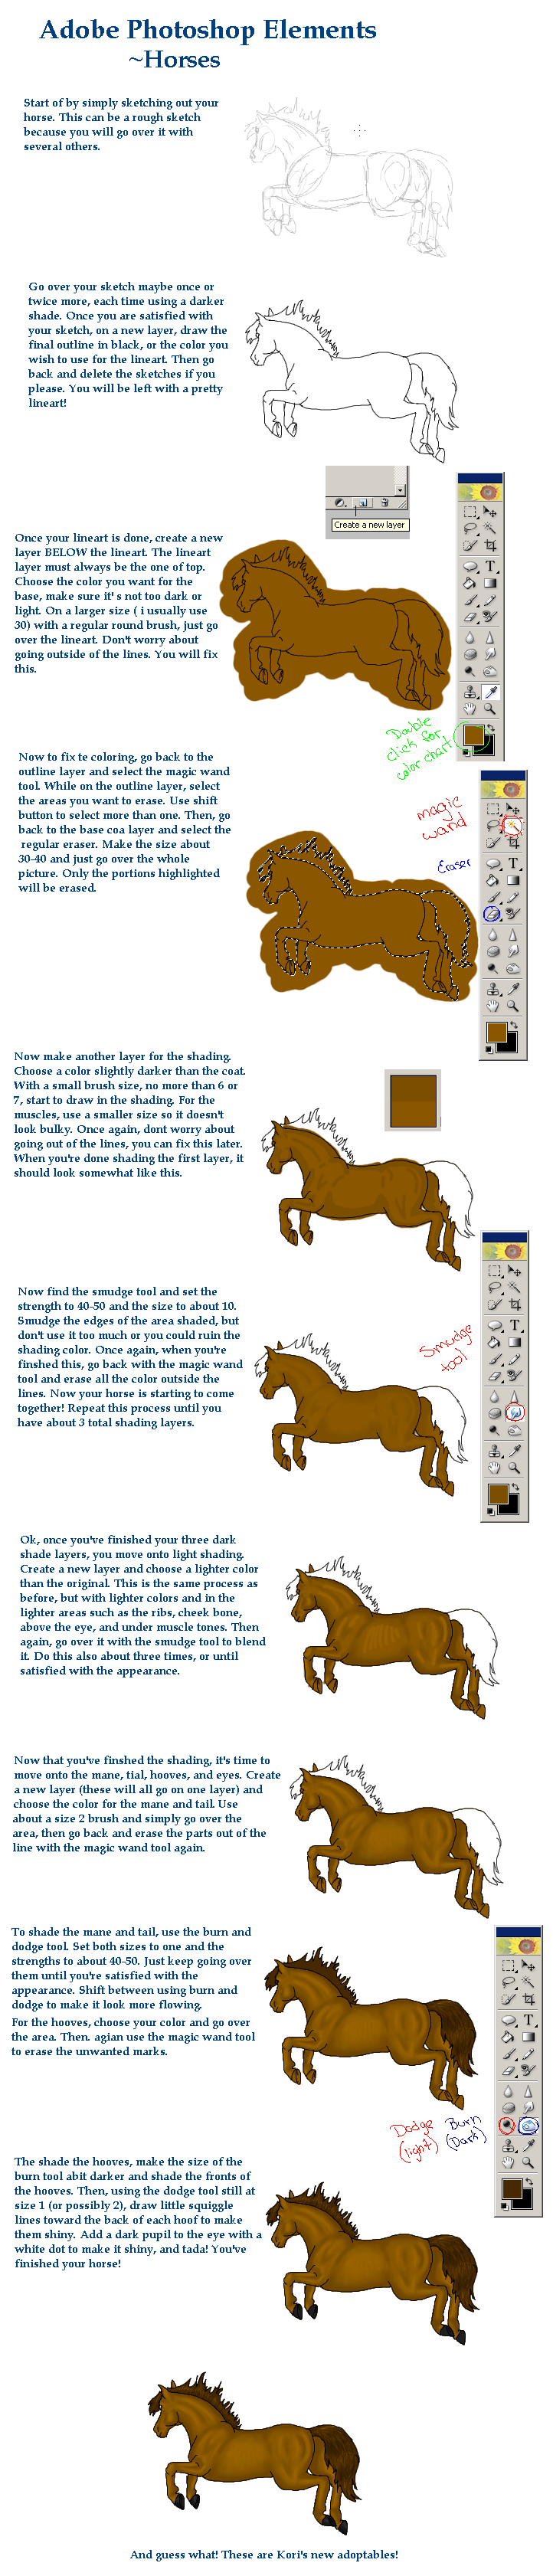
An example of horse pen prototype for PVC injection.
*Injection mold is mass production mold for plastic products mostly, some common materials like acrylic, TPR, PP, PS etc can all be injected by machines. PVC injection is firm but a bit elastic, and shows more details. Often use for characters in capsule toys.
*PVC injection allows a bit of undercut in mold release. Some of the molding angles issues and parting lines are expertise involved that we are not going to discuss here.
*Please see the pictures that was taken during sculpting, you may be able to see how it was formed.
Alex Liao
-------------------------------------------
Here are some point/please compare with the pictures:
1. Build the armature:
*I held the sculpture for long hours in sculpting, so the first thing I’ve got to make sure, the armature was strong enough. In this case of PVC injection of pen prototype, using jumbo paperclips would be strong enough. Bended the paperclips to the right shapes and angles, covered with clay (I normally use Super Sculpey), thinner clay than the concept design but steady.
*Take your time to adjust it, the armature is very important as sculpting! You don’t wanna come back to fix the armatures when you find it dislocated and you have soft clay in hand that is almost finished... (screaming!!!)
*Bake the armature when finished. It can be over-baked a bit to make it stronger.
2. The top portion:
*I held the bottom half of armature to sculpt the top half first. Apply fresh clay to baked armature, add a very thin layer of Sculpey softener if the clay wouldn’t stick, or a few drops of super glue in some key areas. Like connecting points of limbs etc.
*I start from the big portion of shape. However you sculpt a character, don’t go to the detail yet if the whole proportion is not good enough.
*I added clay bit by bit like adding muscle, flesh tissue (get some reference of horse anatomy would really help).
*I normally use nail polish remover with a nylon brush to smooth out the surface. Add some define lines and details after brush each time.
*Bake the half top portion when finishes. At this point, the area from the ridge to belly would need to fix lately when making the bottom half.
3. The bottom half:
*I held the baked top portion to make the lower part of pen. The horse's hoof would need to insert a pen lead from the flat end, so I have to check and measure it visually for the space inside of rear legs while sculpting. As I mentioned, it’s a pen prototype of PVC injection, the inner of pen is somewhat hollow in molding, so the pen lead can stick into it from the hoof in mass production.
*I tried not making it too odd because 2 lags were combined to 1 from its hip. And the shape and the angle are useful as a pen. The muscle details would fade out from its hip to the hoof, so I made it not obviously appeared much on the lower leg.
*It’s not necessary making the tail after the whole pen baked. I just thought that I couldn’t hold it easily making its tail, so I sculpted it after the whole pen was baked. You can adjust the method in a proper condition.
-----------------------------------------------------
《歡迎搜尋加入》Welcome to add me:
Facebook: www.facebook.com/AngelbeingWor…
Blog: sculptor101.deviantart.com/
Instagram: www.instagram.com/sculptor101_…
Pinterest: www.pinterest.com/sculptor101_…
Youtube:youtube.com/c/AngelbeingWorkshop/
#design #Blog #deviantart #sculpture #garagekit #sculptor #videoturorial #molding #modeling #YouTube #FaceBook #Instagram #pinterest #sculpturetutorials #arts #雕塑 #原模師 #雕塑教學 #公仔模型 #動漫 #翻模 #原型師 #公仔 #精工 #影片教學 #藝術 #設計 #陶藝 #模型 #模型師
Related content


Comments: 12

Great tuturial! Many thanks for sharing your work
👍: 0 ⏩: 1

You are welcome!
Thanks for your visiting!!
👍: 0 ⏩: 0


great work. thanks for sharing your process with us
 (Smile)")
👍: 0 ⏩: 1
You are welcome! Thanks for visiting my pages here!
👍: 0 ⏩: 0

...I had no idea you could put wet Sculpy on top of baked Sculpy.... This will totally change how I sculpt.
👍: 0 ⏩: 1
Of course you could! But I wonder why Super Sculpey company didn't mention it...
I do that in all of my sculptures, some got in and out of the oven more than 10 times. As long as you low down the temperature a bit each time, and cover the baked areas, especially thin and pointed (baked) areas with aluminum foils.
If you look at my other tutorials carefully, you'll see the same methods.
👍: 0 ⏩: 1
I've struggled for YEARS trying to figure out how to keep the figured ridged. .. this is for real a game changer. Thank you so much!!!!!
👍: 0 ⏩: 1
The clay is good for sculpting, but as it's soft, don't hold it in hand, so you'll need to make some workable condition between hard and soft clay. Once you figure it out, you are free to go on with it!!
👍: 0 ⏩: 0

Great sculpt! It's always interesting to see your sculpting method.
👍: 0 ⏩: 1
Thanks a lot!! Hope you find it useful!!
👍: 0 ⏩: 0