HOME | DD
 SteelDollS — How To Change Image Resolution Size in MMD
by-nc-sa
SteelDollS — How To Change Image Resolution Size in MMD
by-nc-sa
#beginner #image #mmd #resolution #size #mikumikudance
Published: 2017-02-14 16:38:58 +0000 UTC; Views: 16161; Favourites: 41; Downloads: 26
Redirect to original
Description
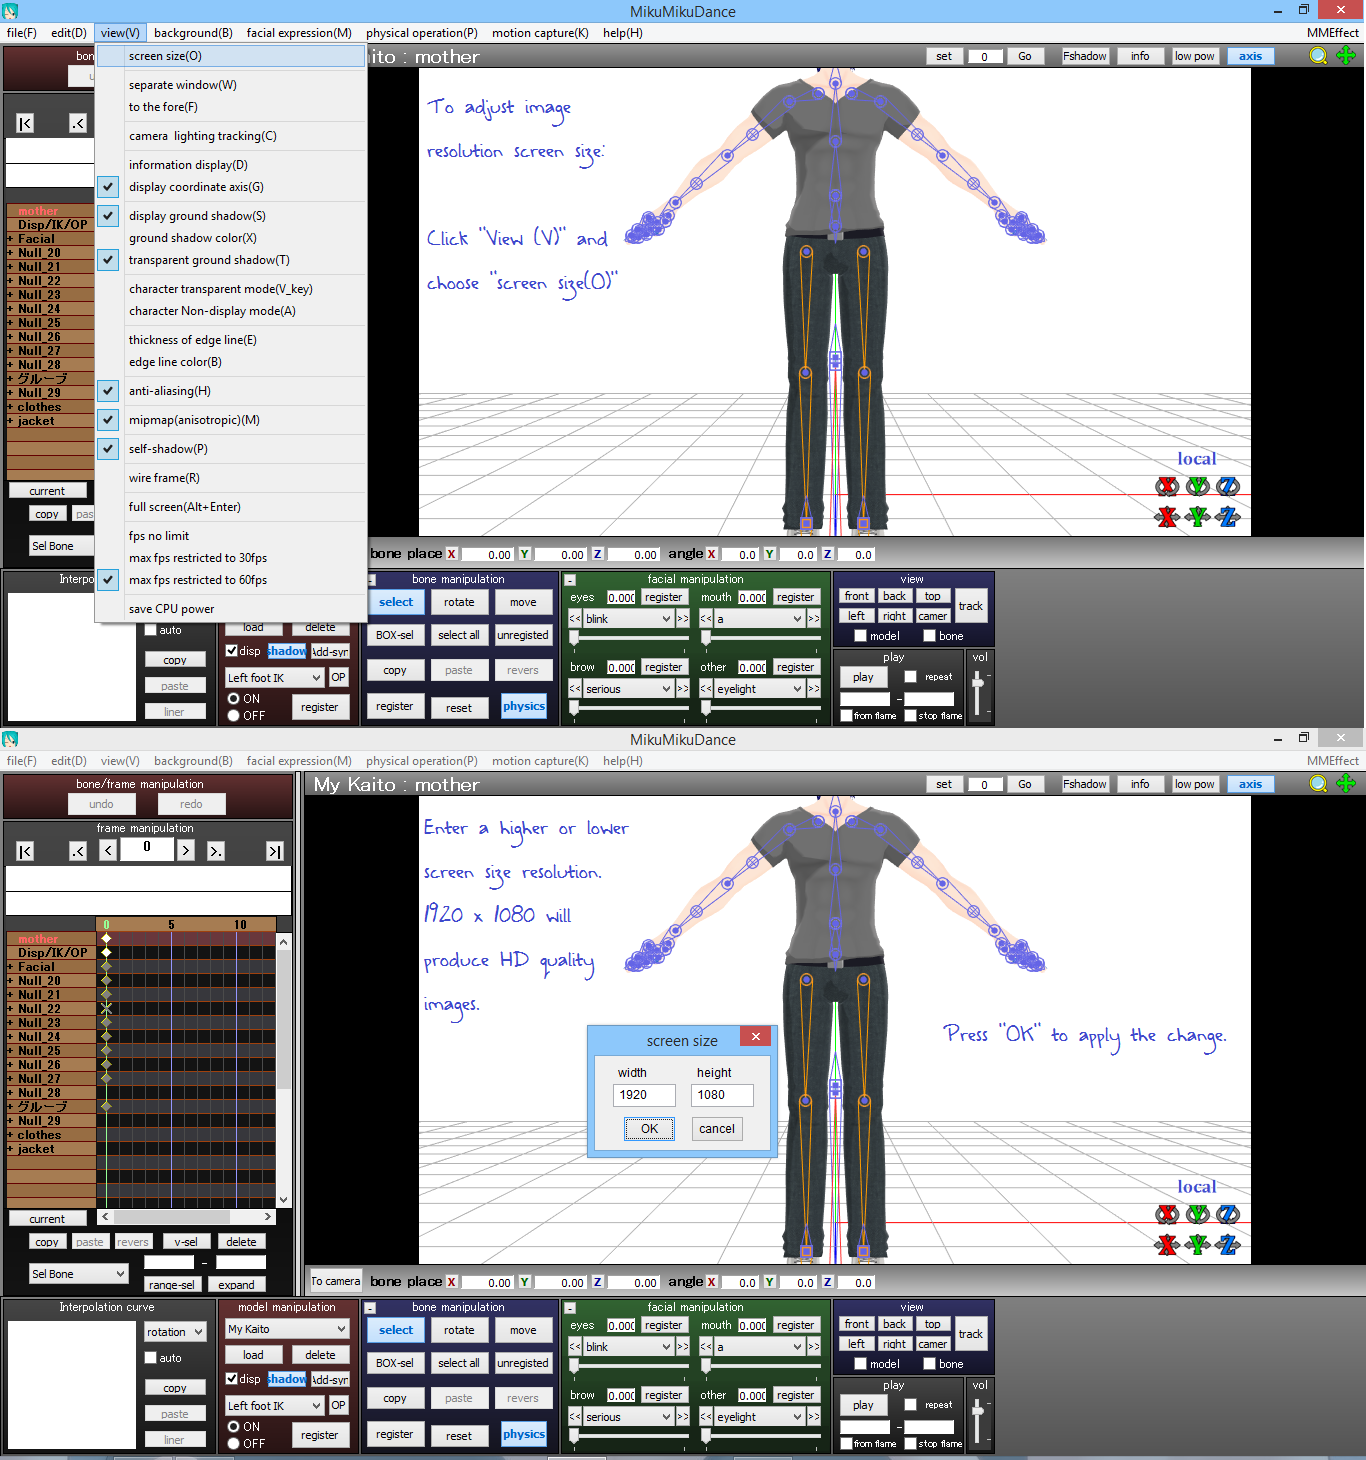
had some questions about rendering images in higher quality and zooming the camera.This is a short tutorial for how to change the pixel rate to produce bigger or smaller images in terms of definition.
The bigger your "screen size", the more detailed your images will be, and the bigger the size of the image. If you exceed the size of image your graphics card can handle, the image will be rendered as a black screen. Always double check your rendered image after rendering, but before closing your project. Screen size means pixels (PPI) as far as MMD thinks.
P.S.- You can choose different image format outputs. Either .bmp or .png produces a lossless image file. Some MME will not render properly in .png, but the file size is more manageable. Double check to see what works best for you.
If you're not sure what size you need, like if you're looking to make a custom wallpaper for a specific desktop, you can refer to: en.wikipedia.org/wiki/List_of_… in the first column with the "width x height" to get some ideas.
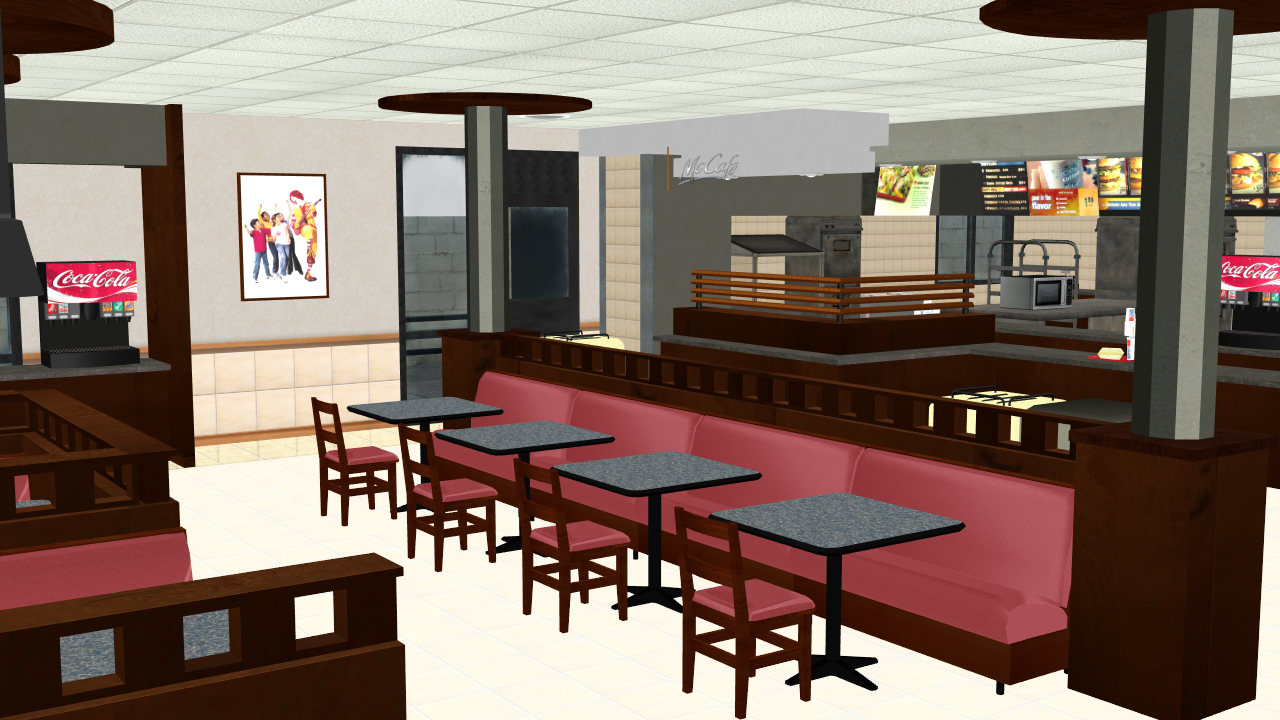
Kaito model pictured in this image made by
Related content


Comments: 7

👍: 0 ⏩: 0

👍: 0 ⏩: 0

Thanks for making this! It will be very helpful to me.XD
👍: 0 ⏩: 0

please help
I have a model in mmd but it is very large.
What do I do to change the size to smaller?
some quick tutorial or video, please
the model is a giant monster that I want to make it smaller
👍: 0 ⏩: 1

Hi, this is easy to do if you have the editor. (PMXE) It just takes a couple button clicks. ^^ If any part of this doesn't make sense without images, let me know and I'll do a tutorial with pictures. I just wanted to be able to answer you right away, so I ended up typing it here so I could answer you faster.
First: Open PMXE and drag the model file into the editor. It will start to open the file and give you a dialogue box about how you want to open it.
The label for the dialogue box will be "Add / Change Size". On the lefthand side is where you choose to (Import) New or Add. (Default is Import: New, which is fine.)
On the righthand side of the dialogue box is (Model Adjustment) Scale. The Scale is defaulted to Custom: 1 which means it's a 1:1 scale (aka you open the model at the size it presently is.) So, if your model is too big, just put in a fraction there instead of leaving it as "1". Or you can choose the 1/10 option which is below "Custom", to resize the model to 1/10 of its present size. But to put a fraction manually, here is an example: you put .5 for half the size, or .25 for 1/4 the present size.
(By the way, some of the editors do not read percentages with "." and if that happens, you will have to use "," instead of "."
...but most of them use "." (Example: if ".25" doesn't work, put ",25" and it should work.))
Once the model loads, everything is automatically resized to the size you specified. Physics, bones, everything, resizes automatically to the size you put in. Then all you have to do is save the fixed model with a different filename, and load it in MMD and you're done! Just make sure to save it as the same type you loaded it as. (Save .pmd as .pmd, and .pmx as .pmx. Otherwise you might have to fix things.)
I think you can also use MMM to automatically be able to change model size, but I don't have experience with doing it. Resizing isn't technically editing since you don't change anything about the model's data to do it, and there are effects that can produce the same result, but it's a really useful thing to know how to do, especially for making parts work if you do do model edits or something like that in the future.
(If you don't have PMXE and you just need things to look small, however, you can skip this if you just pan the camera out far enough, or move the model really far away on the Z axis. /sweats)
I hope this helps! Let me know if it made sense and fixed it for you.
👍: 0 ⏩: 0

I now know why my images turn black sometimes
👍: 0 ⏩: 1
Yep! It's because your system's graphics capabilities are overwhelmed. It might be fixed a number of ways:
-Make the resolution of the image smaller by changing the screen size (like on this tutorial)
-Close other applications that are taking up too much graphics. (art editors, media players, and internet browsers)
-Reduce the amount of MME effects if they are heavy on your graphics.
-Run a cleaner like CCleaner and reboot MMD (and/or your computer) to empty temporary usages (save your work first)\
I frequently will make an image incrementally "smaller" until it renders correctly lol
I just check it until it stops turning up black screen when it's saved :_3
When I close MMD, sometimes I come upon a problem when I try to re-load a project, so that's not usually preferable for me. Sometimes it doesn't remember where my model is saved, so I have to figure out where the file is for the model again. This is fine unless the models are in foreign language and there are several of them ;_______;
And then, there are sometimes where I'll use too many MME and then save it, and then can't get it to open again because the load is too much for my graphics card. You can fix this (sort of) if you delete the .emm file that gets saved in the folder with the .pmm file. The .emm file holds the information for your MME. You would have to re-apply the shaders once you re-open it, but at least your project will open and you won't lose it. These things happen when the memory is low, haha ;__;
I am full of helpful random useless information that made me bash my face against hard things from frustration, when I did not know them, and could not figure out the problem sob ;')
👍: 0 ⏩: 0