HOME | DD
 Arehandora — How I make the lineart...
Published: 2007-02-06 19:10:10 +0000 UTC; Views: 57776; Favourites: 1104; Downloads: 749
Redirect to original
Description
Hello ^^Well, many people had asked to me about how I make the lineart of my pictures... Some asked why the lines are smooth, thought that I make them with a tablet T__T;; ... But, it isn't that way, I haven't any tablet [ right now, it is very expensive ;_;.... ]
So, I tried to explain how I do it: [in Corel Photopaint 11, I don't know if the name of the tools are the same in PhotoShop, sorry
 ]
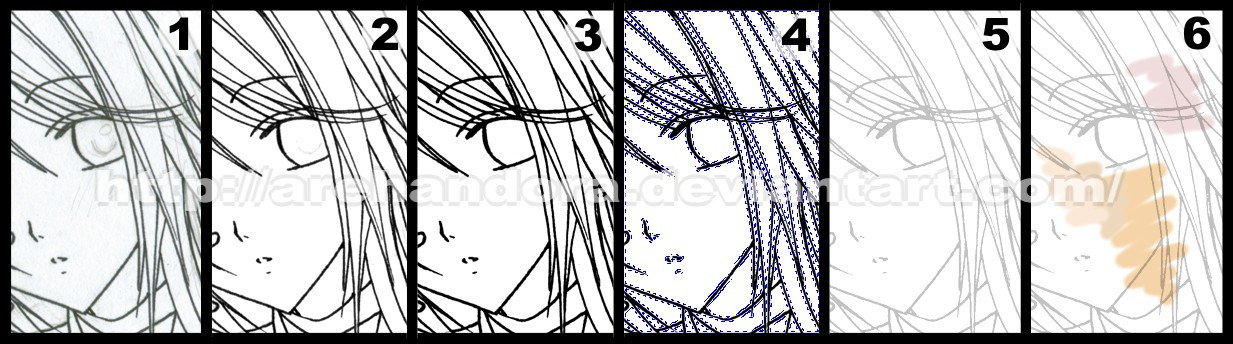
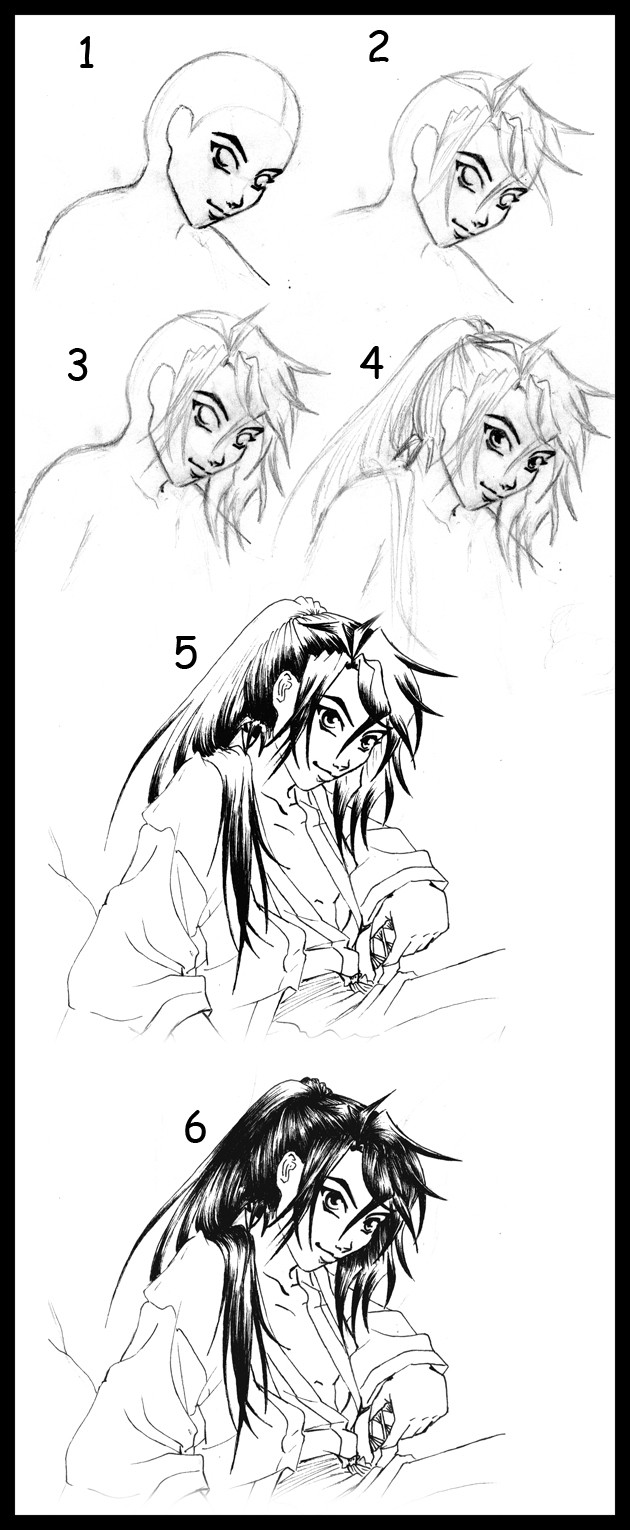
]1- I draw a sketch in a paper, then, ink it [by hand] using a marker/liner 0.5 or 0.7mm. [0.0276 inches approx.] and finally scan it at 300dpi [photo mode] ...you still can see the lines in pencil [yes, I didn't erase them... >_> I'm lazy]
2- Using the "contrast/saturation" controls I try to stand out the lineart [giving more contrast and intensity to the pic] ... also I clean some imperfections with the "eraser" tool...
3- Then, using the "gamma" control, I put the gamma at 0,75 approx. ...so, it becomes darker... and the lines stand out again...
4- This way, using the "mask" tool ... I can SELECT ONLY the black color... and become it to an object or layer...
5- Now, the lineart is an object/layer, so I can turn it transparent [at 50 or 60% approx.]
6- ... and finally I can start colouring the picture in a new layer UNDER the lineart... ^_^
I hope it helps to someone! XD;;; I'll move it to scraps later.
Thank you for visiting me!

-------------------------------------------------------------------------
EDIT: Here, tried to explain the same but for Photoshop, thank you so much!

"I don't know if this has already been posted or not...but you said you didn't know about how to do the same thing in Photoshop so i thought i'd post help on that for your viewers *smiles*
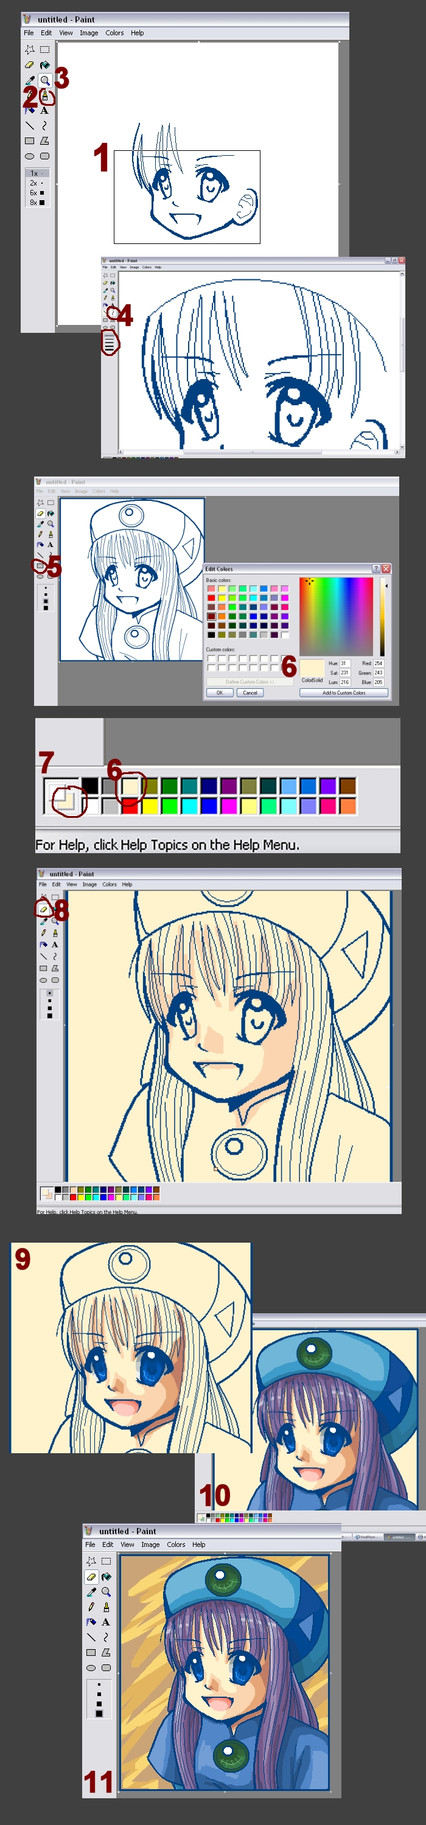
1-Using the same ideas as above get your line art brightest white against darkest black.
2-Go into the channels tab and hit "load channels selection" this will automaticaly select all the white areas of your picture as long as your colors are set to black on white.
3-Using the selection tool "select inverse" so now it only traces the lineart itself.
4-Now that your lineart is by itseld go to layers and hit "new layer" button. This will make the line art it's very own layer...i'd name it accordingly.
5-What i do next is hit "Alt+backspace"(make sure your colors are still black on white) and what this will do is make your lineart transparent so thereafter you can make it any color or intensity you want. Unselect the line art with the "Selection tool" and click the "lock transparent pixels" checkbox. Now your lineart can't be messed up. Create your next layer to begin coloring the image!
Hope this helps!"
-------------------------------------------------------------------------
EDIT2: En Español
1- Dibujo el boceto en papel, después lo entinto [a mano] usando un marcador/microfibra 0.5 ó 0.7mm. y finalmente lo escaneo a 300dpi [en modo de fotografía] ... como se puede ver, todavía están las líneas de lápiz que no borré >_>;;;;
2- Usando los controles de "contraste/saturación", trato de resaltar las líneas del dibujo [dándole más contraste e intensidad] ...además, usando la herramienta de borrar, limpio algunas imperfecciones de la imagen...
3- Usando el control de "gamma", hago que las líneas se vuelvan más oscuras, bajando la gamma a 0,75 aproximadamente.
4- Así, usando la herramienta "mascara" puedo seleccionar UNICAMENTE el color negro ... y convertirlo en un objeto o capa...
5- Ahora que las líneas del dibujo ya son una capa/objeto, entonces ya puedo hacerlo transparente [al 50 ó 60% aprox.]
6- ... finalmente, puedo empezar a pintar la imagen en un nuevo objeto/capa DEBAJO de las líneas del dibujo... ^_^
Related content


Comments: 202

uau!!!!!!!!!!!!!!!!!Me encantó la explicación!!!!!!!!!!!Gracias!!!! Voy a ponerlo en práctica!!!!!!!!!!!XDDDDDDD
👍: 0 ⏩: 0


hmmm, I use the Microsoft Digital Media Editor thingy, but this should work the same, yes? I'll try it and see what happens XD Thanx for posting it! It's really helpful!
👍: 0 ⏩: 0

Thank you for uploading this. It's very helpful. ^_^
👍: 0 ⏩: 0

very nice! cant beleive i never thought of that....-_-; quick question, where's gamma control located?
👍: 0 ⏩: 0


Hm . . . this should come in handy. Thanks for posting ^^
👍: 0 ⏩: 0

Wow, thank you! I always have trouble getting my lines to look clean, so it's really helpful to see the way others do it. Your explanation is really clear too ^^
👍: 0 ⏩: 0


doesnt corel photopaint have multiply layers? in photoshop and painter all you have to do (after adjusting the levels or contrast) is turn the layer into a multiply layer and color under it... it works the same
not trying to spoil your tutorial, i just think that you are putting too much work into it with the gamma stuff... but then again maybe photopaint doesnt have the same layer types
👍: 0 ⏩: 0

ahh! muy buena explicación!! gracias =3!! voy a intentar!! ojalá me funcione X3
besos!!!
👍: 0 ⏩: 0

")

Well, I hae a tablet but that doesn't matter. Your hand seems steady, evan besides. My hands are shakey
👍: 0 ⏩: 0

One other and easier possibility to draw under a black lineart is to follow the following steps :
1) Change contrast, gamma etc as explained above
2) Don't use the "mask" tool (or "load channels selection"), but just create an empty layer that you place under the one with the lineart.
3) The most important : in the Layer properties, choose "Multiply" as a layer mode. You can also adjust transparency if you want to see through the lines while you draw.
Actually I know how to do it in Gimp but I know you can do it in PhotoShop and Corel PhotoPaint too.
This way you can draw under your lineart even if it's not very contrasted. The black areas of your lines will be totally opaque while grey ones will be semi-transparent. Hence this Multiply layer can also be used for shading.
More info at [link] .
By the way, you have a very nice gallery ! :3
👍: 0 ⏩: 0


I'm cheap and I use ballpoints for inking on paper!
👍: 0 ⏩: 0


Great tut! Wondered how people scanned and colored it in.. though I should know lol..
👍: 0 ⏩: 0

anda... y es por eso q te queda tan claro!!! ^^
👍: 0 ⏩: 0

wahhh that's so useful! Thank you! I never thought of using mask and then making it transparent to make it softer.
👍: 0 ⏩: 0

muchas gracias por la explicación ^^
tendre que ir por un diccionario para entenderlo mejor
👍: 0 ⏩: 0


Brilliant! I'll have to use this in the future.
👍: 0 ⏩: 0

This was very helpful thankies!!
👍: 0 ⏩: 0

Ahh, thank you! I've been trying to find a lineart guide I understand and this one I do. >o<
👍: 0 ⏩: 0

ah, I've been trying to figure this out
moooochas gracias
👍: 0 ⏩: 0

¿Puedo preguntarte qué es eso de "tablet"? (me mata la ignorancia -_-)
👍: 0 ⏩: 1

Es una tableta gráfica, con la cual se puede dibujar y pintar muchisimo mas facil que con un mouse comun.... Acá hay un ejemplo: [link] ^_^
👍: 0 ⏩: 1
Guau O_O Lo que es la tecnología ")
👍: 0 ⏩: 0

Nice technique~!!!! Though it still looks like you inked it 
👍: 0 ⏩: 0

Wa, I also don't erase the pencil lines when I do with ink XD (just too lazy) XD
I didn't get very well the change of 3 to 4 T___T
Where is that "gamma"? I coudn't find. T__T'''
I think this is very different from Photoshop...
Wa, but I have Painter 8...is it similar? >.<'
A tablet is not that expensive in my country .__.
And you are already wonderful without a tablet...imagine with one!
👍: 0 ⏩: 0


 (Smile)")


y en español tambien lo podrias poner...........estaria genial
👍: 0 ⏩: 0


wooow !! this is easy .. i'll try it ^^
thank u for the TuT
👍: 0 ⏩: 0

wow....
long silence*..................
dont get it><
👍: 0 ⏩: 0

yes, i've ALWAYS been wondering how people clean up their linears without a tablet so i'm really glad you put this up~ thanks so much!!
👍: 0 ⏩: 0

Ugh. Now I just need to learn how to do perfect lines without messing up. xD;
👍: 0 ⏩: 0

ooohh.. Interesante..
parece que yo no andaba tan perdida..lo unico que no hago de eso es lo de Gamma (intentare a ver si me da buenos resultados)
👍: 0 ⏩: 0

wow that's interesting. Maybe if you're free you might do a shading tutorial as well I love the way you shade your characters!
👍: 0 ⏩: 0


I don't know if this has already been posted or not...but you said you didn't know about how to do the same thing in Photoshop so i thought i'd post help on that for your viewers *smiles*
1-Using the same ideas as above get your line art brightest white against darkest black.
2-Go into the channels tab and hit "load channels selection" this will automaticaly select all the white areas of your picture as long as your colors are set to black on white.
3-Using the selection tool "select inverse" so now it only traces the lineart itself.
4-Now that your lineart is by itseld go to layers and hit "new layer" button. This will make the line art it's very own layer...i'd name it accordingly.
5-What i do next is hit "Alt+backspace"(make sure your colors are still black on white) and what this will do is make your lineart transparent so thereafter you can make it any color or intensity you want. Unselect the line art with the "Selection tool" and click the "lock transparent pixels" checkbox. Now your lineart can't be messed up. Create your next layer to begin coloring the image!
Hope this helps!
👍: 0 ⏩: 0

Oooh, genial! Podrías subir la foto con las explicaciones abajo, please? si no te molesta, claru ^^
👍: 0 ⏩: 0

ooo! can't wait to try it out ^^ new techniques i've never tried
👍: 0 ⏩: 0

tablets rule you shold get one.
ask people on DA to donate to your cause haha <3
your artwork is splendid by the way ^^
👍: 0 ⏩: 0
<= Prev | | Next =>