HOME | DD

FireFlyExposedBubble Reflection Tutorial

Published: 2013-01-22 18:08:30 +0000 UTC; Views: 65260; Favourites: 2134; Downloads: 1533
Redirect to original
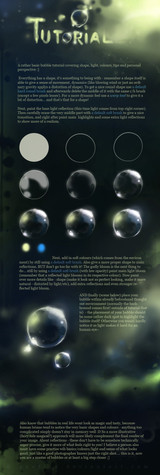
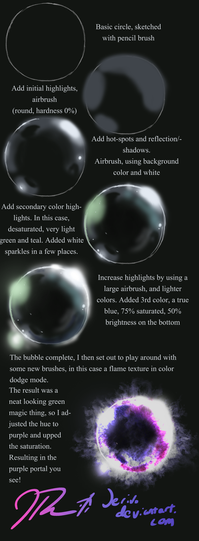
Description I couldn't find a tutorial on how to do convincing bubbles with proper reflections ... so I thought I should share how I did mine

I have shown two ways to make a bubble reflection ... the part in green is for PS 3 and lower

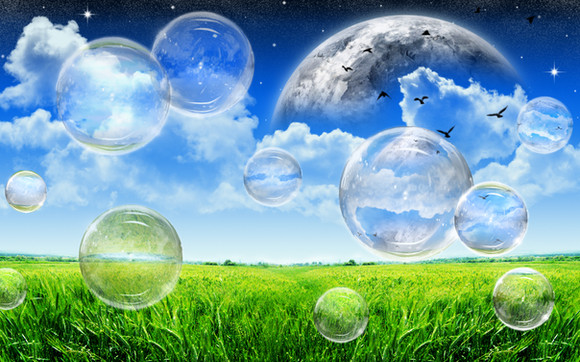
Here's what I made:

The bubble brush I used in the tutorial is this one (the first bubble in the set): [link] ~elestrial

This tutorial was painstakingly and lovingly made by me! You do not have permission to post it on other websites without my permission ... you are however free to use the "share" buttons to pin and tweet and stuff this tut.

Please feel free to browse my stock account

EDIT 01:
The 3D menu is only available on Photoshop CS4 Extended edition (and above?) ... so I added another method to make up for that. Now you have 3 methods to create the start of the reflection: 3D Sphere (blue); Liquify: Bloat (green) and Warp (purple).

Featured here:

PE: Stock, Resources and dA Related: Features

Also see the main article:

Stock, Resources & deviantART Related

Now let's get on with the features Hopefully these will help inspire you to help you discover what you could create to help the community

Stock & Resources

Stock Images

Tutorials

Textures

<

Related content
Comments: 167

FireFlyExposed In reply to ??? [2015-06-30 06:53:36 +0000 UTC]

great to hear! and thank you

👍: 0 ⏩: 0

Vanessa28 [2015-04-21 22:45:54 +0000 UTC]

Hey! You did the best you could with this tutorial and you did a great job!! I can't wait to try it out myself

👍: 0 ⏩: 1

FireFlyExposed In reply to Vanessa28 [2015-04-27 20:04:17 +0000 UTC]

Thank you! It's fun to do

👍: 0 ⏩: 0

KiraSaintclair [2014-08-10 08:34:10 +0000 UTC]

That's simply amazing Oo

👍: 0 ⏩: 1

FireFlyExposed In reply to KiraSaintclair [2014-08-21 11:06:48 +0000 UTC]

Aww thank you
Hope it is useful

👍: 0 ⏩: 1

KiraSaintclair In reply to FireFlyExposed [2014-08-23 17:40:12 +0000 UTC]

It is^^

👍: 0 ⏩: 0

XxAnimeLov3rxXCredit [2014-06-30 10:28:29 +0000 UTC]

Gorgeous ~! Thank you so much for the help! 

👍: 0 ⏩: 1

FireFlyExposed In reply to XxAnimeLov3rxXCredit [2014-07-13 10:02:12 +0000 UTC]

Thank you

and you are very welcome

👍: 0 ⏩: 0

DarkForceLeader [2013-12-17 01:56:42 +0000 UTC]

You saved me the time and trouble, thanks a lot.

By the way, your reflection bubbles are very beautiful.

👍: 0 ⏩: 1

FireFlyExposed In reply to DarkForceLeader [2013-12-17 14:57:07 +0000 UTC]

Aww ... thank you very much

👍: 0 ⏩: 1

DarkForceLeader In reply to FireFlyExposed [2013-12-17 16:55:27 +0000 UTC]

My pleasure.

👍: 0 ⏩: 0

CoderSpriter [2013-11-21 01:02:05 +0000 UTC]

Awesome tutorial!

👍: 0 ⏩: 1

FireFlyExposed In reply to CoderSpriter [2013-11-24 17:58:04 +0000 UTC]

Thank you very much

👍: 0 ⏩: 1

CoderSpriter In reply to FireFlyExposed [2013-11-25 00:14:58 +0000 UTC]

  No problem! 

👍: 0 ⏩: 0

FlyingGekko774 [2013-10-29 19:22:24 +0000 UTC]

Epic, epic tutorial!!

Thank you for taking the time to do this!

👍: 0 ⏩: 1

FireFlyExposed In reply to FlyingGekko774 [2013-10-31 11:10:01 +0000 UTC]

hope you can use it
Thank you

👍: 0 ⏩: 0

Chengmonkol [2013-08-08 03:15:17 +0000 UTC]

WOooooooooooooooooooowwwwwwwww!!!

👍: 0 ⏩: 1

FireFlyExposed In reply to Chengmonkol [2013-08-08 07:40:24 +0000 UTC]

👍: 0 ⏩: 0

lolotaha [2013-07-27 05:20:25 +0000 UTC]

but the 3d menu does not   show in menus
and i have photoshop cs6

👍: 0 ⏩: 1

FireFlyExposed In reply to lolotaha [2013-07-27 14:47:37 +0000 UTC]

the 3D menu is in the extended addition.

👍: 0 ⏩: 1

lolotaha In reply to FireFlyExposed [2013-07-27 17:18:14 +0000 UTC]

thank you
i will try to download it

👍: 0 ⏩: 0

beshep [2013-07-17 18:49:58 +0000 UTC]

Greatgreat tut!! thx ))

👍: 0 ⏩: 1

FireFlyExposed In reply to beshep [2013-07-19 16:14:17 +0000 UTC]

Thank you very much

👍: 0 ⏩: 0

Leeaves [2013-07-17 08:29:43 +0000 UTC]

Wow, that's really awesome- it helped me a LOT!

👍: 0 ⏩: 1

FireFlyExposed In reply to Leeaves [2013-07-19 16:30:14 +0000 UTC]

Great
I'm really glad it helped

👍: 0 ⏩: 0

thejaguar1 [2013-06-24 23:22:59 +0000 UTC]

Love it. I love how your tuts teach me step by step. God Bless and More Power!

👍: 0 ⏩: 1

FireFlyExposed In reply to thejaguar1 [2013-06-26 15:46:22 +0000 UTC]

Thank you very much for your comment! It's fantastic to hear that this is easy enough to understand.

👍: 0 ⏩: 0

Zephyrift [2013-03-16 19:27:56 +0000 UTC]

Cool! I'm still learning the BASICS or PhotoShop however!

👍: 0 ⏩: 1

FireFlyExposed In reply to Zephyrift [2013-03-18 07:26:38 +0000 UTC]

Hmm ... photoshop is surprisingly easy to use. If you need help with this tutorial, just not me

👍: 0 ⏩: 1

Zephyrift In reply to FireFlyExposed [2013-03-18 09:52:30 +0000 UTC]

Ahh. Thank you!

👍: 0 ⏩: 0

KiyotoMidori [2013-03-14 13:35:43 +0000 UTC]

it's impossible. thanks : D

👍: 0 ⏩: 1

FireFlyExposed In reply to KiyotoMidori [2013-03-14 15:54:10 +0000 UTC]

Impossible?

👍: 0 ⏩: 0

smsgraphics [2013-03-07 18:38:03 +0000 UTC]

Brilliant! I had been wondering about reflections for some time in making more realistic bubbles or glass orbs. You've given me something to go on. Thanks!

👍: 0 ⏩: 1

FireFlyExposed In reply to smsgraphics [2013-03-13 05:49:23 +0000 UTC]

Awesome ... brilliant when someone can use it
Hopefully it works as well for you as it did for me

👍: 0 ⏩: 0

calavel [2013-03-03 23:16:39 +0000 UTC]

wow, not sure if I'll use but will save and play around - thanks so much!

👍: 0 ⏩: 1

FireFlyExposed In reply to calavel [2013-03-13 05:51:42 +0000 UTC]

maybe one day you will want to make bubbles ... then you will think *OOOH ... I remember that bubble tutorial on dA!*

👍: 0 ⏩: 0

Faithful-Imagination [2013-02-18 04:23:10 +0000 UTC]

This is AWESOME!

👍: 0 ⏩: 1

FireFlyExposed In reply to Faithful-Imagination [2013-02-18 13:29:09 +0000 UTC]

Thanks

👍: 0 ⏩: 1

Faithful-Imagination In reply to FireFlyExposed [2013-02-19 02:03:29 +0000 UTC]

You're welcome!

👍: 0 ⏩: 0

namenotrequired [2013-02-09 22:07:34 +0000 UTC]

Featured in Stock, Resources and deviantART Related Feature for #projecteducate

👍: 0 ⏩: 1

FireFlyExposed In reply to namenotrequired [2013-02-09 22:27:09 +0000 UTC]

YAY!
and OMG you have a $! I never saw that before ... YAY, congrats!

👍: 0 ⏩: 1

namenotrequired In reply to FireFlyExposed [2013-02-12 23:45:21 +0000 UTC]

Hehe, thank you! I have an internship

👍: 0 ⏩: 0

tricky9cats [2013-01-31 12:22:34 +0000 UTC]

Fantastic tutorial, will definitely try it, thank you

👍: 0 ⏩: 1

FireFlyExposed In reply to tricky9cats [2013-02-03 17:34:08 +0000 UTC]

Thank you very much ... and you're welcome

👍: 0 ⏩: 0

Kirsui [2013-01-29 14:28:18 +0000 UTC]

Thank you! This tutorial looks extremely useful!

👍: 0 ⏩: 1

FireFlyExposed In reply to Kirsui [2013-02-03 17:34:34 +0000 UTC]

Thanks

👍: 0 ⏩: 0

Createnna [2013-01-29 01:22:22 +0000 UTC]

Whoa! That is one really cool effect! Thanks for making this.

👍: 0 ⏩: 1

FireFlyExposed In reply to Createnna [2013-02-03 17:35:01 +0000 UTC]

Thank you

👍: 0 ⏩: 0

Coffee-vee [2013-01-28 04:00:30 +0000 UTC]

..sooo can this be like....welll is there a SAI tutorial for this that ya got? o3o

👍: 0 ⏩: 3

PizzaPotatoNBacon In reply to Coffee-vee [2013-02-10 14:16:34 +0000 UTC]

I use both and in my opinion SAI isn't really what one should use in Photomanipulation.
SAI is more of a digital art kind of program, whereas PS can be both (but you'd have to get yourself some brushes for blending ). SAI is probably better for digital paintings, but if you want to do Photomanipuatory effects such as this, PS is your friend.

👍: 0 ⏩: 0


| Next =>