HOME | DD
 GriswaldTerrastone — Perspective Tutorial: 1VP 6

Published: 2010-10-03 21:10:04 +0000 UTC; Views: 8534; Favourites: 96; Downloads: 265
Redirect to original
Description
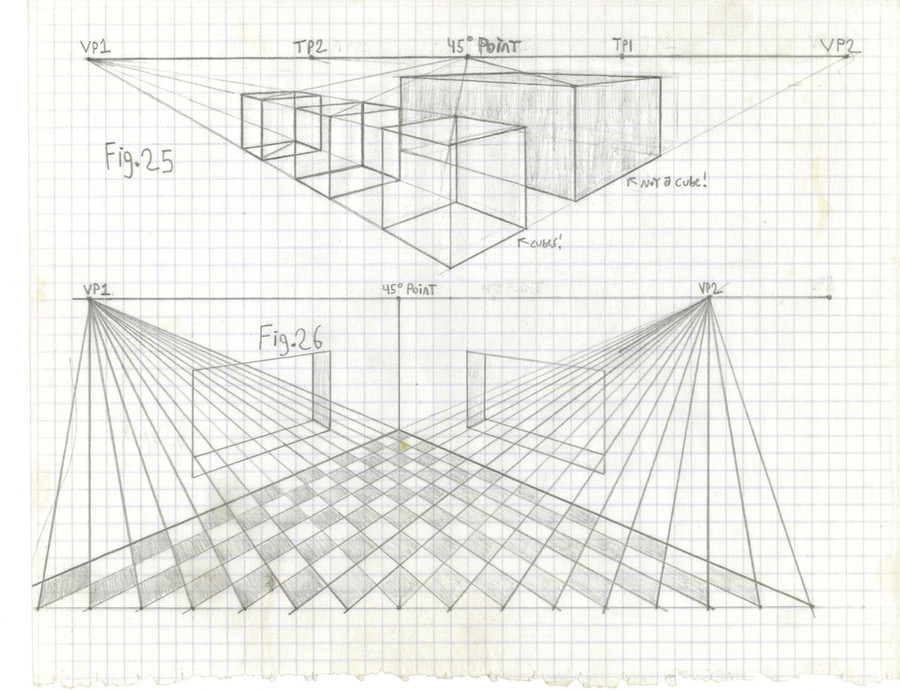
Well, well- what have we here? Looks like a corridor, and a tricky one at that!Such a thing was quite intimidating to me once, because I did not keep in mind the basic steps. Had I done so, even just the ones from Page One, this would've been much easier.
First, ignore the walls and ceiling. What do you have left?
The first part of the checkered floor.
That's it.
And so it is with the other three sides. That is it.
Now, how far do you space the horizontal lines? You could just use angles, like for the checkered floor, drawing a faint center line to start with here, or you could just try to make it "look" right. Just keep in mind that where you draw that second horizontal line, above the first and longest line, will define the size of each segment.
But, the how-to...
First, draw a nice, even rectangle, or at least close to it for now.
Now, connect the corners, so you have an "X" in the center. This is our vanishing point, and as before, is the heart of everything.
Draw a horizontal line above the bottom line. Draw the other three lines, nice and vertical for the walls, and nice and horizontal, for the ceiling.
You have a smaller rectangle.
In whatever way you want, repeat this, until you are down to tiny rectangles. No need to go beyond that, if you don't want to.
You now have a basic rectangular corridor.
But let's not stop there! Find the middle of the top line on the biggest rectangle- there!- and draw two dots, each the same distance from the center dot on that line.
Now, connect one, and then the other, of those dots- left and right- to the vanishing point.
You now have two lines on the ceiling, converging at the vanishing point.
In each segment of the ceiling, draw in two horizontal lines- but notice something!- notice how the space between our- let's call it an overhead light- overhead light and the "near" horizontal line is bigger than the one between it and the horizontal line below it?
Remember the laws of perspective, how equal-sized things seem smaller than ones further away? Remember those six lines on page one, how they grew closer together and smaller as they went off into the distance?
Same thing here. Exactly the same. It all comes from those basic things.
Repeat as you go down.
Now, on the right side, we once again use the vanishing point to draw in the doorway, adding those horizontal lines. Also see how the space on one side of the doorway ("1") is smaller than the other ("2")?
Same as before.
Now, that "window"- this time, two lines from the vanishing point, two horizontal lines of the same length, then TWO MORE LINES FROM THE VANISHING POINT to outline the other side. Add the vertical line, and it's ready.
And that is all, folks. Just as with math, it all builds up from the very basics.
Next page:
[link]
Related content


Comments: 2

I remember having to do similar vanishing point exercises way back in high school art class. We never went all that far with vanishing points, just going as far as one using a road and a building alongside it as an example. These perspective tutorials are really good with simple steps that are easy to follow.
👍: 0 ⏩: 1

Thanks!
I've just uploaded the images for the second part: I'll type in the text soon, but I'm almost out of time here.
👍: 0 ⏩: 0