HOME | DD
 GriswaldTerrastone — Perspective Tutorial: 2VP 5

Published: 2010-10-29 22:02:42 +0000 UTC; Views: 3421; Favourites: 29; Downloads: 128
Redirect to original
Description
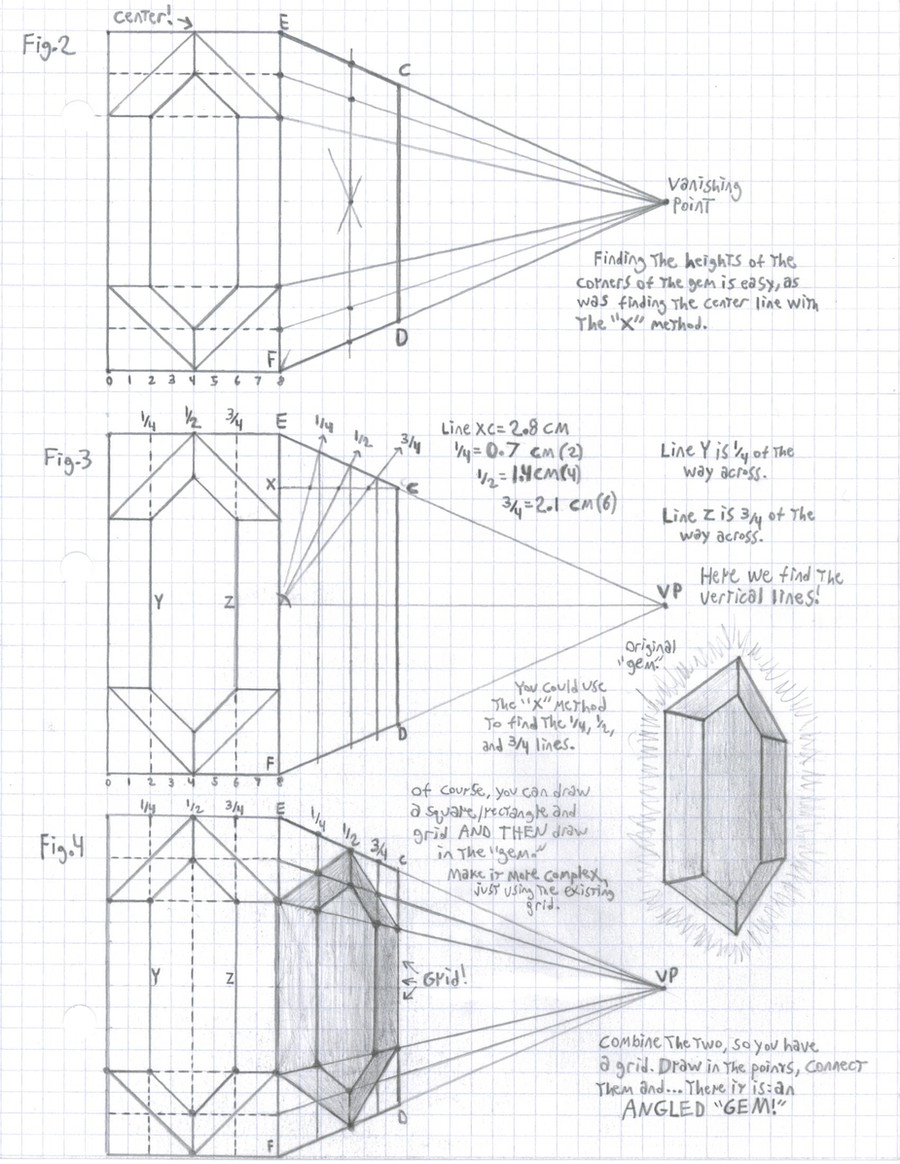
O.K, now it gets a bit stricter here…but in a good way! So far, we’ve just drawn blocks as we went. It worked, but what if you want an actual, good, even block- a cube? How in the world do you do it? We know that when you move past a cube (or almost anything) one side will seem to get closer to the middle and the other further away, but how do you draw it?
Squares and a cube are so central to so much, being able to draw one is really a good thing to be able to do!
Here’s how…
Draw a line- make it horizontal here- and on the left end put Vanishing Point 1. Put Vanishing Point 2 on the right end.
From VP1 draw a line that is 45 degrees to the horizon, as shown. Do the same from VP2; what you should have is a nice, neat "V" with its point directly under the middle of the horizon, as in Fig. 15.
Right now, measure the distance from VP1 to that junction, and then measure the distance from VP2 to the junction. Write those two numbers down; you’ll need to use them soon.
The 45 degree point will be right in the middle of the horizon, as it always will be when you want a square. If you ever simply want to draw 2VP squares, all you have to do is draw a line with the two vanishing points and the 45 degree point right in the middle; the line coming from that mid-point will always give you a square (anything to its left or right will give you a rectangle). Notice how the line from the "junction" to the 45 degree point neatly bisects the junction into two 45 degree angles- this will be important for a later part of this tutorial!
By now you should have three points on the horizon. To avoid confusion later on, you can erase all three of the lines below the horizon; all you need is the horizon and the three points on it.
(NOTE- The small picture to the left of Fig. 16 shows a logical mistake: the "V" has been turned, so its point is no longer below the middle of the horizon. But the line coming from the point is still a "45 degree line" and you still get a "45 degree point"...you'd think you'd get a square, as I did.
HOWEVER- This does NOT give you a square; what you will get is a rectangle! To get a square the "45 degree point" MUST BE RIGHT IN THE MIDDLE OF THE HORIZON. Anything else will give you a rectangle. Notice how the "V" of that small picture actually forms half of a rectangle?)
In Fig. 17, I just drew in a dot below the horizon, and then drew a line from each vanishing point through it. This is the “Front Corner Point.” You’ll see why in just a second, but if you already know why, then you’ll get this with no problem at all.
Next page:
[link]
Related content


Comments: 9

I am still confused as to how you found the 45 degree point, specifically how you found it once your lines were no longer equal in length. It makes sense to me that if your two lines are equal, the 45 degree point would be halfway in between them. It also makes sense that if you then try to use *that same point* for a different set of lines, it would not be the 45 degree point any more.
Where I get lost is, how did you find the 45 degree point when the two lines are different lengths? Are you using a protractor, or somehow using the lengths of the lines to figure it out?
👍: 0 ⏩: 2

If you mean that smaller triangle on the left, by a very primitive method. Imagine the left point as a hinge; swing the right end of the horizon down towards the lower point. The line still divides that low angle into two 45 degree angles (that's why I call it a "45 degree point), but now you'll get two unequal lengths on either side of the point on the horizon.
It is a warning that just because you have a line that divides the low angle into two 45 degree angles, you won't necessarily get a proper square out of it. What matters is that the center point MUST be right in the middle of the horizon.
👍: 0 ⏩: 1
I was confused how you got from figure 16 to figure 17. I saw the little triangle to the left of figure 16 and saw your note about "bad", so I assumed that all triangle shapes with unequal legs were bad. Figure 17 looked similar to the side note of figure 16 that you said was bad, so I was confused as to what the difference was between figure 16's side note and figure 17.
I didn't realize that the 45 degree point is ALWAYS in the middle of the horizon, and the reason that you drew the triangle in figures 15 and 16 was to figure out where to put the temporary points in the next step.
👍: 0 ⏩: 1
It's later explained how this works. A typical tutorial starts this way, but later you find out that it's this easy:
1) Draw a horizontal line with a point on each end and one dead center. This is the Horizon.
2) From that center point draw a line, it doesn't have to be straight down, oh no!
3) Put two points on that new line.
4) From each of the endpoints on the horizon, draw a line through those points on the new line, a total of four. Make sure they are long enough.
You have your 2VP square!
 (Smile)")
👍: 0 ⏩: 0
Wait, is the giant right triangle that you're building kind of like a reference field? As in, as long as I draw my cube *within* the lines of that triangle, I can use the 45 degree point as the 45 degree point for the cube I'm drawing?
Sorry if I'm not making sense, I feel like this is kind of hard to explain well over typing. It's the kind of knowledge/understanding that doesn't translate well into words.
👍: 0 ⏩: 1
Sorry for the so many comments, but I think I finally got it! It's amazing what tinkering around and trying stuff does. Thanks for the tutorials; I've had some introduction to perspective before, but I could never figure out how to make things square, and I think I'm starting to get it.
Also, I was able to combine this with your "Checkered Floor" tutorial from 1-point perspective to make a 2-point checkered floor. Man, I'm feeling smart right now.
Thanks again for the tutorials!
👍: 0 ⏩: 1
Serendipity is key to so much- NEVER be afraid to ask "what happens if I try this..."
No problem with the comments- that's why this tutorial is here: to allow other artists to understand this BEFORE hitting their mid-forties.
Good luck and have fun!
 (Wink)")
👍: 0 ⏩: 0

This is correct for 45 degree angle perspective. It is not quite correct for any other angle. I have been struggling with this kind of thing too. I will enjoy reading through your work to see what I can learn.
I have some solutions that I have not quite seen in you work.
2 and 3 point perspective : [link]
my other perspective works: [link]
👍: 0 ⏩: 1
By swinging the vertical line left or right, you can shift the view (actual rotation is covered later). The key thing here are squares; to get them- like for a checkered floor- you must have that horizon point dead center.
Rectangles- ones you actually deliberately design, like ones that are twice as wide as they are tall- are also covered later. Honest!
👍: 0 ⏩: 0