HOME | DD
 GriswaldTerrastone — Perspective Tutorial: Rotate 1
Published: 2010-12-17 21:58:41 +0000 UTC; Views: 5177; Favourites: 23; Downloads: 84
Redirect to original
Description
SUPERIOR TECHNIQUE HERE:[link]
(THIS was a tough one, no question about it!)
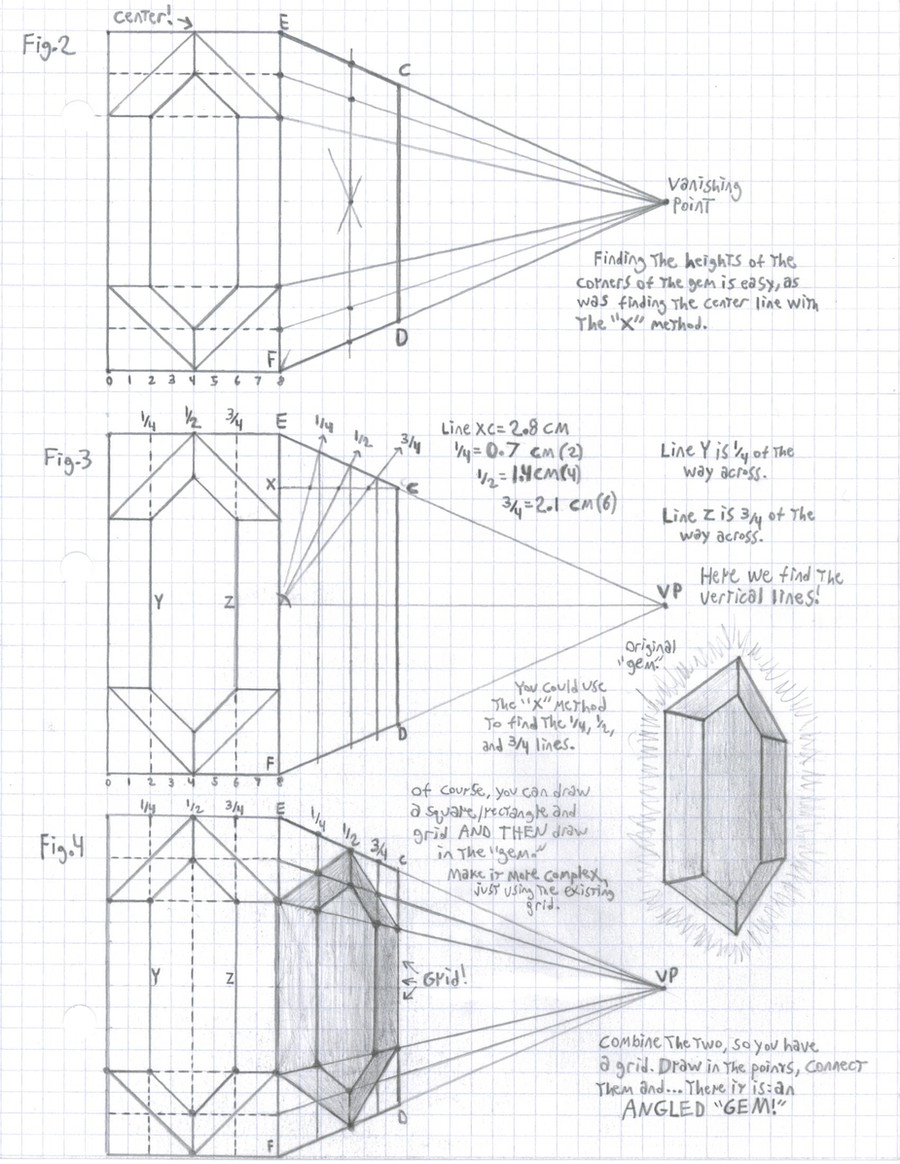
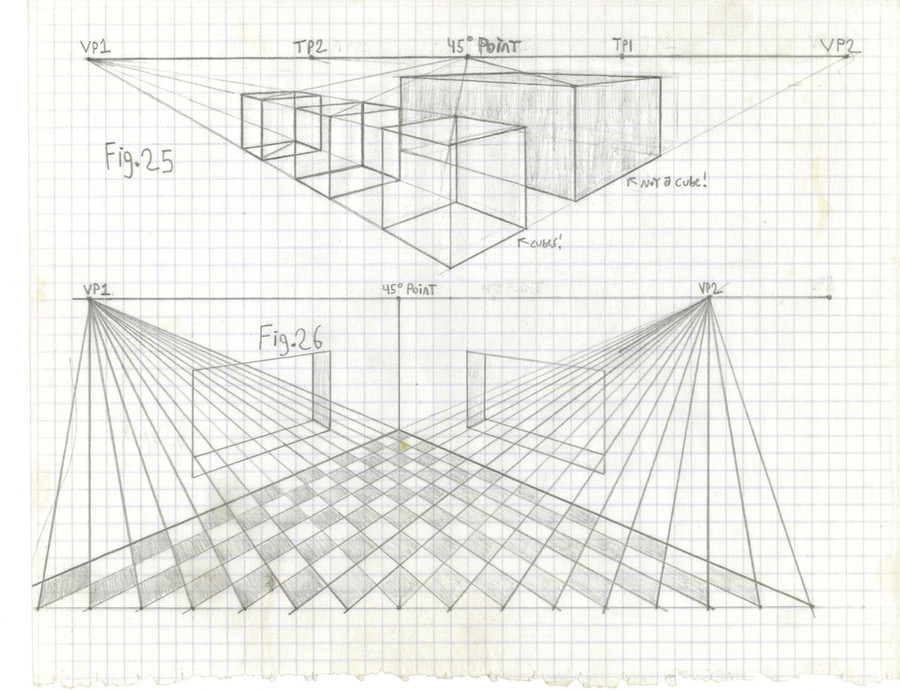
So far, this tutorial has shown how to do a number of things, including how to draw a table and benches or stools.
But if you want to draw a tavern scene, you've probably wondered: taverns in adventure stories- or real life!- are rarely as neat and tidy as drawing objects using either a one or two vanishing point method would achieve.
The problem is that, with either method, objects always follow the lines from the vanishing point(s).
Take a look at any object drawn in two vanishing point perspective, and you'll see that all objects line up with the lines from those points. Once you've drawn the horizon and the vanishing points, then drawing something like a square in a particular place will ALWAYS turn out that way. The combination of horizon, vanishing points, 45 degree line and the placement of the two corner points on it will yield one and only one position, one and only one alignment.
If you want to draw one of the blocks in a line turned somewhat, you cannot do it with whatever existing set-up you have.
So, what to do? What to do if you want one of the stools turned in a way different than the others in front of the bar or bench?
Here's a way, for traditional artists!
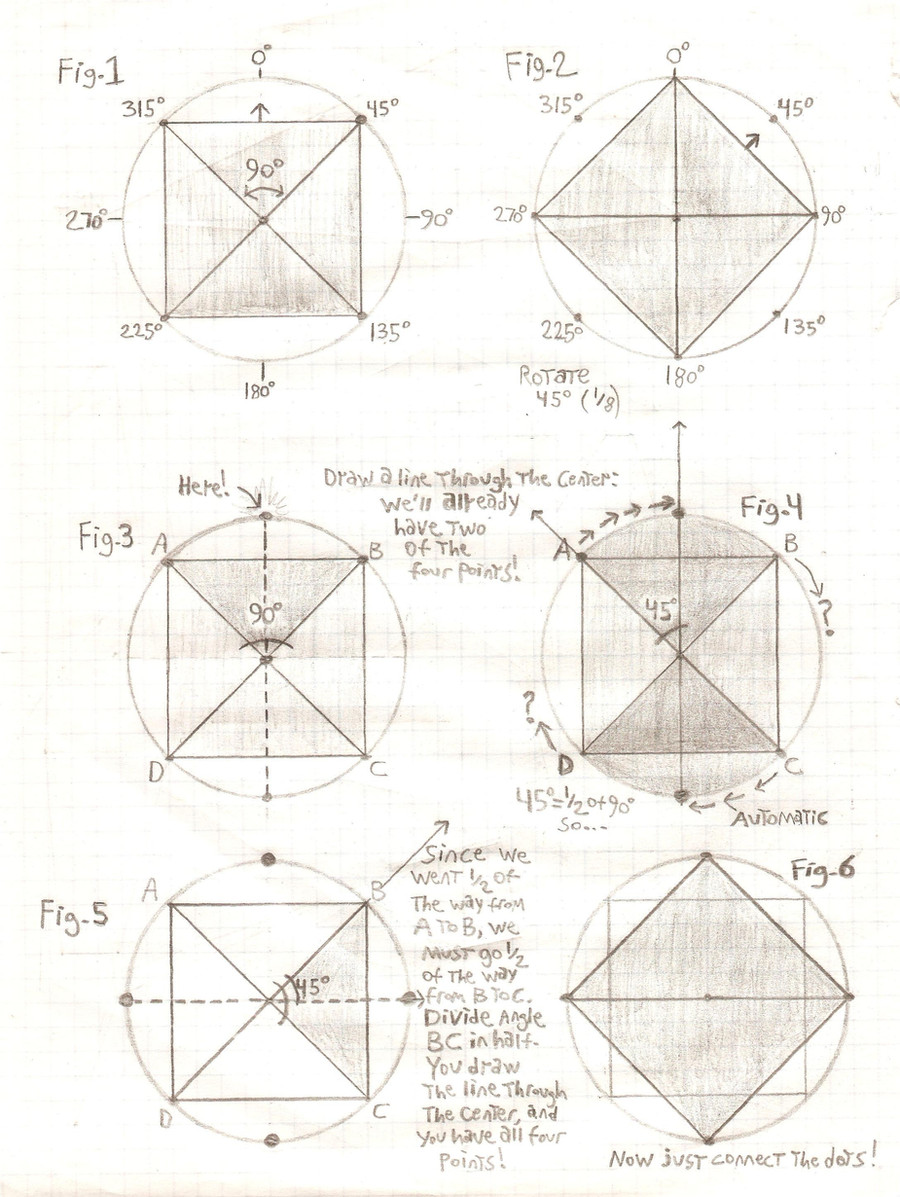
First, consider a square. You've probably seen a circle drawn around it in such a way that only the four corners touch the circle. You also know that a rotating square rotates on its very center, and you know that drawing an "X" will show where that is.
This is the very key to rotating the square with traditional methods- the fact that all four points of the square's corners are ALWAYS on the circle. The same applies to rectangles too!
Also consider that as one point moves along the circle, so will the others- all at the same rate. So if one point moves 90 degrees (a quarter turn), then so have the others. Half as much? Then so have the others.
A circle has 360 degrees, so 90 degrees is a quarter, 180 degrees is 1/2, 270 degrees is3/4, and 45 degrees would be 1/8.
In Fig. 1, a square was drawn in a circle. Notice the small arrow. The circle is surrounded by numbers showing how many degrees there are from the top, going clockwise. If going counterclockwise, it's the same thing (left or right, a quarter turn is 90 degrees). Also notice the corners touching the circle.
In Fig. 2, the square was turned 45 degrees, so now it looks like a diamond. If turned another 45 degrees, it'll look like a square again.
(For a rectangle, it would take a full 180 degrees- a half turn- for this to happen, although all four of its points would also be on the circle.)
Here I should mention a somewhat common mistake: one might draw a diamond in a square or a square in a diamond to rotate it. This will shrink the object. Compare Fig. 1 and 2, and imagine drawing a diamond in the square in Fig.1. See how much smaller it would be?
In Fig. 3, we want to rotate the square again, but this time we'll use the method for rotating any square. The first thing you should do is to draw a circle around the square. This is because no matter what you do, the four points of the square will be on that circle.
Now, draw a point on the circle, in this case between A and B (we'll draw it exactly on top). From there, simply draw a line through the center of the square until you reach the other side of the circle. This is where the point between C and D goes.
So far, you have the circle that the four points will be on, and- easy enough so far!- TWO of the four points!
If you can figure out where to put a third point, then you'd just draw a line through the center of the square to the other side of the circle...you'd have the fourth point and...just connect them, and you have your rotated square!
It's just figuring out where on the circle to put that next point...
Remember how as one point moves around the circle, so will the others, at the same rate? That is how we'll find out where to put that point!
For Fig. 4, in this case, we'll assume that the square is being rotated to the right, clockwise. Therefore, the first point moved from Point A towards Point B, and the second point, automatically, moved away from Point C towards Point D.
The angle formed by lines A and B is 90 degrees (this is a simple example). The line we drew for the new point divides it in half (45/45 degrees)- so the new point travelled half the distance from A to B.
So...
ALL of the new points must have travelled halfway from one point to the next.
In Fig. 5, the angle formed by lines B and C is also 90 degrees. Since the first point travelled halfway, so will the new point between B and C.
Draw in that new point, draw the line through the center, to the other side...notice how the line splits the 90 degree angle in two, 45 and 45 degrees? Same as before.
You have all four points!
In Fig. 6 you have only to connect them, and just as with Fig. 2, you have rotated the square in place!
And that is the very heart of this part of this tutorial!
 (Smile)")