HOME | DD
 hollyann — Colouring Tutorial

Published: 2005-10-13 13:56:49 +0000 UTC; Views: 51787; Favourites: 378; Downloads: 4264
Redirect to original
Description
This particular tutorial was originally posted in my LiveJournal, but I thought I would also post it here, just in case people don't read my LJ (Wink)") If you would like to see the original post of this Tutorial (with larger pictures), the link for it is here: [link]
If you would like to see the original post of this Tutorial (with larger pictures), the link for it is here: [link] Before you begin reading this, I apologise if the photos are blurry...it's hard taking close-up pictures with one hand, it being your opposite hand that you're not used to (since I'm right-handed when I draw and colour, I had to take pictures with my left hand). I hope that it'll still give you a general idea of how I do things
 (Smile)")
Lastly, this is just a tutorial on how I colour. It may not work for you, or maybe it might, I dunno. But this is how I colour. For the most part, I've used Prismacolour brands in this piece, but you can really use whatever you like...I do have other brands with me, so I'm not limited to using JUST Prismacolours
Photo #1
Supplies:
1. Strathmore Bristol Board Smooth, acid-free (I use 9x12")
2. Pencil crayons (I keep mine in groups, according to colours, plus, there's also a mix of Prismacolour, Prang, Crayola, Laurentien, and Shopper's Drug Mart brands in there)
3. Prismacolour Markers
4. ChartPak AD Markers (I'll give more info on these guys later)
5. "Specialty" markers (Galaxy marker that writes in white, and metallic silver marker)
6. Micron pens for inking
7. My pencil and eraser
8. Um...that's my flying squirrel plushie. She wanted to be in the picture
9. (Not Seen In This Picture...) Prismacolour Blending Pencils...there will be a picture of them later on though
Now, for this particular drawing that I did for this tutorial, I didn't use ALL of these things, but I used most of them. The only things I didn't use for this drawing was the Specialty markers and the ChartPak AD Markers.
Photo #2
The Drawing:
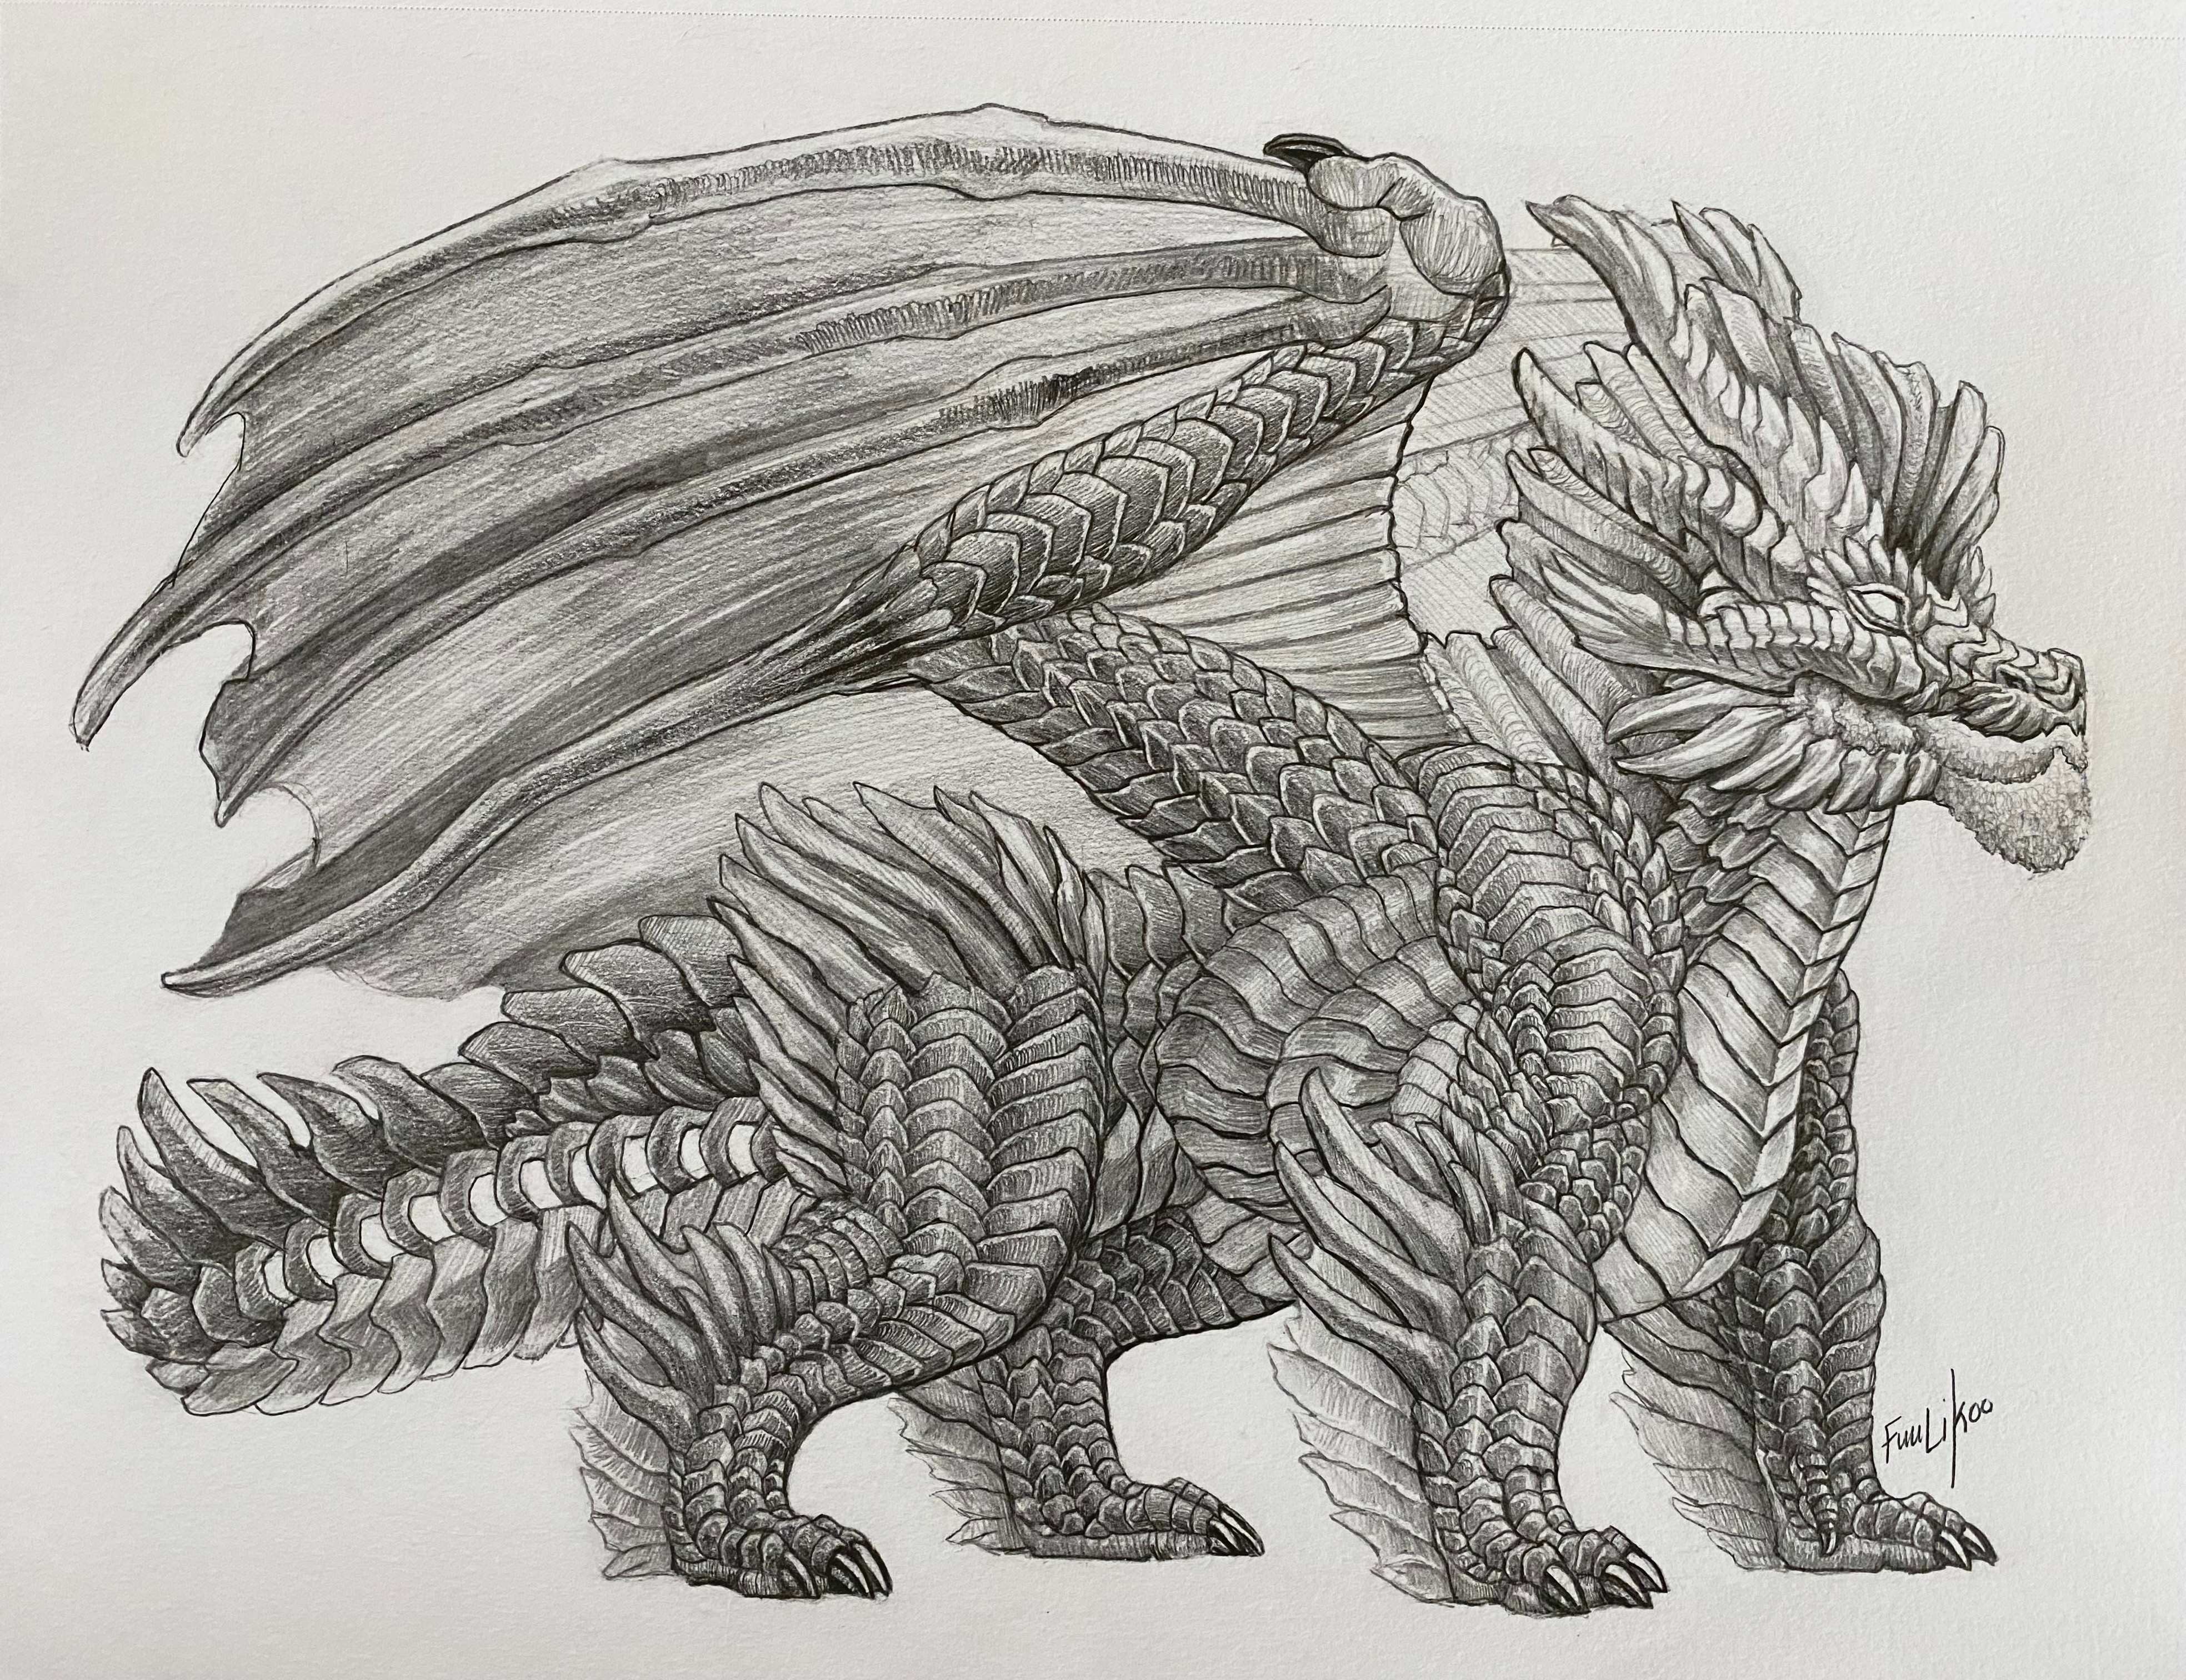
I chose to draw Clax for this tutorial cuz...Um...I didn't really know what to draw for it, really XD Looks like he just woke up from a nap XD Anyways, I had penciled in my drawing, and then I inked it with my Micron pen. I erased the pencil sketch, and then (as seen in this photo, I'm going over the inked lines again, making them a little more darker, as well as putting in some thicker lines here and there. You can see parts of it where I started going over it with the inking pen a little more, and other places is just small lines.
Photo #3
This is what it looks like when it's all inked
Doesn't he look like a happy camper? Photo #4
Before I start colouring, I get a scrap of bristol board. Since Clax is mostly purple, I got all of my purple markers out and tested them out on the scrap paper. I went with the colour "Imperial Violet" (the colour that's on the left, first colour of the first row). I don't have many shades to work with, unfortunately, so I go with what I usually have, and then improvise along the way. Using that scrap bristol board will be very useful later on too, so keep reading
Photo #5
Using the Imperial Violet marker, I colour Clax's body colour with it. I'm purposly leaving his mane, tail tuft, eyes and beak uncoloured for most of the tutorial (usually, I colour everything all at once with the markers), but I'm working on his main colour, just so you can see how it's done. And yay! I suck at colouring with markers XD But since I'm going to be covering it up with pencil crayons, it doesn't matter...you won't see the streaks by the time I'm done.
Photo #6
And here he is, his main colour coloured with markers. For some odd reason, the pictures make him look more on the blue-ish side rather than purple
") But anyways. After I had done colouring this, I decided that the colour was a little too dark for my liking...but that's Ok, cuz I'm going to lighten it up
But anyways. After I had done colouring this, I decided that the colour was a little too dark for my liking...but that's Ok, cuz I'm going to lighten it up Photo #7
I used Greyed Lavendar (a Prismacolour pencil), and I coloured on top of it. This is what the pencil's colour looks like compaired to the solid marker, I purposly coloured just the head and a bit of his forearms, just give you an idea.
Photo #8
And here's how it looks, completely coloured in the Greyed Lavendar
He's ready to be shaded now Photo #9
I found a darker shade of purple in my pencil crayons stack...For this shade, I used Imperial Violet (which is actually a little darker than the marker of the same name).
Photo #10
I used an even darker colour for more shading...The Prismacolour pencil called Violet. you can't really see it all that well in the photo though
But after I've laid down all the shading that I wanted, now's the time for....Photo #11
...The Prismacolour Blending pencils!
") I have a bunch, stacked together like the different colours of pencil crayons I have. It's time to start blending the shades of colours together.
I have a bunch, stacked together like the different colours of pencil crayons I have. It's time to start blending the shades of colours together.Photo #12
(Sorry for the fuzzy picture)
") In places where I want show a little bit of texture and show exactly which way the fur/feathers are going, I usually start from the darkest point (like, under his eye), and drag the pencil across to the lighter areas. Then I pick up the pencil and just repeat that part. Where it gets lighter (where the pencil is atright now in the photo, I sometimes scribble that part with the blender pencil, to blend all that shading stuff in with the lighter colours there on the cheek. Whenever I colour a character, I usually do the head first.
In places where I want show a little bit of texture and show exactly which way the fur/feathers are going, I usually start from the darkest point (like, under his eye), and drag the pencil across to the lighter areas. Then I pick up the pencil and just repeat that part. Where it gets lighter (where the pencil is atright now in the photo, I sometimes scribble that part with the blender pencil, to blend all that shading stuff in with the lighter colours there on the cheek. Whenever I colour a character, I usually do the head first.Photo #13
You might be able to see it a little better here...The colours look more blended, rather than "scribbly".
Photo #14
Again, trying to show the difference between not-blended, and blended. This is the "not blended" pic
I was just focusing on the forearms for this.Photo #15
Blended...although, unfortunately, it's fuzzy cuz of the photo
When I get into larger areas, I tend to just use the Blending pencil like I'm colouring with it. I also press down on it too, that also helps to move the colour around a little bit more.Photo #16
After I'm done blending the whole body, I'll take a regular Prismacolour white pencil and put a little bit of highlights in there. That's one thing I like about the blender pencil...you can still colour on top of it
And, as you can see, I'm always moving my drawing around. Sometimes it's right-side up, sometimes it's sideways, sometimes it's upside down Photo #17
Well, the main body colour is done!
Basically, it's just repeating what you did before. Here's Clax with the basic marker for the mane and tail tuft. I used the Prismacolour marker called Violet.Photo #18
Here's where that scrap piece of Bristol Board comes in handy again
I use those scribbles that I had tested out the colours earlier, to test out which colours match the marker, as well as which ones look good as shading and for highlights.Photo #19
For finishing Clax's mane, I used the Prismacolour pencil Violet to completely colour in his mane on top of the marker. Then, I used my black pencil crayon, as well as that Greyed Lavendar pencil. I scribbled the black on in areas that I thought would be the shadows, and then used the Greyed Lavendar for the highlights. Then I blended it together. I had to put the Greyed Lavendar on again after I had blended it, cuz the darker colours overwhelmed it a bit. So, that's how his mane and tail tuft look like now.
Photo #20
Now for his beak. Whenever I colour something black, I usually use blue marker as the base colour. In this case, I used Prismacolour Light Cerelean Blue (it's my most used marker). I colour his whole beak blue.
Photo #21
Ugh...Another fuzzy picture
I coloured most of the beak with my black pencil, leaving some areas "blank" so that the blue can show through (the blue will become the highlight colour).Photo #22
Grab that old scrap piece of Bristol Board again (see, it's really handy!). I clean off my Blending pencil by just dragging the tip against the old bristol board. I have other Blending pencils that I could use, but I'm too lazy
Drag it across the bristol until there's no more colour left over.Photo #23
Bleh, another fuzzy picture >.< Anyways, I use my Blending pencil and "colour" the black with it. The blending pencil usually makes my black pencil show up a lot darker than what I usually colour on the picture. When I get to the blue part of the beak (like the highlight in the centre of the beak), I only colour up to the blue part with the black, mostly cuz the Blending pencil WILL drag that black over, and I don't want to completely cover that area. I just keep the black where I want it. After I'm done with that, I clean off the Blending pencil again, and then go over the edges of the black, where it meets that blue highlight colour, just so soften the edges a bit more.
Adding the eye colour is just as easy (just not as much to do, since they're small). I coloured the eyes with Prismacolour Crimson Red marker, and then I used a really really dark red-ish purple colour (I think it was Prang Raspberry) for the little bit of shadow at the top part of the eyes, and then just plain white for the highlight of the eyes.
DONE!
And he's all done!
Sheesh, you'd think he'd be happy that he was all coloured This is the scanned-in finsihed version of the pic, and I had to fix it up in Photoshop so that he'd look at least close to the purple that he really is.A Note about CharPak AD Markers : I didn't use any for this drawing, but I DO like using them.
Pros for ChartPak AD markers:
* They don't streak!
Woo! The colour goes on flat, and I've had it so that the marker dried on the bristol board, and then I went back and scribbled on top of with the same shade of marker. After it dried, you didn't even see the scribble I had made. I love using CharPaks for stuff like...the sky.Cons for ChartPak AD Markers:
* They stink...literally! Whenever you read about me feeling light-headed or had gotten a headache from colouring, that's usually because I've used ChartPak markers. Prismacolours do have a smell to them, but ChartPak's is a MUCH STRONGER smell.
* They also bleed. I usually have to colour about 1/4" away from the lines and just let it bleed itself up to the line. Otherwise, if I colour right up to the line, it'll bleed over. Unless, of course, I'm going to colour over it with pencil crayons anyways, then it won't be noticeable.
But I do like using those markers
They're great if you just wanna colour using markers and no pencil crayons.I like using the Galaxy Marker from time to time, usually in my conbadges. Like the badge I did for ~janusd (should be located here on DA, he's in a pink tux, doing the whole Stayin' Alive dance)...the white outline around him was made with the Galaxy Marker. Galaxy Markers also come in different colours...they're markers specifically made for colouring on black paper. I've used it as a highlighting marker as well, but personally,I like using the white pencil crayon for highlights, because it's more softer and natural looking, whereas this, it looks like you blotted Liquid Paper on it
I like using my metallic silver marker from time to time as well...doing touch-ups with things, or doing fancy borders or stuff. I used it for Eclipse's glasses frames on his Conbadge (Found here: [link] ). Originally, it was just a black marker line, but I "traced" over it with the silver marker, and after that dried, I very carefully traced around the silver, giving them a black outline.
Some artists have used gel pens (*huskie666 is AWESOME with them!). I've tried it once, but they had already dried up on me
So I've yet to try something with them.There are also Prismacolour Blending Markers. *XianJaguar was the one to introduce me to the whole blending thing, and she was even nice enough to send me Blending markers. I'll use them from time to time, and I do like them, but I've found that I liked using the pencils more, maybe because I'm just used to them more, rather than the blending markers. ChartPak also has blending markers that are WAY more stronger than Prismacolour. Both brands of markers kinda "melt" the wax of the pencil crayons to do their blending thing, but the way ChartPak does theirs...if you've had alot of pencil crayons layered on your drawing, by the time you're finished, it almost makes it look like an acrylic painting of some sort...Or at least, that's what I've been told it looked like. This picture ([link] ) is an example of using ChartPak markers and blending markers. The sky was done with ChartPak marker, and the blending marker was used on the clouds. It looks more impressive in person though...
If you're colouring with markers (with or without pencil crayons), I've found that Bristol Board and Cardstock are great with markers
Maybe Bristol board a bit more than Cardstock, as I've also noticed that if I use alot of markers, it tends to get slightly warped. I've tried using Prismacolour and Chartpak markers on regular photocopy paper, and it was definately bleh! The paper went all warped and even the Prismacolour markers bled over the lines. So, whenever I use markers, I usually use Bristol Board. Cardstock is also nice, but I don't use that one very often.That's it! I hope this tutorial helps
Related content


Comments: 85

This tutorial reks of sheer awsomeness
PS. His beak looks just little too black... Hmmm.... :S
👍: 0 ⏩: 0

I am going to try this! can this work with JUST prisma color pencils? (I have these blendy stick things called torttilions, will it work with those?)
👍: 0 ⏩: 1

I've never tried Torttilions...never heard of them, actually O.o The best I can say is give it a try and see how it goes
👍: 0 ⏩: 1
OK! I will try!
👍: 0 ⏩: 1
Oh neat! I'm going to have to look those up and see if I can try them out sometime!
👍: 0 ⏩: 1
Yeah, they are TOTTALY worth it!

👍: 0 ⏩: 0


omgosh plz tell me wat i should buy?
i Live in Aussie.
could u send me a note (list) of wat i should get.
👍: 0 ⏩: 1
Um..I'm sorry, I'm not quite sure what you mean O.o
👍: 0 ⏩: 1
i was asking if u knew a few pens/marker that would be suitable for drawing, as i live in Australia, i cannot buy the same equpiment.And i was just wondering if you knew a few things that i COULD get that would be ok to use.
thank yyou for reading!
👍: 0 ⏩: 1
Oh! Ok
Hmm...well, Micron pens (what I use) seem to be all over the place, I'd be surprised if they weren't in Australia O.o
If you have any major craft stores or art supplies stores in your area, you ask them if they have Micron. If they don't, ask them if they have an inking pen that's an archival pen that's acid-free, fade proof, and water proof (all of which the micron pens are). I know there are other brands out there, other than Micron, but I've never tried them.
The reason why you want them to be fade proof and water proof is this:
Fade proof means that the colour of the ink will withstand time. I have a drawing that I made without a fade proof ink, and it's only been about 9 years, and the lines are faded and look kind of orange-beige now O.o Waterproof is good too, especially if you ever want to get into colouring with markers (like Prismacolour or Copics) because then your lines won't smear when you use them. It's also excellent for painting with watercolour and gouache, because of the whole waterproof thing
If no one seems to sell any inking pens like that, the only other thing I can think of is to buy them online. Some places ship world wide, although I can imagine the shipping to Australia might be a little expensive O.o If it comes down to that though, I'd buy a bunch of pens to make sure they last you for a while, so you don't have to buy more every couple months
Check out DickBlick [link] and Jerry's Art-a-Rama [link] Both are awesome sites, and I'm sure they both ship things worldwide
When you do get inking pens, be sure to pay attention to the width of the nib too, since they come in all different sizes. I have several pens, all in different sizes, ranging from very thick for thick lines/larger drawings, to very fine tips for fine details/smaller drawings. Again, if you're able to find them locally, they usually have an open-source of the pens, where you can just take it off of the display case and open the cap to see/test them out.
Hope that helps
👍: 0 ⏩: 0

How much were your Prismacolor markers?
Very awesome tutorial, by the way.
👍: 0 ⏩: 1
Thanks!
I get my markers at the local art store for about $3.59 per marker...it's kinda expensive but...well, if I need to get them, I need to get them
👍: 0 ⏩: 1
No problem. ^^
That's pretty good. I remember spending 7 dollars on a Prismacolor black marker.
I think it was a fancy one though. Thanks for the info!
👍: 0 ⏩: 1
Wow, that must've been one fancy Prismacolour marker to be $7 O.o LOL!
👍: 0 ⏩: 1
LOL I know, it's one of those two-ended inking ones.
It has a broad end and a skinny end... also smells weird.
👍: 0 ⏩: 1
Yeah, it sounds like a regular marker to me O.o It's got a broad chisel end, and the other is a fine nib.
👍: 0 ⏩: 1

this was very helpful. I like the way you just demonstrate instead of being all wordy like most tutorials
👍: 0 ⏩: 0

hey, it looks like an eyrie(neopets ")
nice tutorial, i'll apply it in the future
now, where's my bunny plushie? i need some huggin
👍: 0 ⏩: 0

Wow. = D You're really good at coloring Mrs. = ) Hehe your end result came out so pretty and beautiful. ^^ I love coloring with markers but sometimes they can be a pain to use. 
Hehe nevertheless, it's really really nice! Nice tutorial. = D
👍: 0 ⏩: 1
Actually, I use the colourless blender pencil on the pencil crayons (aka coloured pencils) which are layered on top of the marker colouring
To blend marker shading, I just basically go over the shade colour with the original flat colour, to blend it, and help to "fuzz" the shading colour, so it looks more blended together
It's kinda hard to describe 
👍: 0 ⏩: 1
Oh! I get it now. = ]
Hehe that's my weakness then since I move so slow with markers even when I try to be a bit faster...
👍: 0 ⏩: 1
It just takes practice, is all
Again, it just takes practice
👍: 0 ⏩: 1
Oh! I do that sometimes! = D Haha that does make sense!
Thanks for the advice. = ]
Hehe ^^
👍: 0 ⏩: 0

Wow this is an awesome tutorial! I've being trying to figure out how people made the colours turn out so nicely without using computer colouring. Thanks, cuz i know this must have taken FOREVER to put together!
👍: 0 ⏩: 1
Yeah, it took me a while to put that all together
👍: 0 ⏩: 0
You get them at any art store, or if you have a major craft store (like Michael's) in your area, they have them there as well
👍: 0 ⏩: 1

Thank you so much! Do you know what price they range into?
👍: 0 ⏩: 1
Again, it depends on where you get them
They also come in sets as well, where you get one of each: 005, 01, 03, 05, 08...they're usually like $10-$13 or so
These days, you can even find them in different colours too, other than black, which could be neat if you're trying to ink something that would match the colour of something you're colouring
👍: 0 ⏩: 1

Do you think a blender pencil would work better than the blender marker? I can never get the blender marker to blend.
👍: 0 ⏩: 1
I usually use blender pencils - The way blender markers work is that they melt the wax of the coloured pencils and that's how they blend things together, and some artists really know how to use them well. But I always muck things up whenever I try them
Give the blending pencils a try. I really like them, and they work well for me
👍: 0 ⏩: 1
I will have to try that I think I have an old blender pencil around here somewhere
👍: 0 ⏩: 1
*nods* And if you need more, they sell them at most art stores, as well as Michael's or any major arts and crafts stores too
👍: 0 ⏩: 1
Yeah I have a Jerry's right near me. I went and looked for my pencils and I could not find any of them. lol Guess I will have to buy one next time I go get some more markers. I found some new prismas I wanna get.
👍: 0 ⏩: 0

Really useful! I used got markers quite recentl, and wasn't sure how to use them. Thanks a lot for the tutorial!
👍: 0 ⏩: 0

that was pretty helpful, i need to try that now ^^

👍: 0 ⏩: 0

omigosh. I think we have the SAME MARKERS.
Prismacolor? uh... ultramarine?
👍: 0 ⏩: 0

u r a
plzzzzzzzz plzzzzzzz
recomend reasonably cheap (GOOD) pens to work with + where to get them i have tryed fineliners, but they split realy easily
kerri


👍: 0 ⏩: 1
Pens like...Inking pens you mean?
👍: 0 ⏩: 1
huh? pens to outline with, normally come in different sizes of tip
👍: 0 ⏩: 1
Yeah. I'm not sure what else I could suggest...I've been using Micron Sakura pens. They're about $1 or so each, and sometimes you can get a variety pack, that will have 6 in a pack, each of them would be a different size of tip. I haven't tried any other brand of inking pens other than those.
👍: 0 ⏩: 1

omfg YOU ROCK!! i use Prismacolor art markers and pencil crayons too and i dont know very many good coloring techniques.
👍: 0 ⏩: 1
Yay! I'm glad I could help
👍: 0 ⏩: 0

Just a question... how do you keep from having the Prismas all bleed together even if they're the same colour? Whenever I colour, it always comes out blotchy.
Also... I've never even understood how to use the blenders, and I've got TWO of them...
Any help offered would be greatly appreciated...
👍: 0 ⏩: 1
Bleeding together...you mean with the markers? I usually try to colour with markers very fast, so they don't bleed over the lines and stuff...If a colour bleeds over another colour, I usually don't worry too much because I'll be covering it up with coloured pencils anyways
As for blenders...I usually use the blending pencils over the blending markers...the only time I use blending markers is if I'm only colouring with markers, and even then, they can be tricky and make your colours bleed or look washed out. Explaining how blending pencils work can be a little tricky...it's easier to show then to explain (and I swear, one day, when I figure out how I can make movies and post them on the internet, I'll do a visual tutorial on how I colour). But in the meantime, I'll do my best in explaining
Normally what I do is this: After I've coloured my drawing in markers, I'll pick a section that I want to colour first. Let's say in the drawing, it's a human, just wearing clothing. Say I start with the pants. I usually find a coloured pencil that closely matches the same colour of the marker colour I just coloured his pants. And I completely colour his pants with that pencil. After that, I take 2-3 shades darker of that colour. Say he was wearing jeans and I coloured them a light blue. I would then take a medium blue, an "electric" shade of blue, a dark indigo blue and then black. First, I'd shade the jeans with the medium blue, completely covering all parts that I want to be shaded. Then I go with the "electric" blue and do the same, but covering less of the shaded area. The same goes with the indigo blue, covering less of the shaded area...and likewise for the black. After I've gotten it to how I like it, I take the blending pencil to it. I usually start with the dark, shaded area and work to the lighted area...it's just like colouring over it again, but the blending pencil should "push" some of that colour around, making it more solid and less grainy-looking. Again, it's hard to explain (verbally or in text) and it's easier to show
Erf...I don't know if that's all clear or not. Again, once I figure out how to post movies on the net (and preferably here on my galleries), I'll post a visual tutorial about that
👍: 0 ⏩: 1
Oh wow, thank you! This was actually a very visual explanation, if that makes any sense.
I guess I'll have to learn how to colour quickly though... It's just a shame when it bleeds.
👍: 0 ⏩: 1
| Next =>