HOME | DD
 Hypercats — Dewalt Coiler Nailer - Nerf Rayven

Published: 2013-01-11 06:33:43 +0000 UTC; Views: 52014; Favourites: 139; Downloads: 356
Redirect to original
Description
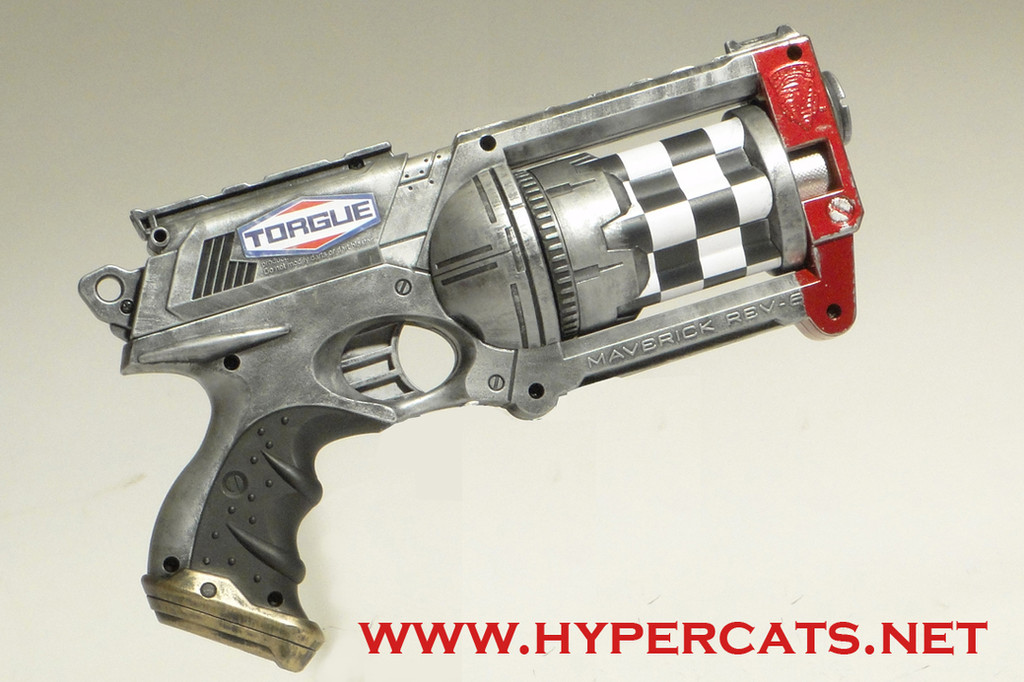
Painted this one for my wife for indoor battles. I couldn't decide if I wanted the drum mag to be a nail coil or an 18v battery. Either way, I think it turned out pretty good. It could use some more black wash, I suppose, but I didn't want to dirt it up too much.Related content


Comments: 28

👍: 0 ⏩: 0

speaking of high voltage batteries, have you ever tried shoving a 3S LiPo in the Rayven, better motors too.
👍: 0 ⏩: 0

I'm dying to use this idea on a paintball gun!! Where in the world did you get the labels done?
👍: 0 ⏩: 0

")

Talk about inspirational! I blame you guys for this new obsession ;0)
(If only that power could be turned to good, instead of evil...)
👍: 0 ⏩: 0


I'd hang it in the garage, but it's my wife's favorite Nerf gun, so she takes it with her when we go to Nerf outings.
👍: 0 ⏩: 0

Ah! This is so awesome! Love it, love it, love it!
👍: 0 ⏩: 0

Thanks! It's the wife's primary gun. She loves it. :3
👍: 0 ⏩: 0
Thanks! When we bring it to parties, guys who don't play with Nerf guns love it.
👍: 0 ⏩: 1

Makes me kinda want to paint my own stampede up as a ryobi
👍: 0 ⏩: 1


That's fantastic! Great paint scheme and weathering
👍: 0 ⏩: 1
Thanks! I'll have some video of it in action this weekend. It's time for our annual "30+ people in a house full of Nerf guns and beer" party.
👍: 0 ⏩: 1
Nerf parties are always a blast!
👍: 0 ⏩: 1
This was from last year, after things had died down enough for me to get out the camera:
[link]
👍: 0 ⏩: 1
LOL, looks like a good time
👍: 0 ⏩: 0

Excellent job. I've got one of these drills, you seem to have matched the colour and markings perfectly.
👍: 0 ⏩: 1
Thanks, it's close, but there's some things I would do differently if I did it again. Most DeWalt tools have yellow plastic, and I opted to weather this Rayven to look like the yellow pieces were cast aluminum with a yellow powdercoat that was chipping off. Big difference in wear. Plastic would scratch, scrape, and gouge, and those would be filled with black gunk over time. :/
👍: 0 ⏩: 0

Amazing work, as always. Loving the label work. A lot of thought went into it and it really shows.
👍: 0 ⏩: 1
People ask me all the time "how do you do drybrush"? But 90% of it is knowing how different materials wear on what surfaces, and how much of the underlying material to "expose" through wear. I think there's like 4 or 5 different drybrush techniques used on this one piece, in different places where either the wear would be different, or materials would be different. For example, a heavy silver drybrush on flat black would imply a dirty bare aluminum or steel surface [link] , whereas a light silver drybrush on just the edges of a satin black would imply minor/moderate wear on a denser, black metal alloy [link]
[link]
👍: 0 ⏩: 0

NICE! You know I liked it before and now it's all touched up and grimy it looks even more epic. I love how you've sort of rubbed away at one of the decals and added that sort of 'burnt' look. Great stuff.
👍: 0 ⏩: 1
Yeah, I wanted it to look like it's had some electrical problems, like something behind that door had caught on fire at one point. Crazy stuff happens on the jobsite with tools.
👍: 0 ⏩: 0