HOME | DD
 TaniDaReal — Tutorial - Coloring outlines
Published: 2008-11-19 23:17:10 +0000 UTC; Views: 67892; Favourites: 1512; Downloads: 972
Redirect to original
Description
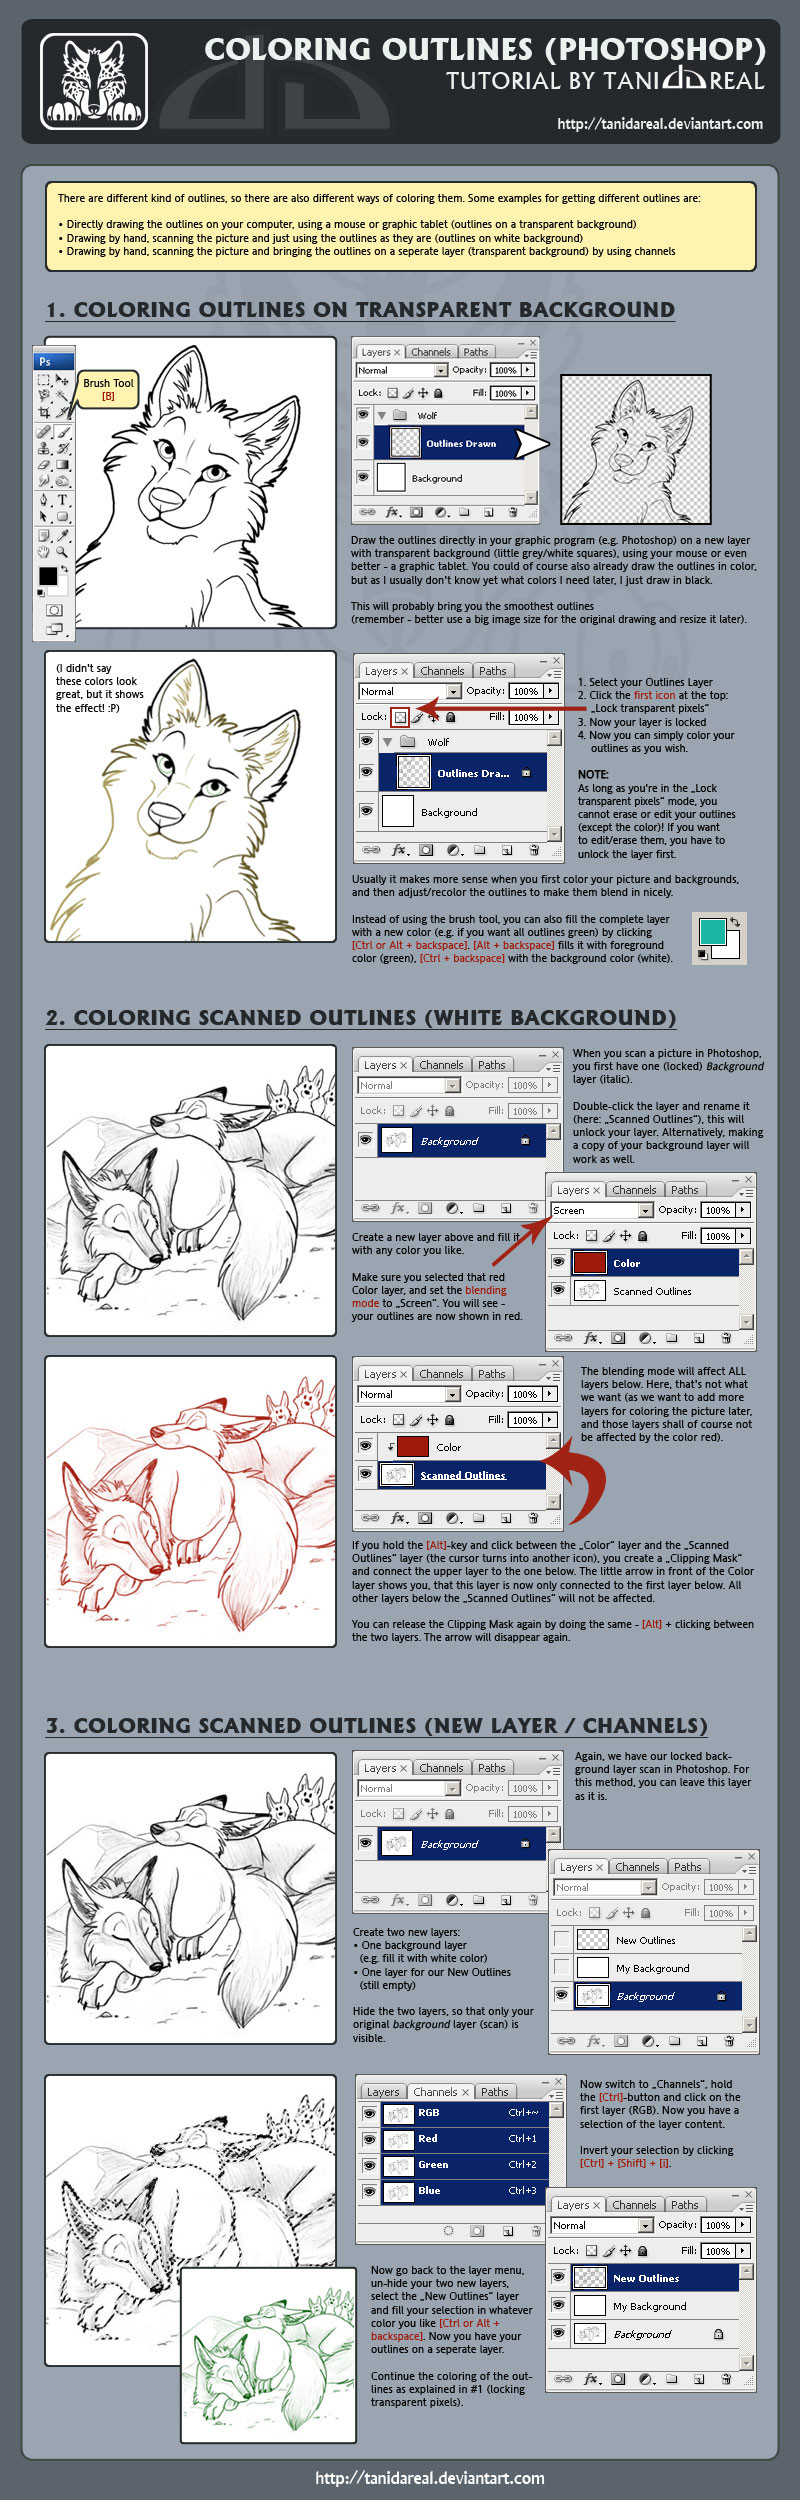
I recently got asked how I color my outlines, and I couldn't explain it properly without pictures, so - here's my second Tutorial: (Smile)")
Coloring Outlines in Photoshop (3 different methods)
This is more an addition to the first tutorial. The first method (outlines on transparent background) I already mentioned there.
I used Photoshop CS3.
If anything is unclear, please let me know.
Related content


Comments: 99


Hoe do you get the transparent background is there somewhere I click on to do this?
👍: 0 ⏩: 1

If you mean, how to get the photoshop file (with layers), click download on the left side.
👍: 0 ⏩: 0

Aaaaaah this makes so much more sense than any of the other ones I've looked at!! Thank you so much! X3
👍: 0 ⏩: 0


Thank you so much! I'd been looking for a tutorial on how to change the colors for my linearts in photoshop for a LONG time. 
👍: 0 ⏩: 0

i can'y figure out how to fill the layer in with a color please help me
👍: 0 ⏩: 1
It's exactly described in the tutorial, even with what key combination you can fill the layer (or use the bucket tool). It's under #1. Before I repeat it, please have a look there again.
👍: 0 ⏩: 1
ok i see now i was just looking under the #2 tutorial thanx
")
👍: 0 ⏩: 0

That is cool, really handy tutorial and not too complicated eather.
👍: 0 ⏩: 0


I LOVE YOUUU
And your tutorials, i love you for doing tutorials, and the tutorials for being so easy to understand. THANKYOUUU MY art is going to actualy inprove now THANKYOUU
👍: 0 ⏩: 0


Oh jeez, I always drew them as different colors, this helps so much, thank you Tani!!
👍: 0 ⏩: 0

I have been thinking that how can I color my outlines nice and here it is! Great tutorial for it. ^^ I'll favourite this, this is very helpful. I'm pretty lazy with my works, but maybe some day... I'll color my works' outlines with one of these methods. (:
👍: 0 ⏩: 0

Never thought of that first technique, thanks.
👍: 0 ⏩: 0

Yay thank youso much now i know what a clipping mask is !!!
👍: 0 ⏩: 0

These are some great photoshop tricks you're putting out here with tutorials. I know a fair bit but these will certainly help with whatever next project I do
Thanks for taking the time to make these tutorials!
👍: 0 ⏩: 0


hey, das is n sauguter tip. ich hab mich immer abgemüht, die outlines gleich in der farbe zu zeichnen, wie ich sie gebraucht hab. was teilweise sehr unpraktisch ist, wenn die farbe dann am ende doch nich passt. aber jetz weiss ich, wie man die farbe ändern kann.yay
👍: 0 ⏩: 0

Danke dafür!
Wollte schon immer mal wissen, wie man das macht.
Schön erklärt...

👍: 0 ⏩: 0


Just add/create a new layer - it will always be transparent (unless you fill it with a color).
👍: 0 ⏩: 0

woah! thank you Tani! this will be useful to many artists 
👍: 0 ⏩: 0

Wow das ist wirklich sehr beeindruckend! Ich habe immer Probleme mit meinen Outlines.. Immer zu kantig und ungerade.. Dein Tutorial hilft mir sehr auch wenn ich nicht alles verstehe.. ^^°
👍: 0 ⏩: 0


i never knew you could do that with th scaned pic before you outline on photoshop. thansk for making this it's gonna help me out a lot :3
👍: 0 ⏩: 0

*Tani umknuddel*
Danke Du, Vielen Dank ^^ Nun weiß ich endlich wie ein Meister sowas macht. Natürlich bekommst du darauf ein 
Mir hats sehr geholfen, Danke nochmal ^^
*Happy is*
👍: 0 ⏩: 0


Hmm der erste Weg funktioniert bei mir irgendwie nicht. Obwohl ich kein gutes Englisch kann hab ich glaub ich alles richtig gemacht. Transparenter BG beim Outline und dann einfach die Ebene gelockt und dennoch bleibt es Schwarz
")
👍: 0 ⏩: 1
Es muss schon das "lock transparent pixels" icon sein (nicht das allgemeine locken/sperren). Und dann musst du die Ebene einfärben (von alleine passiert da nichts). Evtl. mal nen Screenshot machen?
👍: 0 ⏩: 1
Ah okay, jetzt hab ichs glaub ich verstanden
Jedenfalls funktioniert es jetzt. Kann die Outline sogar hell färben und sie bleibt trotz BG hell, das wollt ich schon immer können
[link]
👍: 0 ⏩: 1

these tutorials are absolutely fantastic! they're so helpful! thank you so much! i can't wait to try them out!
👍: 0 ⏩: 0


i wish i'd seen this before i started drawing~ thank you for making this. its very helpful
👍: 0 ⏩: 0

Thank you so much, Tani! I've been wondering how to apply color to my lineart that easily. You explain it very well--thanks again!
👍: 0 ⏩: 0

Wow, awsome tutorial!
I didn't know how to do that. Thx a lot!
👍: 0 ⏩: 0

Many thanks for another tutorial, Tani :3
This'll help me with my work, especially now that I've just opened up commissions myself ^^
👍: 0 ⏩: 0


ooo never heard of that last one.. I'll have to try it out sometime :3
👍: 0 ⏩: 0

Thank you SO much for this. Very easy to follow!
👍: 0 ⏩: 0


Oh great and just when I needed this most! Thanks a lot, very well explained.
👍: 0 ⏩: 0

<= Prev |