HOME | DD
 Duffzilla —
Working faster in Photoshop
Duffzilla —
Working faster in Photoshop
Published: 2010-02-06 02:19:03 +0000 UTC; Views: 116325; Favourites: 4240; Downloads: 13551
Redirect to original
Description
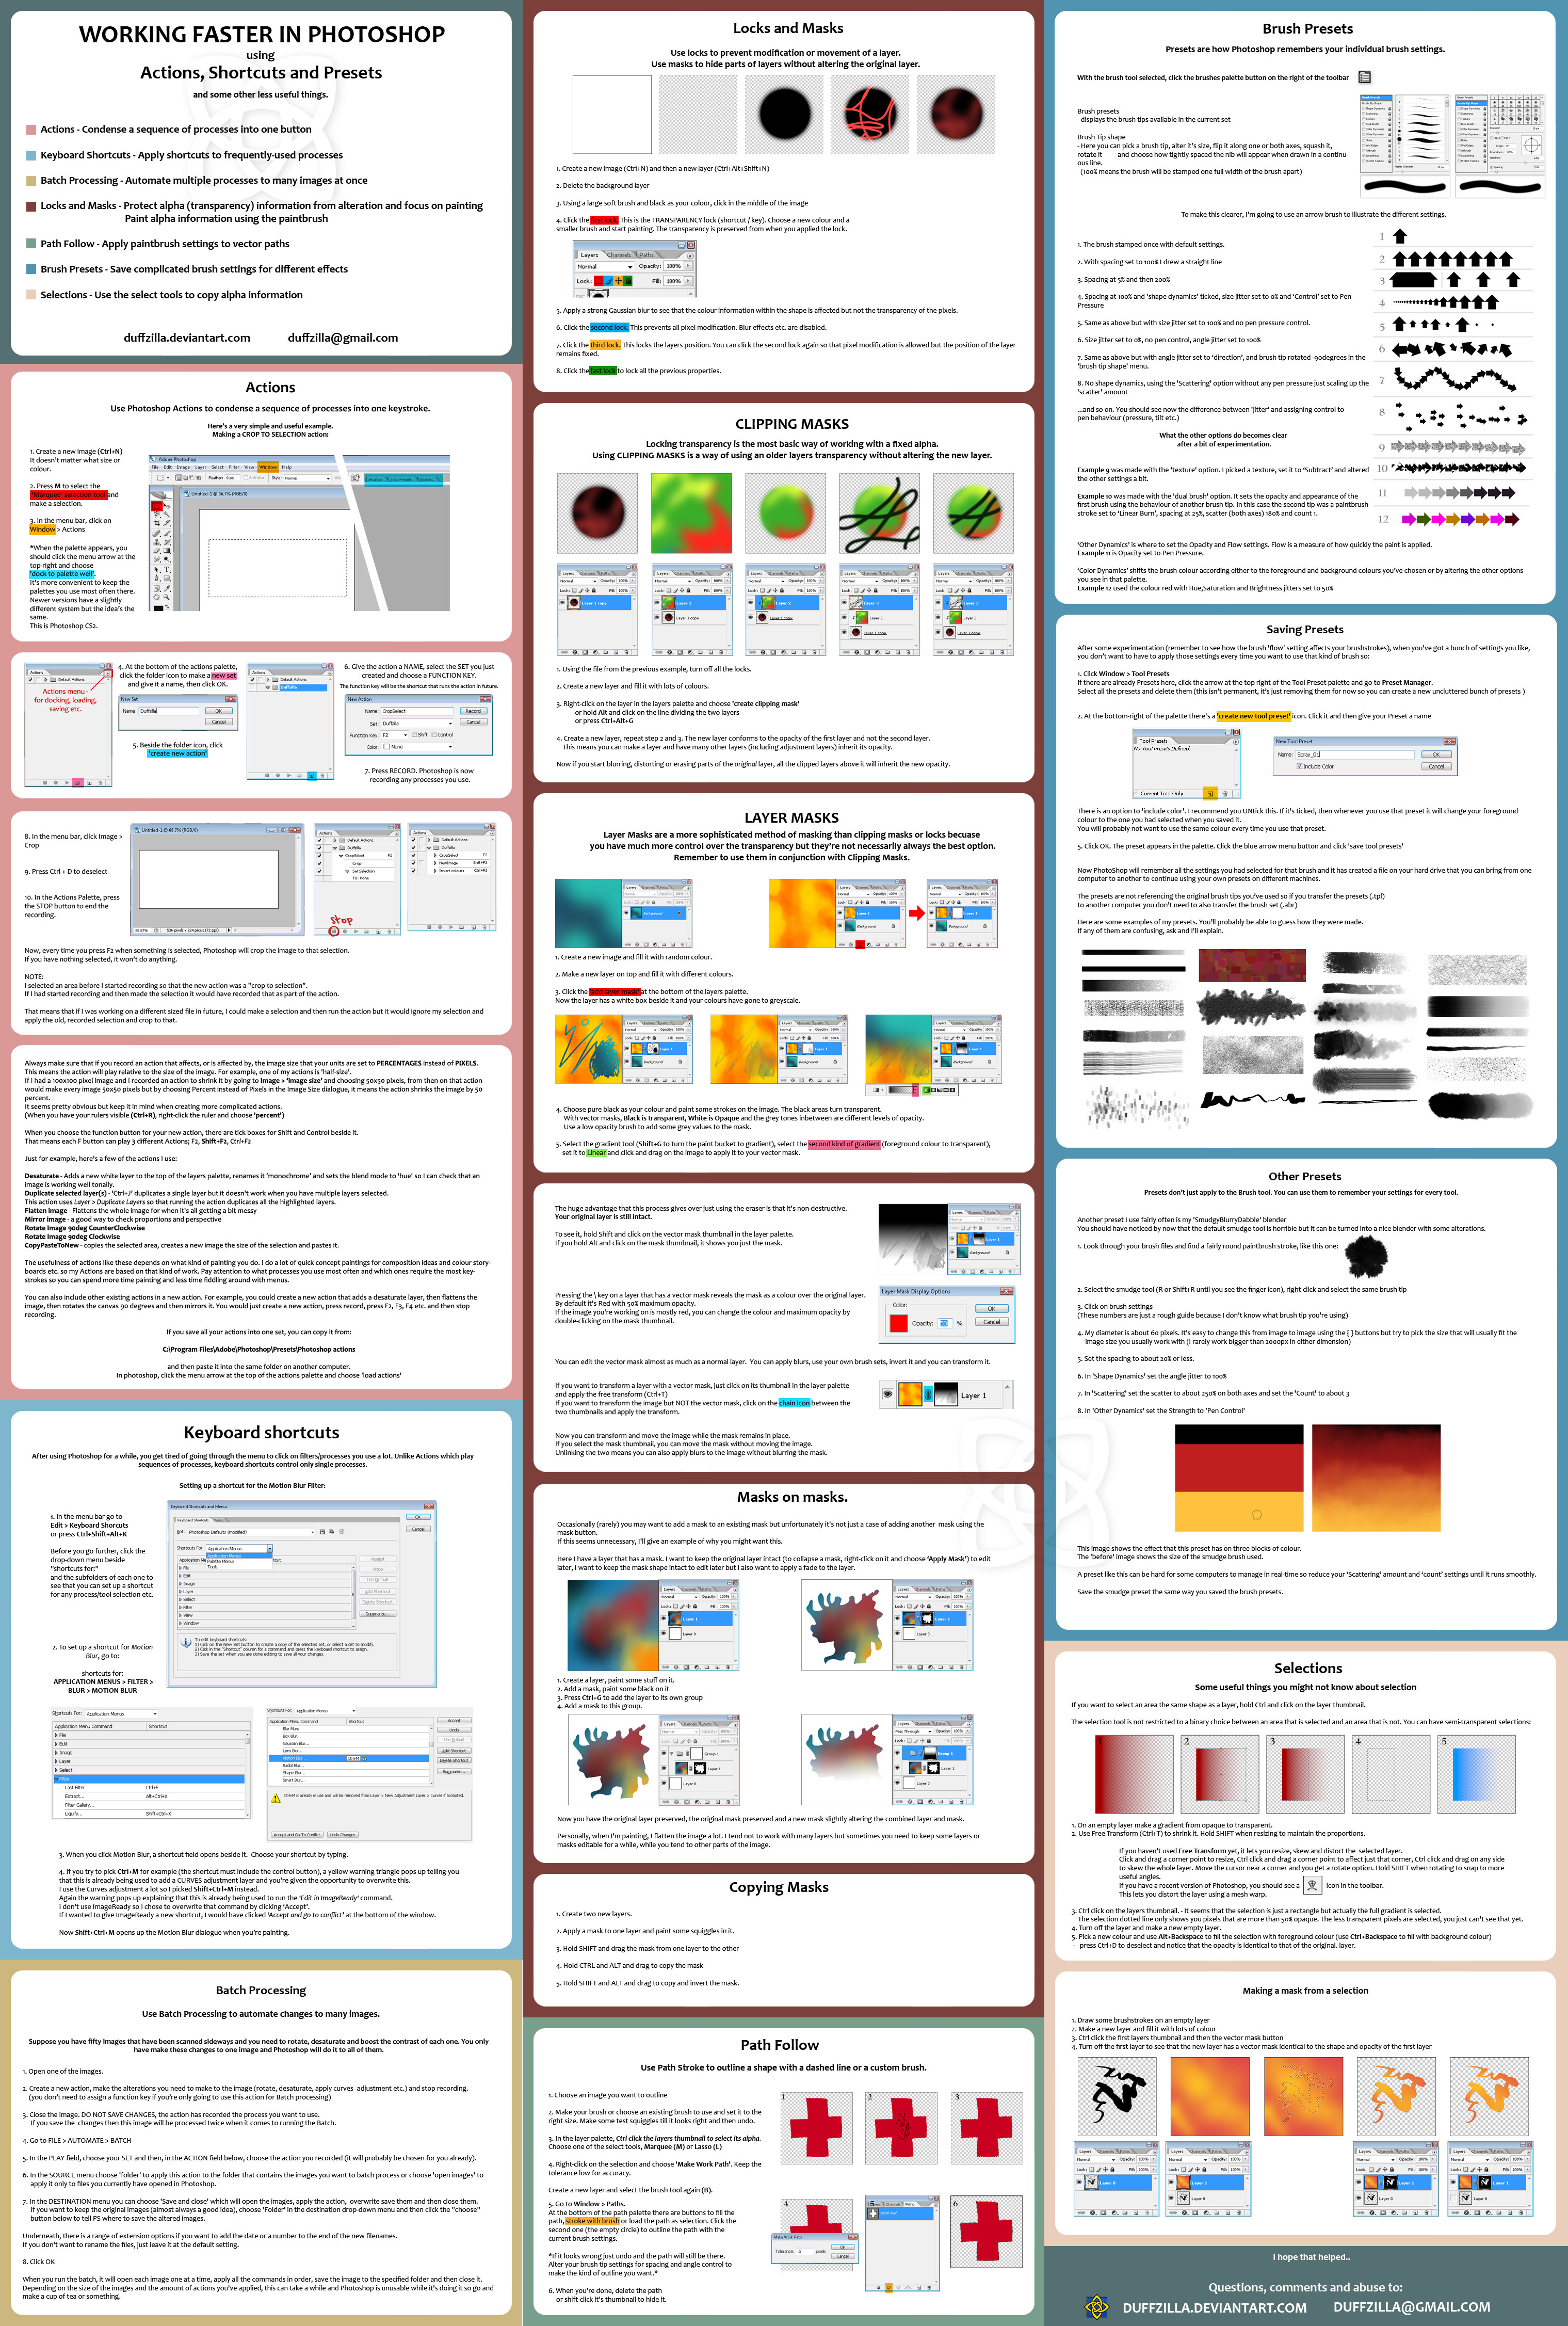
3039 x 4507 px jpeg!..Okay, I know "efficiency" isn't the sexiest thing in the world. There are flashier, more attractive tutorials out there but I thought it might be useful to put together a basic bundle of tutorials focussed on helping you work faster in Photoshop.
You can have a look at the little table of contents panel to see if you already know this stuff.
If everything here is new to you, and if you go through the whole tutorial, you should work twice as fast the next time you paint something. ..so you can spend less time messing around with menus and more time painting.
I think I was planning on saying more here than I can remember right now but if I come up with anything, I'll update.
EDIT:
Jesum crow, it's a DD!
Thanks to everybody who's favourited and commented and found it useful ...and to ^znow-white for featuring it and ~the-arkz for suggesting.
It wasn't a waste of time after all.
I want to bring your attention to two comments made below: (edited for brevity)
"Doing create workpath like that creates an insane amount of unnecessary paths, much easier to use the pen tool and make the points yourself.
The reason why so many path points is bad is because if you were to make that a .tiff file with the workpath as a clipping path, the filesize skyrockets."
"Using the pen tool is much more efficient for your 'path follow' part, but each to their own I guess."
My response to these was along the lines of these techniques being for quick digital paintings as opposed to hi-res, multi-layered Photoshop extravadanzas and that doing it this way is quicker than tracing manually woth the pen tool.
If you're going to work on huge files and doing a lot of vector stuff, take these comments into account.
THANKS AGAIN
 (Smile) - :)")
Related content


Comments: 289

lots of great photoshop tips in this tutorial, it will be a fantastic addition to our group thank you!
#light-artists
👍: 0 ⏩: 0

wow! this is really useful- one of the best info tutorials on dA i've seen. i work so slowly on photoshop so this really does help a lot! thanks

👍: 0 ⏩: 0

Great, wonderful, fantabulous! This DD is so totally deserved too, congrats
👍: 0 ⏩: 0
Great, wonderful, fantabulous! This DD is so totally deserved too, congrats
👍: 0 ⏩: 0

this is one of the best made tuts I've seen.  - :D")
👍: 0 ⏩: 1

It's definitely useful!
I have some questions though...
1. What's the difference between a layer mask and a vector mask?
2. When stroking or filling a path, is it raster, or vector, assuming nothing was done with the layer and its presets?
3. How do you apply/fill a gradient to a path?
4. When you save a vector piece to .EDF or some other file type, is it true that when you zoom in all the detail is intact, unlike a raster image?
5. What to the selection presets(e.g. Expand, Contract, etc.) do, individually?
👍: 0 ⏩: 1

Hi.
1) Layer masks are raster images so the quality depends on your current resolution. You make and edit them with the brush and selection tools.
Vector masks are made with the pen tool so they're not affected by resizing.
2) The path made is a vector, as soon as you stroke it the stroke is a raster layer.
3) If you right-click on the path and choose 'fill path...' you'll see there are fill options but gradient isn't one of them so I'd fill it with solid colour and use that as a clipping mask back in the layer view for a gradient layer above it.
4)I don't know .edf files but yes, there are filetypes that maintain vector information for lossless scaling.
5) Make a selection.
Border hollows out the selection to the specified width.
Smooth smoothes out the selection to the specified amount. High values turn the selection into a blob.
Expand and Contract increase or decrease the size of the selected area.
Feather blurs the selection edge.
When you have a selection made you can also go to Select > Transform Selection to alter the selection size and shape.
👍: 0 ⏩: 0

awesome!! this is truely very useful!! THANKS a lot!!
👍: 0 ⏩: 1

 (Wink) - ;)")


This awesome possum *A*
But oh so long..I just skimmed it, faved it and I'm going to read it later
Thanks for posting this though! I'm sure it'll help me (along with many others)
~Cootie

👍: 0 ⏩: 0

This is glorious. Even if "Efficiency" isn't the sexiest word out there, if I can cut a 6 hour drawing down to anything smaller and have the same results, that is AWESOME.
Plus, this is wonderful for the painterly digital art I want to get into.
My thanks for this, good sir. My thanks.
👍: 0 ⏩: 1


too much information to take in at once *head explodes*
thank you for the tut! i'll study it :3
👍: 0 ⏩: 1
👍: 0 ⏩: 0


👍: 0 ⏩: 0

Superb tutorial!
I feel that I could confidently work faster with this program now than ever.
👍: 0 ⏩: 1

Awesome tut, Makes me happy that i knew everything on it already minus the details of the different lock buttons.
👍: 0 ⏩: 0


Oooh, yay, more cool photoshop stuff I didn't know! Thanks especially for the clipping mask information: I knew how to do that once upon a time, but I forgot, so it's great to have a tutorial!
Congrats on the well-deserved DD
Oh, and I have been using actions for a while; those things are SUCH a time saver.
👍: 0 ⏩: 1
They sure are. Very versatile, too
Thanks
👍: 0 ⏩: 0


EFFICIENCY IS SEXY, TOO.
(pssst, tried adding some lensflares to your tutorial, but my photoshop crashed from the awesome it was creating)
👍: 0 ⏩: 2

I must say, I find your childish, blind optimism and enthusiasm endearing but really, this is not a game. You could've got hurt. Consider yourself lucky to have only suffered some software malfunction. I don't want to be responsible for another awesome-related death.
👍: 0 ⏩: 1
Y-yes, sir. I'll keep that in mind in the future.
...wait, another death?
*cough* could've gotten hurt *cough*

👍: 0 ⏩: 1
wow, that's pedantic
👍: 0 ⏩: 1
Sorry, grammar geek here 
Fact of the day: "gotten" is a regional thing.
👍: 0 ⏩: 0

Very nice, I'm going to throw this at my work colleague who is always asking me questions about photoshop.
👍: 0 ⏩: 1
Cool! try to throw it so one of the corners hits his eye.
👍: 0 ⏩: 0
Caretaker-of-Myth In reply to ??? [2010-02-09 07:35:57 +0000 UTC]
So useful! I've always wanted to know how to use Actions! ^_^
👍: 0 ⏩: 0


Thank you very much! Really comprehensive!
👍: 0 ⏩: 0

wow this will be handy (don't have PS right now)
👍: 0 ⏩: 0


This is very useful. I've been using photoshop for a while, but never heard of batch processing. It will come really handy to resizing my new camera's pictures to get them rady for the net
Thank you
👍: 0 ⏩: 0

This could DEFINITELY come in useful. Thank you so much
👍: 0 ⏩: 0


Very helpful! Shortens what I've been doing with some bg's and blending to half the time! Congrats on the DD.
👍: 0 ⏩: 0

I wish I could memorize all the tutorials in this... lol
+fav!
👍: 0 ⏩: 0

Awesome! Thanks for making this and sharing it with us!
👍: 0 ⏩: 0
<= Prev | | Next =>