HOME | DD
 GriswaldTerrastone — Perspective Tutorial: 1VP 12
Published: 2011-06-22 21:00:25 +0000 UTC; Views: 7930; Favourites: 75; Downloads: 226
Redirect to original
Description
This is covered in much greater detail in the next section about Two Vanishing Points (it includes dividing things into thirds, fifths, etc.), but this is a good place to start; once you know this, the more complicated methods will be much easier.In any picture using perspective, you will, sooner or later, want to center something, be it a door or window, or something else- but you'll want to center it, or divide something angled in half.
Those two are directly related, by the way.
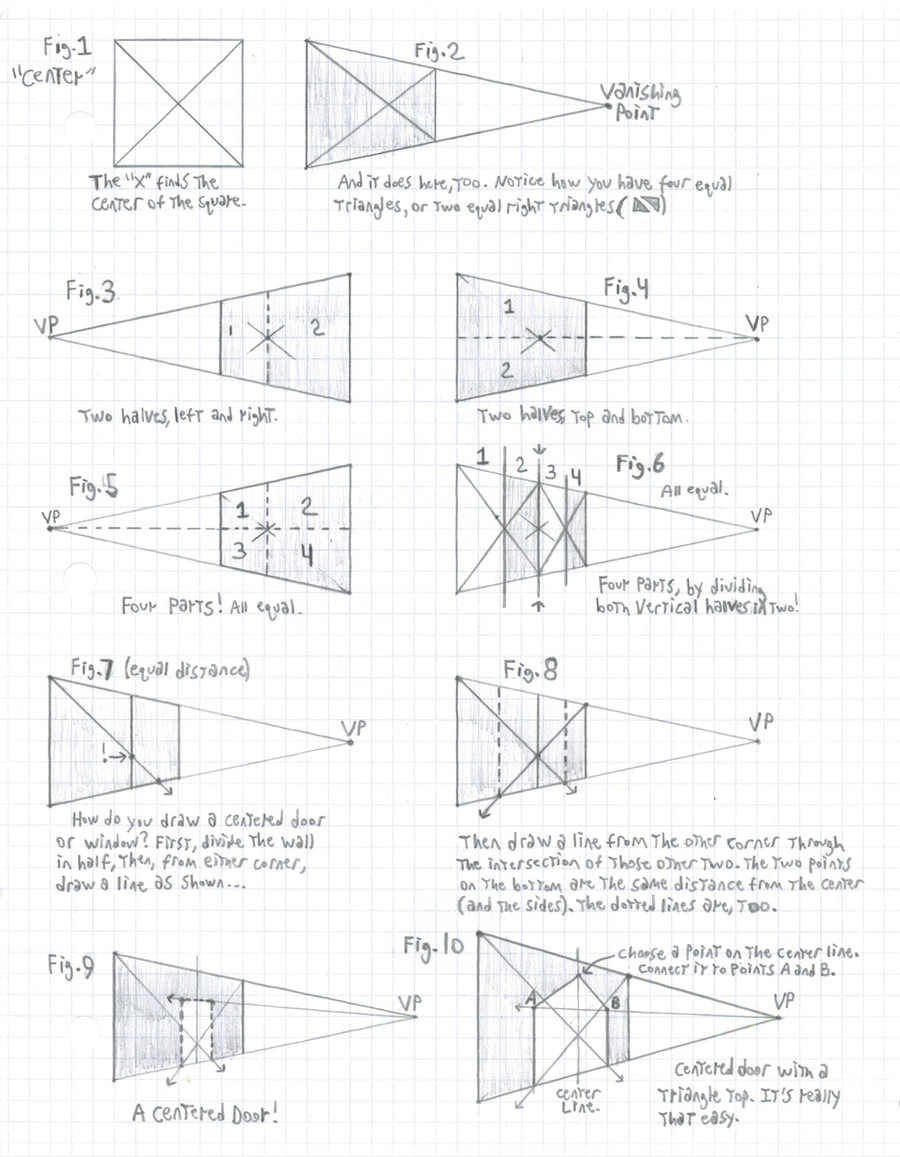
In Fig. 1, we start with a simple square. To find its center, you simply draw an "X" using the corners.
This is the "X" trick or method, and it is an easy and effective way of doing this.
Now, to divide the square, all you have to do is draw a horizontal line through the center, or a vertical line, depending on what you want.
This all applies to rectangles, too.
For Fig. 2, to find the center of an ANGLED square (or any rectangle) coming from a vanishing point, you would...draw an "X" using the corners.
If you want to divide the shape into vertical halves, draw a vertical line through the center, just like in Fig. 3.
Horizontal halves? That's a bit different: in Fig. 4 it is a horizontal line going through the center, but that is only because the shape is even with the vanishing point. To divide the shape "horizontally," you MUST draw a line from the vanishing point through the center. It will often be a diagonal line rather than a horizontal line, but that is how it is supposed to be, then.
Fig. 5 combines Figs. 3 and 4 so the shape is divided into quarters.
Fig.6 first divided the shape into vertical halves, just like in Fig. 3, but then those halves were each divided in two by the "X" method. For this sort of division, the line from the vanishing point should go through the center of ALL of the X's.
You can find the center of any divided portion with the "X" method, by the way. So if you wanted to find the center of those four parts in Fig. 5, then just draw an "X" from the corners of each little quarter.
It's actually that easy.
O.K., so now you can divide up angled walls. You can find their centers. So far, so good, but what if you want to draw a centered doorway or window?
You have already guessed just by looking at the images on this page that when you divide an angled wall into vertical halves, the half that is "further away" is smaller than the one that is closer. Therefore, any centered door or window should be the same, but by how much?
"X" to the rescue! It is almost as easy as finding the center of a shape, really, honestly!
In Fig. 7, the shape was divided into two vertical halves, as in Fig. 3. The vertical line is still there, but not the original "X." Why? The line is what we need.
From one of the top corners, it doesn't matter which, a line was drawn through that middle line to where you want the far bottom corner of the door to be. See that point on the bottom line? That's it.
Now, in Fig. 8- and this is all there is to it!- a line was drawn from the other top corner right through where the middle line and that first from-the-corner line meet. The result? You now have the other bottom corner of the door!
Draw a vertical line from each of those two bottom points. You now have three of the four sides of the door; all you need is the top side.
And, in Fig. 9, that is exactly what can be found just by drawing a line from the vanishing point through those two new vertical lines, at whatever height you want that side to be.
You have your centered door. That's all there is to it.
Oh, windows? If you want a window you would simply add one more step: draw another line from the vanishing point through those two vertical lines at whatever height you want the bottom of the window to be. That's it!
You now know the basics of drawing centered windows and doors.
Since I had some extra space here, I'll add something for a more fancy look: On the line that divided the shape in half you can draw a point anywhere above the door or window, and then draw lines from it to the two top corners of the door or window for a triangle top.
In fact, for a window, you can do that for the bottom, too.
That's it!
 (Smile)")
By now, you may have guessed at an interesting application using this: If the dotted lines in Fig. 8 are the same distance from the ends of the shape, doesn't that mean that those two end sections are also the same size?
Absolutely. Therefore, you do not have to divide something into halves, quarters, thirds, or the like; you can have a large middle section and two narrow end sections, or a narrow middle section with two wider end sections- and then take it from there with wall section heights (e.g. the middle can be lower than the ends), doors, windows, whatever. Whatever you wish.
BONUS: This is covered later on in greater detail, but for now, here's a tip: ANY POINT on a single line from the vanishing point will be at the same height. So by simply drawing the tops of doors and the bottoms of windows on the same lines, they will all be at the same levels, if not the same size. That last thing is covered later.
Note that most images seen in this part of the tutorial, except for this page, did not use this.