HOME | DD
 GriswaldTerrastone — Perspective Tutorial: 1VP 7

Published: 2010-10-03 21:50:25 +0000 UTC; Views: 7527; Favourites: 84; Downloads: 206
Redirect to original
Description
So far, the vanishing point has always been in the center.What if it isn't?
This time, we'll move it up and to the right!
So...
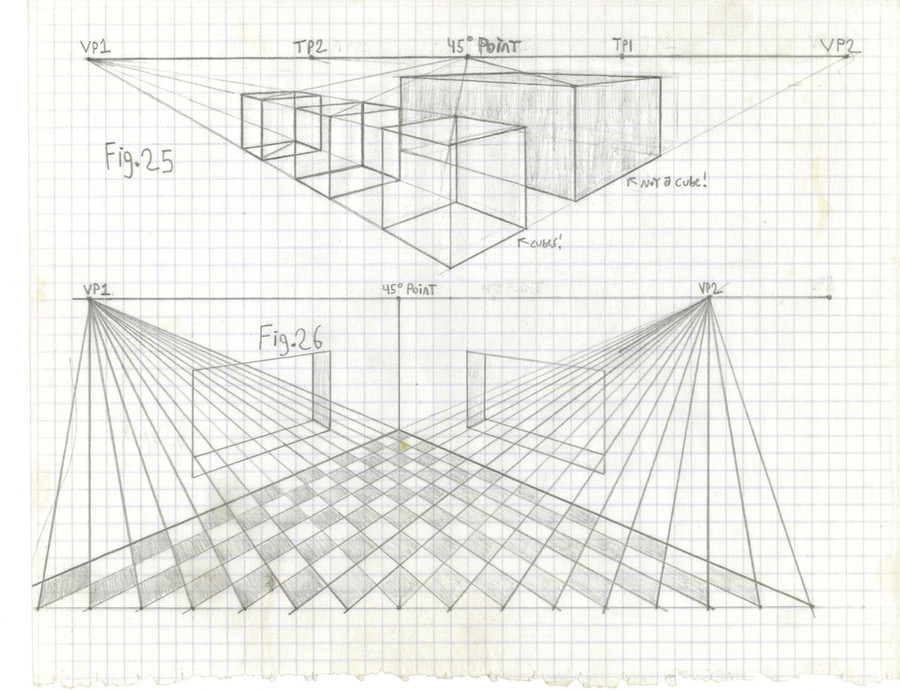
First, draw the large rectangle, as before. This time, it should be the same size and dimensions as before, so trace the one from the previous page. So far, you're doing what you did with the previous image.
This time, though, draw the dot above and to the right of center.
Connect each corner to it, so you get a weird-looking "X."
What you should now do is this: trace the second-largest rectangle from the previous page- the first one going off into the distance- onto this picture. Making sure it is aligned vertically and horizontally, touch the corners to the four lines of the "X." Make sure it isn't tilted.
Or, you can simply measure the bottom line of that smaller rectangle from the previous image, and make sure the ends touch the two bottom lines of the "X," keeping it horizontal. Draw in the rest of the rectangle.
Repeat, each time with the next smaller rectangle.
Just keep in mind that the rectangles going off into the distance are the same sizes as before; they just aren't centered as before. This is very important!
For the ceiling lights- do the same thing as before, except this time, of course, the two lines going from the vanishing point to the two dots are going to be angled differently. Notice that you are still ending them in the same place on top of the big rectangle as before.
So far, so good...
Do what you did before with the doorway and window, keeping in mind that the result will look different, because the vanishing point is off-center- but the procedure is identical to page 4. You can actually end those lines coming from the vanishing point in the same places on the big rectangle; watch what happens.
There you go.
Of course, you can do pretty much the same thing with triangles, or squares, or whatever. Instead of horizontal lines for the ceiling, try two raised lines, meeting on the vanishing point line, for a peaked-roof look. Skylights? Just follow the same rules, and it works.
Good luck, and hope this helps!
Previous page:
[link]
And now....
Related content


Comments: 5

My corridors keep coming out lopsided. xD
When I begin drawing them (after doing the basic rectangle & X inside), I start with a horizontal line across, then vertical down. From there, I draw another horizontal across on the bottom, but when I draw the vertical up to complete the inner rectangle, they never match up. D:
If that made sense. XD
👍: 0 ⏩: 2

Have you had better luck with this?
👍: 0 ⏩: 0
Are you drawing that "X" from the vanishing point? It will not be a nice, neat "X," but rather an oddly-shaped one. You need that for this to work.
What you can try is this: First, draw a regular corridor, with the vanishing point in the center. Draw the smaller rectangles (only a few) going in.
Now, draw a large rectangle identical to the first, but put the VP up and to the right. Connect the corners to it.
Put the first piece of paper under the second, and line up the second largest rectangle on those four lines until it is level. Do this with the others, too. Graph paper is good for this.
Good luck!
👍: 0 ⏩: 0

I love your little tutorials. This makes me want to start drawing backgrounds behind/around my characters from here on out
👍: 0 ⏩: 1
If they help- and now the texts are finally typed in (man, is my back sore; awkward coffeehouse computer on a high counter!)- then it was all worth it!
👍: 0 ⏩: 0