HOME | DD
 nooby-banana — Toothless Tutorial Part 2

Published: 2010-05-27 21:37:16 +0000 UTC; Views: 105838; Favourites: 996; Downloads: 1382
Redirect to original
Description
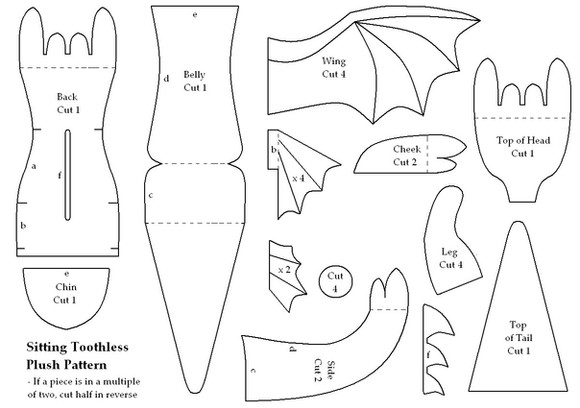
Part 3: [link]Pattern pieces needed:
[link]
[link]
[link]
[link]
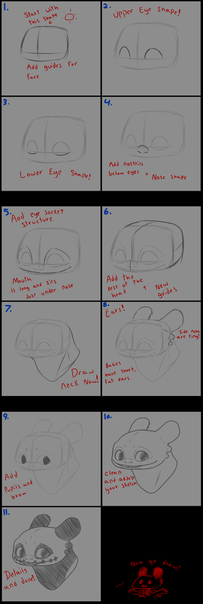
Alright, here's part 2! A note about printing the pattern: paste the picture into a Word document, and then resize it to fill the ENTIRE paper, even going over the margins.
If anything's not clear (which it probably is. I'm terrible at explaining things), feel free to ask.
Related content
Comments: 237

Thank you so much for providing your very clear tutorial. Both my girls are obsessed with HTTYD and have been begging for a plushie, but I agree that the commercial ones are beyond horrible. I have been downloading your pattern pieces and will follow your instructions for sizing and printing. Just a thought for future pattern pieces, it is really helpful when a pattern comes with a 1 inch test square drawn on it (lots of downloadable patterns seem to). Then when you print it out, you can measure the test square and make sure you got the size right. Hope that's helpful. 
👍: 0 ⏩: 0

Great tutorial! However...
RE-SIZING TO FILL THE PAPER DOES NOT ALWAYS WORK OUT ... because some pieces are going to re-size differently than others and you may accidentally waste fabric. BE EXTREMELY CAUTIOUS WITH HOW YOU RE-SIZE, OTHERWISE YOU WILL WASTE A LARGE AMOUNT OF TIME HAVING TO RE-CUT PIECES. To combat this, I would be sure to re-size EVERY piece by percentages, not just dragging the image 'larger' or 'smaller' until you fit the whole space. Be POSITIVE they all re-size by the same percent.
That is all~
👍: 0 ⏩: 0

Do you have to cut the fabric exactly the size of the pattern, or does it have to be a little bit bigger, because of turning right side out? thank you!
👍: 0 ⏩: 0

the chin pattern, should it be the same langth as the upper and lower head peaces?
👍: 0 ⏩: 0

can someone please explain to me how to fit the pattern to fit the entire page on either word or google docs. I'm having some trouble. Thank you. :3
👍: 0 ⏩: 1

paste the picture into a word document and make sure the picture is in 100%!
👍: 0 ⏩: 0

So if I just printed the pattern on a full page, would it be the right size???
👍: 0 ⏩: 1

read my comment up at the top~ it may help you out
👍: 0 ⏩: 0

I was going to double this but then I realized that my college dorm room is 7.5'x11' and thought that it might be more space-saving to make it the right size.
👍: 0 ⏩: 0

Hi! I was just wondering was horn 2 piece suppose to be place on the fold? Or is it suppose to be about half the size of other half of the horn?
👍: 0 ⏩: 0

hey i'm cutting out my fabric and i was wondering why do i only need one chin and not two? thank you for the pattern also!
👍: 0 ⏩: 0

should I print each pattern bit separately to fill the paper? Like, each of the 4 links?
👍: 0 ⏩: 0

I'll have to get my sewing teacher to help me out with this! lol! I have a sewing machine buuuuuuuuttttttt I do not know how to set it up. .-.
👍: 0 ⏩: 0

I can't find the tutorial for the eyes, I could just be missing something. Any help/advice?
👍: 0 ⏩: 0

(totally random quote time!) ONE, SMALL STEP FOR MAN, ONE, GIANT LEAP, FOR MAN KIND. x3 now for the dragon version. ONE, SMALL STEP FOR DRAGON, ONE, GIANT LEAP FOR DRAGON KIND. thanks for the tutorial!! it'll help a lot ^3^
👍: 0 ⏩: 0

Hello! I was just wondering I would like to make the plush a bit bigger, probably 6 foot if i can, what would be the proportions then? (in numbers?)
👍: 0 ⏩: 1

i think the pattern makes a 3 foot approx toothless, so i would suggest doubling every measurement and size of each pattern piece..just a guess though haha
👍: 0 ⏩: 0

Let me start by saying this guide looks AMAZING! So thank you for this!
Secondly, I'm happy to have a smaller plush, even if just slightly, I read that you said that if we wanted to have one slightly smaller it would work just to print out the templates as their standard size. I assume we can do this straight from the phtobucket images because when i copy the templates to word and DON't resize and just print them as is they appear actually SMALLER than the photobucket print outs.
👍: 0 ⏩: 0

When you say resize to fit the whole page do you mean turn it? like with the spike templates if you turn the image they can get much bigger
👍: 0 ⏩: 1

ahh! I don't know either @_@
👍: 0 ⏩: 0

hey, what stitch type did you use? I can't seem to get it right.
👍: 0 ⏩: 0

Hello! Thank you so much for this pattern, and the plush it produces is beautiful! I have one quick question though.
When you sew the Upper Head piece to the Lower Head piece, the shape of the horn you sew up (Horn 2) on the two sides don't seem to line up at all. Is it just a mistake in the pattern and if so do I just force it to work?
👍: 0 ⏩: 0

would resizing the patterns to all the same size like for example, 604x782 on all of them work? Cause I'm having a hard time resizing them without the picture being cut off on some parts.
👍: 0 ⏩: 0

sorry to bother you but the second URL (link) does not work 
👍: 0 ⏩: 0

Ok sorry one more question:
For the main ears on the pattern its not even. AND the lower head and the upper head don't connect correctly unless I flip the lower and upper head bs are flipped
👍: 0 ⏩: 1

I noticed this too. Just make sure the front end (where the face, eyes and snout is) matches up. It's more important than the ears, because when you add in the second part to the ears, you'll fix up the unevenness.
I discovered that the biggest, main ears are supposed to be more "triangular" when connected. So sew one side up and then bend the fabric to match up the other side.
👍: 0 ⏩: 1

thanks. the only problem I have with the ears now is that when I pin it inside out and flip it they're really small. Should I inlarge the back ear.
👍: 0 ⏩: 0

Oh wait never mind about that but I have a question about the bottom chin horn attached to the chin pattern does that not have a back piece to it?
👍: 0 ⏩: 0

Ok the pattern for the chin is that half of the whole chin?
👍: 0 ⏩: 0

sorry if this question sounds stupid but on the chin pattern piece it says to "Put this edge on Fold" What fold is it talking about?
👍: 0 ⏩: 1

It means to put the chin half on the folded part of the fabric, so it comes out as one piece.
👍: 0 ⏩: 0

Would it be ok if I make 2 chin pieces or would it change the shape?
👍: 0 ⏩: 0

The horns aren't actually horns. The biggest ones are ears, and the others are just flaps
👍: 0 ⏩: 0

hi when u say sew uper head and lower head do u mean a or b?
👍: 0 ⏩: 1

no dont do that ull do more work for no reason tape a to a and b to b then cut out your pattern do it 2 time one on pattern side and one one the back side so you can sew both halfs together
👍: 0 ⏩: 0

Oh
My
Gosh
*runs of to do Toothless plush since I have been on a sewing tangent*
👍: 0 ⏩: 0

Is it possible to do this by hand and make it looks close in comparison to a machine sewed one?
👍: 0 ⏩: 2

I hand stitched mine. It was long, but not very hard, and totally worth it.
👍: 0 ⏩: 0

Yup! There have been a few people that hand-stitched their Toothless and it turned out awesome.
👍: 0 ⏩: 0

oh! now I see, sorry for being an egg head and not reading on to the next partXD
👍: 0 ⏩: 0

Hihi! Im having a little trouble with the printing. My Margins wont come off, could anyone tell me how many inches the items should be? Like one for each page? How long should the chin and the back spikes be? And how wide should upper head A, lower head A be where you tape them? XD I just want it to be as identical as possible X)
Thankuuz~~
👍: 0 ⏩: 0

So excited to be making this!! I don't know how to use a sewing machine though..so it looks as if I'm gonna have a /lot/ of hand-sewing on my hands. *sigh* Here we go!
👍: 0 ⏩: 0

Hey, I was just wondering: how much of a seam allowence is there on this pattern?
👍: 0 ⏩: 1

Nevermind. I found a comment on the first part of the tutorial stating it
👍: 0 ⏩: 0

So I'm going to make this into a 6ft Toothless. How would you suggest I blow the pattern up so that every piece is double its intended size?
👍: 0 ⏩: 2

go to staples they will blow it up if they have the right stuff if they dont it will cost to blow it up 3 times the size it is now $96.00 doller so i only did it double and it cosed $6.00 thats right $6.00 doller. look up people that have heavy printing done. hope that helps.
👍: 0 ⏩: 0

Oh gosh I honestly wouldn't know. I'm terrible when it comes to printing. Sorry!
👍: 0 ⏩: 1

I think I figured it out. That's okay. Heh. xD
I'll post pictures when I'm done!
👍: 0 ⏩: 1

If you still need help I can give you an equation that can help you out that I found a while ago when a friend of mine wanted me to make her a 4 foot Mudkip from her 6 inch worn plush toy (slave driver the girl is). Because this pattern is digital it's very easy to resize, unlike mudkip which I had to scan in to my computer in order to use this method.
THE SIZE YOU WANT/THE SIZE YOU HAVE=X
then: X*100= __% (this is the percentage you set the printer to print to. I used Gimp to resize Mudkip to the specific percentage and then I cut it out and pasted it to a word document and then printed it. Photoshop has a similar resizing tool, it's just at the time I had to use what I had and what I had was a free program that I downloaded from the internet. It all works the same).
👍: 0 ⏩: 1
| Next =>

